Deliver Private Backblaze B2 Content Through Cloudflare CDN
- Print
- DarkLight
Deliver Private Backblaze B2 Content Through Cloudflare CDN
- Print
- DarkLight
Article summary
Did you find this summary helpful?
Thank you for your feedback
Cloudflare Workers enable serverless functions to run as close as possible to the end user. For more information about how you can use Cloudflare Workers with your Backblaze B2 Cloud Storage account, click here.
You can use Cloudflare Workers to serve data from a private Backblaze B2 Cloud Storage bucket. To allow Cloudflare to fetch content from a public Backblaze B2 bucket, click here.
You can use Backblaze B2 to host static data for your website (for example, minified Javascript applications or multi-hour 8K videos) securely, reliably, and affordably. One solution to ensure performance and availability is to route requests through a CDN (content delivery network) such as a Backblaze Bandwidth Alliance partner Cloudflare. You can take advantage of Cloudflare's performance and the free data transfer between Backblaze B2 and Cloudflare.
CDN Functionality
Cloudflare uses a DNS (domain name system) so that content requests reach Cloudflare's servers. Through caching and private high-speed links, Cloudflare ensures high availability and reliability from storage. A website's domain name is registered with Cloudflare (and transferred from its domain name registrar) so that Cloudflare becomes responsible for serving content from that domain. Behind the scenes, Cloudflare allows a website's domain to be aliased to some other domain so that a user can see images and content from, for example, https://www.coffeemaniacs.com when those images and that content is actually being served from Backblaze B2 (for example, https://f345.backblazeb2.com/file/coffemaniacs-storage).
Private Backblaze Buckets
Although all buckets are addressable from the Internet, only public buckets can be accessed by anyone. By default, Backblaze B2 storage is private, which means that access requires authentication. Backblaze's various integration partners incorporate this security into their tools to keep Backblaze B2 as user-friendly as possible while still maintaining security.
Website Content from Secure Buckets
Putting these elements together means that you can serve data from your website and store your photos, videos, and all digital content in a private bucket, available through (and only through) your website. When hosting a website directly, adding the authentication required to pull data from Backblaze B2 is straightforward. Fronting a website through Cloudflare is slightly more complex; now Cloudflare must access private buckets to retrieve and cache data, which means Cloudflare must authenticate its requests to Backblaze B2.
Before you begin, complete the following tasks:
- Sign up for a Cloudflare Workers account. You can publish Workers to the default
*.workers.devsubdomain free of charge, or you can publish Workers to your own paid domain. - Install and configure wrangler, the Workers command-line interface (CLI).
Enable Backblaze B2
Before you begin: You must have a Backblaze B2 Cloud Storage account. If you already have a Backblaze account and the left navigation menu contains a B2 Cloud Storage section, your account is already enabled for Backblaze B2.
- Sign in to the Backblaze web console.
- In the user menu in the upper-right corner of the page, select My Settings.
- Under Enabled Products, select the checkbox to enable B2 Cloud Storage.
- Review the Terms and Conditions, and click OK to accept them.
Create a Bucket
Sign in to the Backblaze web console.
In the left navigation menu under B2 Cloud Storage, click Buckets.
Click Create a Bucket.
Enter a name for your bucket.
A message is displayed if your bucket name is already in use.Select a privacy setting: Private or Public.
Note
You can change a bucket's privacy settings at any time.
Files that are in a private bucket require authentication to perform an action, for example, downloading.
Public buckets do not require authentication so you can easily access files. If this is your first time creating a public bucket, complete the following tasks to ensure that you have the correct permissions to create a public bucket:
Verify your email address.
Have a payment history on file, or use the credit card form to pay a small fee that is credited to your account balance.
If applicable, enable a Backblaze B2 server-side encryption key.
Enable Object Lock to restrict a file from being modified or deleted for a specified period of time.
Click Create a Bucket, and copy the value that is in the Endpoint field; you may need this value later.
Click Lifecycle Settings to control how long to keep the files in your new bucket.
Note
Copy the S3 endpoint that is displayed for use in another step.
Create an Application Key
Sign in to the Backblaze web console.
In the left navigation menu under B2 Cloud Storage, click Application Keys.
Click Add a New Application Key, and enter an app key name.
You cannot search an app key by this name; therefore, app key names are not required to be globally unique. Key names are limited to 100 characters and can contain letters, numbers, and "-", but not I18N characters, such as é, à, and ü.Select All or select a specific bucket in the Allow Access to Bucket(s) menu.
If you select a specific bucket, you can also select Allow List All Bucket Names.
This option is required for the B2 Native API b2_list_buckets and the S3-Compatible API S3 List Buckets operations.
(Optional) Select your access type (Read and Write, Read Only, or Write Only).
(Optional) Enter a file name prefix to restrict application key access only to files with that prefix.
Depending on what you selected in step #4, this limits application key access to files with the specified prefix for all buckets or just the selected bucket.(Optional) Enter a positive integer to limit the time, in seconds, before the application key expires.
The value must be less than 1000 days (in seconds).Click Create New Key, and note the resulting keyID and applicationKey values.
Note
When you create a new app key, the response contains the actual key string, for example N2Zug0evLcHDlh_L0Z0AJhiGGdY. You can always find the keyID on this page, but for security, the applicationKey appears only once. Make sure you copy and securely save this value elsewhere.
Create a Cloudflare Worker
The Backblaze B2 GitHub repository contains full source code and configuration details for Cloudflare Workers.
- Start a project in the Workers CLI using the Backblaze repository as a template for your own Worker.
- Run the following commands changing the Worker name, shown in the example as
my-proxy, to your project name:
wrangler generate my-proxy https://github.com/backblaze-b2-samples/cloudflare-b2
cd my-proxy
Configure Your Cloudflare Worker
Before you begin: Create a private bucket in your Backblaze B2 account. If the bucket you want to use is public, do not change this setting until you set up your Worker.
- Edit the wrangler.toml file, adding a [vars] section with your application key ID and endpoint:
[vars]
B2_APPLICATION_KEY_ID = ""
B2_ENDPOINT = ""
BUCKET_NAME = ""
ALLOW_LIST_BUCKET = ""
- Enter your bucket name using one of the following options:
- To direct all incoming requests to the specified bucket, use the format
acme-images. - To use the initial segment in the incoming URL path as the bucket name, enter
$path, for example:https://images.acme.com/acme-images/logos/acme.png
Note: If you use the default*.workers.devsubdomain, specify a bucket name in the configuration, or setBUCKET_NAMEto$pathand pass the bucket name in the path. - To use the initial subdomain in the incoming URL hostname as the bucket name, enter
$host, for example:https://acme-images.images.acme.com/logos/acme.png
Note: If you setBUCKET_NAMEto$host, configure a Route or a Custom Domain for each bucket name that the Workers must access. You cannot route*.acme.com/*to your Workers.
- To direct all incoming requests to the specified bucket, use the format
- Set the
ALLOW_LIST_BUCKETvariable to eithertrueorfalse.
Backblaze B2 buckets, even those that are public, do not allow anonymous clients to list the bucket’s objects. Set theALLOW_LIST_BUCKETvariable totrueto allow this functionality. Set the variable tofalse, to deny this functionality. In most cases, you should setALLOW_LIST_BUCKETtofalse. - Run the following command to publish the Workers project to the Cloudflare Workers environment:
wrangler publish
Deploy Your Worker
- Sign in to your Cloudflare dashboard, and navigate to your new Worker.
- Click Settings, click Variables, and click Edit Variables.
- Add a variable named
B2_APPLICATION_KEY, and enter your Backblaze B2 application key as the value.
Backblaze recommends that you set your Backblaze B2 app key here instead of inwrangler.toml.
You should never save secrets such as API keys, passwords, and other sensitive data in source code files in the event that they are shared privately or in a public repository. - Click Encrypt, and click Save and deploy.
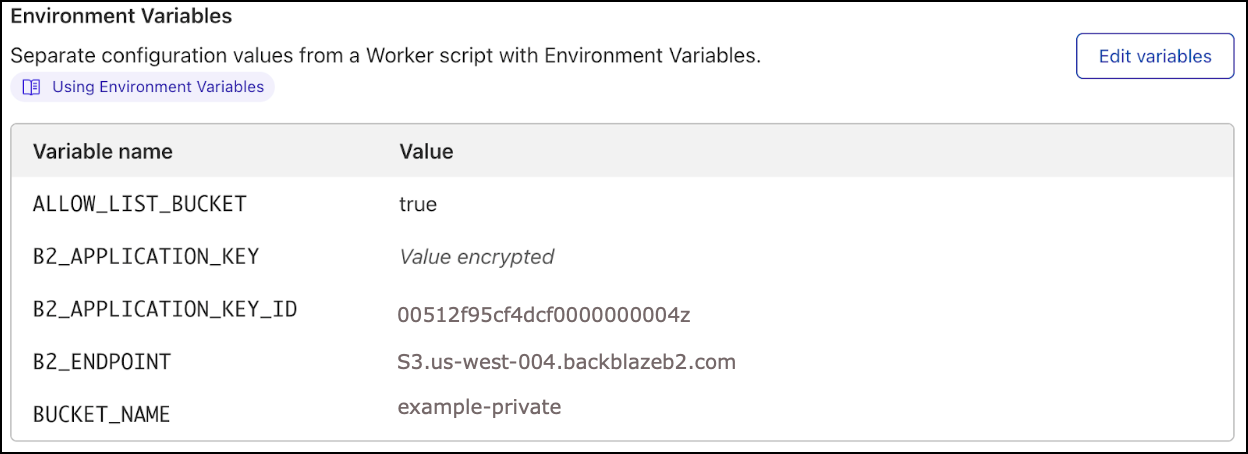
The environment variables should look like the following example:
Update Your Web Pages
You must update your code to reference your Cloudflare Worker rather than the Backblaze B2 bucket. For example, replace all occurrences of acme-images.s3.us-west-001.backblazeb2.com with images.acme.com.
Set Bucket Information
Since the bucket is private, the Cloudflare Worker signs each request to Backblaze B2 using the application key, and it includes the signature in the request’s authorization HTTP header. By default, Cloudflare does not cache content when the request contains the authorization header. Therefore, you must set your bucket’s info to include a cache-control directive.
- Sign in to your Backblaze account.
- In the left navigation menu under B2 Cloud Storage, click Buckets.
- Locate your bucket in the list, and click Bucket Settings.
- Enter {"Cache-Control":"public"} in the Bucket Info field.
Optionally, set additional cache-control directives, for example, to direct Cloudflare to cache each file for a day, enter {"Cache-Control": "public, max-age=86400"} in the Bucket Info field. - Click Update Bucket.
Set Bucket Visibility
- Verify that you can access your content using the Worker. For example, open a URL of the form
https://images.acme.com/logos/acme.pngin a browser. - Change the visibility of the public bucket to private.
- Verify that your content is no longer directly accessible from Backblaze B2. For example, you should no longer be able to access URLs of the form
https://acme-images.s3.us-west-001.backblazeb2.com/logos/acme.png.
End users can no longer access your content directly from Backblaze B2.
Was this article helpful?