Fastly CDN Integration with Backblaze B2
- Print
- DarkLight
Fastly CDN Integration with Backblaze B2
- Print
- DarkLight
Article summary
Did you find this summary helpful?
Thank you for your feedback
The Fastly Content Delivery Network (CDN) lets you cache your data using multiple servers across the world, dramatically reducing the amount of latency involved with accessing it. You can set up Fastly CDN as a front end for your public Backblaze B2 Cloud Storage bucket.
Enable Backblaze B2
Before you begin: You must have a Backblaze B2 Cloud Storage account. If you already have a Backblaze account and the left navigation menu contains a B2 Cloud Storage section, your account is already enabled for Backblaze B2.
- Sign in to the Backblaze web console.
- In the user menu in the upper-right corner of the page, select My Settings.
- Under Enabled Products, select the checkbox to enable B2 Cloud Storage.
- Review the Terms and Conditions, and click OK to accept them.
Create a Bucket
You must create a public bucket.
Sign in to the Backblaze web console.
In the left navigation menu under B2 Cloud Storage, click Buckets.
Click Create a Bucket.
Enter a name for your bucket.
A message is displayed if your bucket name is already in use.Select a privacy setting: Private or Public.
Note
You can change a bucket's privacy settings at any time.
Files that are in a private bucket require authentication to perform an action, for example, downloading.
Public buckets do not require authentication so you can easily access files. If this is your first time creating a public bucket, complete the following tasks to ensure that you have the correct permissions to create a public bucket:
Verify your email address.
Have a payment history on file, or use the credit card form to pay a small fee that is credited to your account balance.
If applicable, enable a Backblaze B2 server-side encryption key.
Enable Object Lock to restrict a file from being modified or deleted for a specified period of time.
Click Create a Bucket, and copy the value that is in the Endpoint field; you may need this value later.
Click Lifecycle Settings to control how long to keep the files in your new bucket.
Upload a File
You must upload a file to note the S3 URL for your hostname.
- Sign in to your Backblaze account.
- In the left navigation menu under B2 Cloud Storage, click Buckets.
- In your bucket details, click Upload/Download and click Upload.
- Drop your image from your local drive into the dialog box, or manually select your file.
- Click Browse Files to see your uploaded file, and click the image filename to see more details.
- In the S3 URL field, note the value, for example,
https://<bucketname>.s3.us-west-000.backblazeb2.com/<imagename.jpeg>.
Configure the Fastly Service
Before you begin: You must have a configured domain name. If you do not have one, configure one that will at least temporarily (until the domain is registered) be addressable at the address
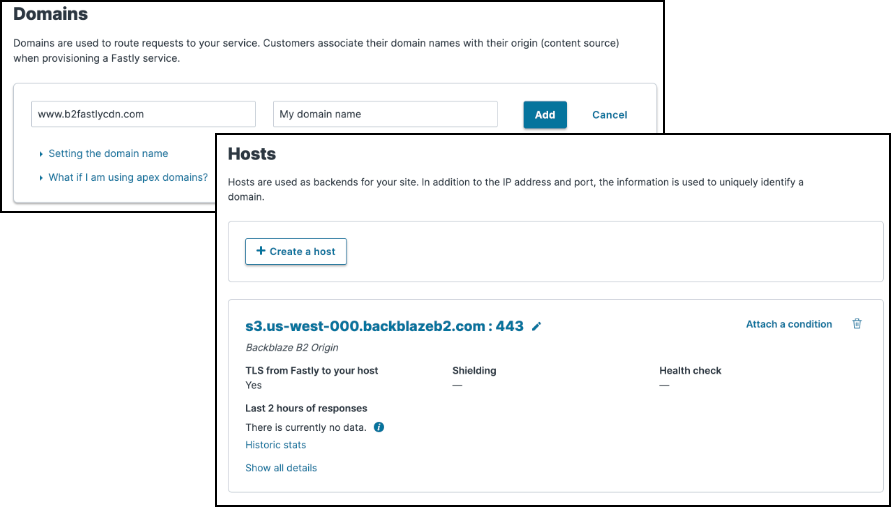
- Under Domains, enter your domain and domain name, and click Add.
- In the left navigation menu under Origins, select Hosts.
- Click Create a host, and, as the hostname, enter the S3 URL without the bucket name, for example,
s3.us-west-000.backblazeb2.com. - Click
 (edit) next to the hostname you just created.
 - Edit the parameters of the host.
- Ensure that the Certificate hostname and the SNI hostname are the same as the hostname.
- In the Override host field, enter the full S3 URL, for example,
https://<bucketname>.s3.us-west-000.backblazeb2.com. - Click Update.
- Activate the service.
You can navigate to any object that is stored in your Backblaze B2 bucket by appending its path to your domain name. For example, navigating to <domain>.global.prod.fastly.net/<imagename.jpeg> displays the image that you uploaded.
Help us improve this guide. If you find an error, notice outdated information, or have suggestions for improvement, email techpubs@backblaze.com.
Was this article helpful?