When building an application or solution on Backblaze B2 Cloud Storage, a common requirement is to be able to send a notification of an event (e.g., a user uploading a file) so that an application can take some action (e.g., processing the file). In this blog post, I’ll explain how you can use a Cloudflare Worker to send event notifications to a wide range of recipients, allowing great flexibility when building integrations with Backblaze B2.
Why Use a Proxy to Send Event Notifications?
Event notifications are useful whenever you need to ensure that a given event triggers a particular action. For example, last month, I explained how a video sharing site running on Vultr’s Infrastructure Cloud could store raw and transcoded videos in Backblaze B2. In that example, when a user uploaded a video to a Backblaze B2 bucket via the web application, the web app sent a notification to a Worker app instructing the Worker to read the raw video file from the bucket, transcode it, and upload the processed file back to Backblaze B2.
A drawback of this approach is that, if we were to create a mobile app to upload videos, we would have to copy the notification logic into the mobile app. As the system grows, so does the maintenance burden. Each new app needs code to send notifications and, worse, if we need to add a new field to the notification message, we have to update all of the apps. If, instead, we move the notification logic from the web application to a Cloudflare Worker, we can send notifications on Backblaze B2 events from a single location, regardless of the origin of the request. This pattern of wrapping an API with a component that presents the exact same API but adds its own functionality is known as a proxy.
Cloudflare Workers: A Brief Introduction
Cloudflare Workers provides a serverless execution environment that allows you to create applications that run on Cloudflare’s global edge network. A Cloudflare Worker application intercepts all HTTP requests destined for a given domain, and can return any valid HTTP response. Your Worker can create that HTTP response in any way you choose. Workers can consume a range of APIs, allowing them to directly interact with the Cloudflare cache, manipulate globally unique Durable Objects, perform cryptographic operations, and more.
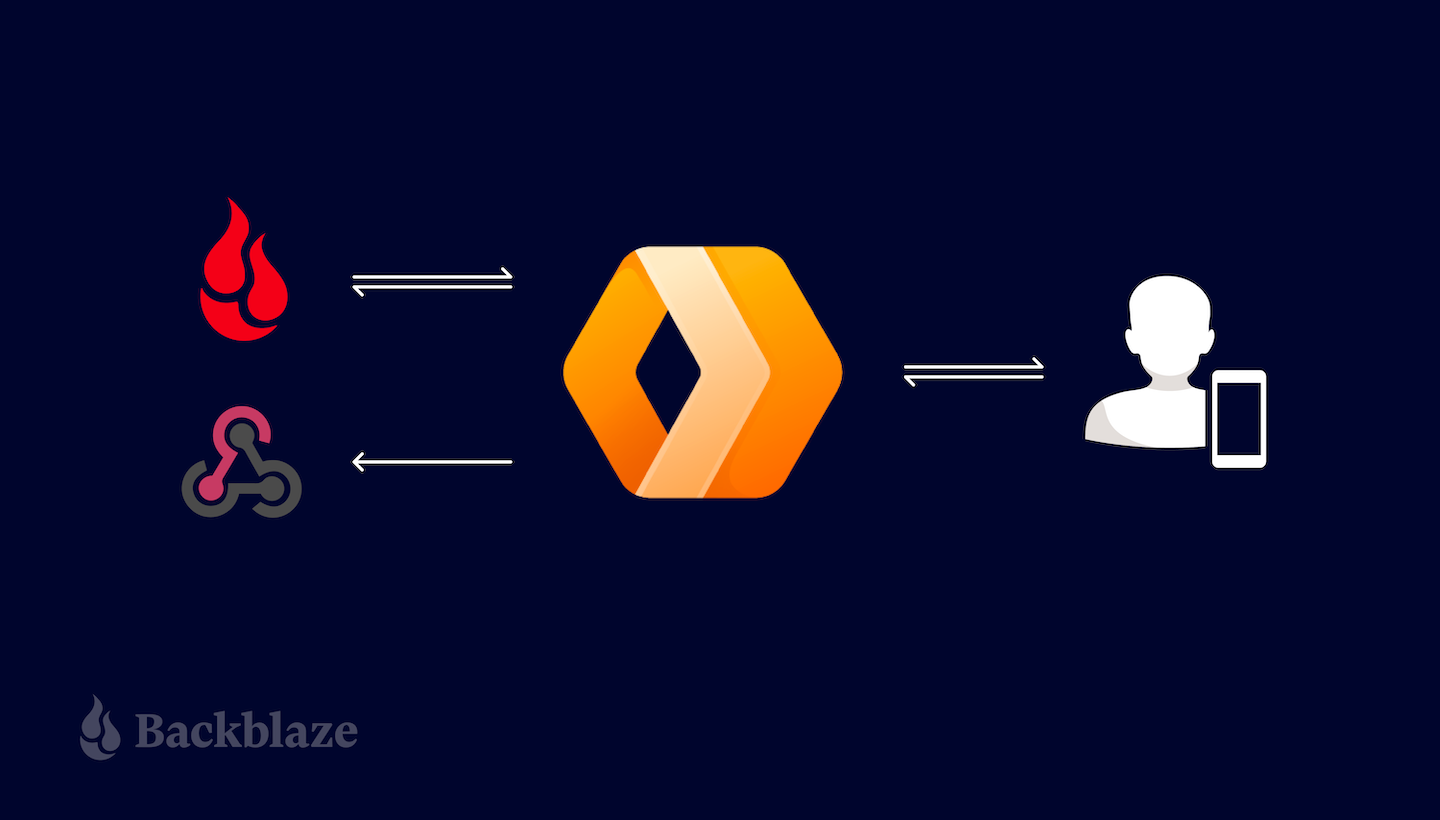
Cloudflare Workers often, but not always, implement the proxy pattern, sending outgoing HTTP requests to servers on the public internet in the course of servicing incoming requests. If we implement a proxy that intercepts requests from clients to Backblaze B2, it could both forward those requests to Backblaze B2 and send notifications of those requests to one or more recipient applications.
This example focuses on proxying requests to the Backblaze S3 Compatible API, and can be used with any S3 client application that works with Backblaze B2 by simply changing the client’s endpoint configuration.
Implementing a similar proxy for the B2 Native API is much simpler, since B2 Native API requests are secured by a bearer token rather than a signature. A B2 Native API proxy would simply copy the incoming request, including the bearer token, changing only the target URL. Look out for a future blog post featuring a B2 Native API proxy.
Proxying Backblaze B2 Operations With a Cloudflare Worker
S3 clients send HTTP requests to the Backblaze S3 Compatible API over a TLS-secured connection. Each request includes the client’s Backblaze Application Key ID (access key ID in AWS parlance) and is signed with its Application Key (secret access key), allowing Backblaze B2 to authenticate the client and verify the integrity of the request. The signature algorithm, AWS Signature Version 4 (SigV4), includes the Host header in the signed data, ensuring that a request intended for one recipient cannot be redirected to another. Unfortunately, this is exactly what we want to happen in this use case!
Our proxy Worker must therefore validate the signature on the incoming request from the client, and then create a new signature that it can include in the outgoing request to the Backblaze B2 endpoint. Note that the Worker must be configured with the same Application Key and ID as the client to be able to validate and create signatures on the client’s behalf.
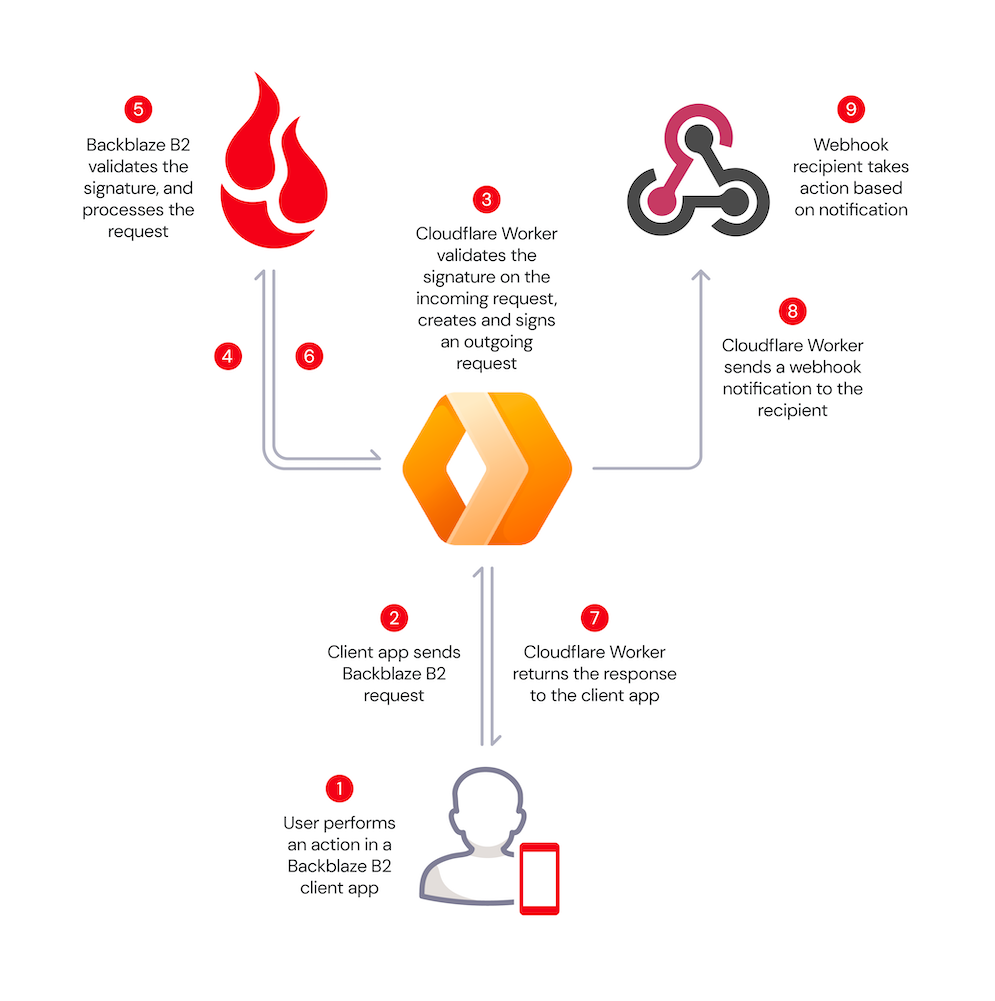
Here’s the message flow:
- A user performs an action in a Backblaze B2 client application, for example, uploading an image.
- The client app creates a signed request, exactly as it would for Backblaze B2, but sends it to the Cloudflare Worker rather than directly to Backblaze B2.
- The Worker validates the client’s signature, and creates its own signed request.
- The Worker sends the signed request to Backblaze B2.
- Backblaze B2 validates the signature, and processes the request.
- Backblaze B2 returns the response to the Worker.
- The Worker forwards the response to the client app.
- The Worker sends a notification to the webhook recipient.
- The recipient takes some action based on the notification.
These steps are illustrated in the diagram below.
The validation and signing process imposes minimal overhead, even for requests with large payloads, since the signed data includes a SHA-256 digest of the request payload, included with the request in the x-amz-content-sha256 HTTP header, rather than the payload itself. The Worker need not even read the incoming request payload into memory, instead passing it to the Cloudflare Fetch API to be streamed directly to the Backblaze B2 endpoint.
The Worker returns Backblaze B2’s response to the client unchanged, and creates a JSON-formatted webhook notification containing the following parameters:
contentLength: Size of the request body, if there was one, in bytes.contentType: Describes the request body, if there was one. For example, image/jpeg.method: HTTP method, for example,PUT.signatureTimestamp: Request timestamp included in the signature.status: HTTP status code returned from B2 Cloud Storage, for example200for a successful request or404for file not found.url: The URL requested from B2 Cloud Storage, for example,https://s3.us-west-004.backblazeb2.com/my-bucket/hello.txt.
The Worker submits the notification to Cloudflare for asynchronous processing, so that the response to the client is not delayed. Once the interaction with the client is complete, Cloudflare POSTs the notification to the webhook recipient.
Prerequisites
If you’d like to follow the steps below to experiment with the proxy yourself, you will need to:
- Sign up for a Backblaze B2 account. You’ll receive 10GB of storage, free of charge, no credit card required.
- Sign up for a CloudflareWorkers account. You’ll be able to publish Workers to the default
*.workers.devsubdomain free of charge, or to your own paid domain. - Install and configure the Workers CLI,
wrangler.
1. Creating a Cloudflare Worker Based on the Proxy Code
The Cloudflare Worker B2 Webhook GitHub repository contains full source code and configuration details. You can use the repository as a template for your own Worker using Cloudflare’s wrangler CLI. You can change the Worker name (my-proxy in the sample code below) as you see fit:
wrangler generate my-proxy

https://github.com/backblaze-b2-samples/cloudflare-b2-proxy

cd my-proxy
2. Configuring and Deploying the Cloudflare Worker
You must configure AWS_ACCESS_KEY_ID and AWS_S3_ENDPOINT in wrangler.toml before you can deploy the Worker. Configuring WEBHOOK_URL is optional—you can set it to empty quotes if you just want a vanity URL for Backblaze B2.
[vars]
AWS_ACCESS_KEY_ID = “<your b2 application key id>”
AWS_S3_ENDPOINT = “</your><your endpoint – e.g. s3.us-west-001.backblazeb2.com>”
AWS_SECRET_ACCESS_KEY = “Remove this line after you make AWS_SECRET_ACCESS_KEY a secret in the UI!”
WEBHOOK_URL = “<e.g. https://api.example.com/webhook/1 >”
Note the placeholder for AWS_SECRET_ACCESS_KEY in wrangler.toml. All variables used in the Worker must be set before the Worker can be published, but you should not save your Backblaze B2 application key to the file (see the note below). We work around these constraints by initializing AWS_SECRET_ACCESS_KEY with a placeholder value.
Use the CLI to publish the Worker project to the Cloudflare Workers environment:
wrangler publish
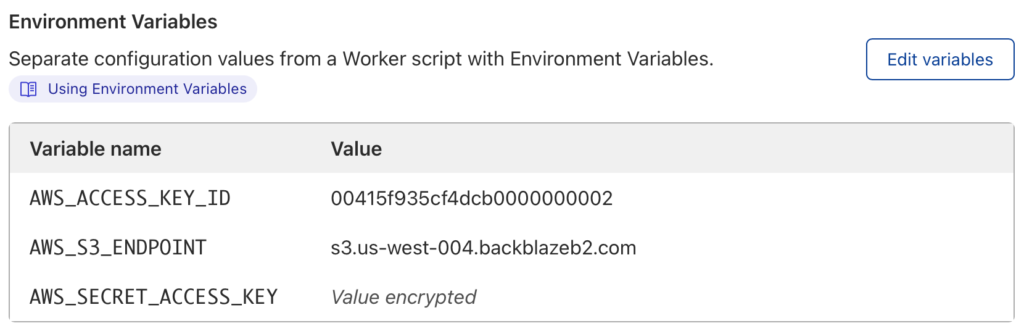
Now log in to the Cloudflare dashboard, navigate to your new Worker, and click the Settings tab, Variables, then Edit Variables. Remove the placeholder text, and paste your Backblaze B2 Application Key as the value for AWS_SECRET_ACCESS_KEY. Click the Encrypt button, then Save. The environment variables should look similar to this:
Finally, you must remove the placeholder line from wrangler.toml. If you do not do so, then the next time you publish the Worker, the placeholder value will overwrite your Application Key.
Why Not Just Set AWS_SECRET_ACCESS_KEY in wrangler.toml?
You should never, ever save secrets such as API keys and passwords in source code files. It’s too easy to forget to remove sensitive data from source code before sharing it either privately or, worse, on a public repository such as GitHub.
You can access the Worker via its default endpoint, which will have the form https://my-proxy.<your-workers-subdomain>.workers.dev, or create a DNS record in your own domain and configure a route associating the custom URL with the Worker.
If you try accessing the Worker URL via the browser, you’ll see an error message:
<Error>

<Code>AccessDenied</Code>

<Message>

Unauthenticated requests are not allowed for this api

</Message>

</Error>
This is expected—the Worker received the request, but the request did not contain a signature.
3. Configuring the Client Application
The only change required in your client application is the S3 endpoint configuration. Set it to your Cloudflare Worker’s endpoint rather than your Backblaze account’s S3 endpoint. As mentioned above, the client continues to use the same Application Key and ID as it did when directly accessing the Backblaze S3 Compatible API.
4. Implementing a Webhook Consumer
The webhook consumer must accept JSON-formatted messages via HTTP POSTs at a public endpoint accessible from the Cloudflare Workers environment. The webhook notification looks like this:
{

"contentLength": 30155,

"contentType": "image/png",

"method": "PUT",

"signatureTimestamp": "20220224T193204Z",

"status": 200,

"url": "https://s3.us-west-001.backblazeb2.com/my-bucket/image001.png"

}
You might implement the webhook consumer in your own application or, alternatively, use an integration platform such as IFTTT, Zapier, or Pipedream to trigger actions in downstream systems. I used Pipedream to create a workflow that logs each Backblaze B2 event as a new row in a Google Sheet. Watch it in action in this short video:
Put the Proxy to Work!
The Cloudflare Worker/Backblaze B2 Proxy can be used as-is in a wide variety of integrations—anywhere you need an event in Backblaze B2 to trigger an action elsewhere. At the same time, it can be readily adapted for different requirements. Here are a few ideas.
In this initial implementation, the client uses the same credentials to access the Worker as the Worker uses to access Backblaze B2. It would be straightforward to use different credentials for the upstream and downstream connections, ensuring that clients can’t bypass the Worker and access Backblaze B2 directly.
POSTing JSON data to a webhook endpoint is just one of many possibilities for sending notifications. You can integrate the worker with any system accessible from the Cloudflare Workers environment via HTTP. For example, you could use a stream-processing platform such as Apache Kafka to publish messages reliably to any number of consumers, or, similarly, send a message to an Amazon Simple Notification Service (SNS) topic for distribution to SNS subscribers.
As a final example, the proxy has full access to the request and response payloads. Rather than sending a notification to a separate system, the worker can operate directly on the data, for example, transparently compressing incoming uploads and decompressing downloads. The possibilities are endless.
How will you put the Cloudflare Worker Backblaze B2 Proxy to work? Sign up for a Backblaze B2 account and get started!