Deliver Public Backblaze B2 Content Through Cloudflare CDN
- Print
- DarkLight
Deliver Public Backblaze B2 Content Through Cloudflare CDN
- Print
- DarkLight
Article summary
Did you find this summary helpful?
Thank you for your feedback
The partnership between Backblaze and Cloudflare means that you can store content with Backblaze B2 Cloud Storage and serve it to users using Cloudflare's CDN (Content Delivery Network) with no download fees from Backblaze. This means that content can be stored in Backblaze B2 while being delivered with the high speed and low latency of one of the world's premier CDNs. Users access your site with the same URLs as before, but now they enjoy the speed and reliability of Cloudflare. As a webmaster, you can also use Cloudflare features like Edge cache expire TTL.
Setting up your website with Cloudflare allows your site to serve data from one or more public Backblaze B2 buckets.
For example, if you have a website for photos.mysite.com, you can use Cloudflare to set up a file URL like https://photos.mysite.com/myimage.jpg, where the file myimage.jpg is actually stored in your Backblaze B2 bucket at https://f000.backblazeb2.com/file/mybucket/myimage.jpg.
Note
To use Cloudflare with a private Backblaze B2 bucket, see Deliver Private Backblaze B2 Content Through Cloudflare CDN.
Enable Backblaze B2
Before you begin: You must have a Backblaze B2 Cloud Storage account. If you already have a Backblaze account and the left navigation menu contains a B2 Cloud Storage section, your account is already enabled for Backblaze B2.
- Sign in to the Backblaze web console.
- In the user menu in the upper-right corner of the page, select My Settings.
- Under Enabled Products, select the checkbox to enable B2 Cloud Storage.
- Review the Terms and Conditions, and click OK to accept them.
Create a Public Bucket
You can use an existing public bucket, or you can create a new public bucket. You must select Public as your privacy setting.
Sign in to the Backblaze web console.
In the left navigation menu under B2 Cloud Storage, click Buckets.
Click Create a Bucket.
Enter a name for your bucket.
A message is displayed if your bucket name is already in use.Select a privacy setting: Private or Public.
Note
You can change a bucket's privacy settings at any time.
Files that are in a private bucket require authentication to perform an action, for example, downloading.
Public buckets do not require authentication so you can easily access files. If this is your first time creating a public bucket, complete the following tasks to ensure that you have the correct permissions to create a public bucket:
Verify your email address.
Have a payment history on file, or use the credit card form to pay a small fee that is credited to your account balance.
If applicable, enable a Backblaze B2 server-side encryption key.
Enable Object Lock to restrict a file from being modified or deleted for a specified period of time.
Click Create a Bucket, and copy the value that is in the Endpoint field; you may need this value later.
Click Lifecycle Settings to control how long to keep the files in your new bucket.
Upload Files
You must upload one or more files to your public bucket.
You can upload files to a Backblaze B2 bucket from your local drive. The maximum single file size that you can upload through the Backblaze web console is 500 MB. If you need to upload larger files, click here for more information. You can also use the B2 Native API or the Command-Line Interface to upload files.
- Sign in to the Backblaze web console.
- In the left navigation menu under B2 Cloud Storage, click Buckets.
- In your bucket details, click Upload/Download and click Upload.
- Drop your images from your local drive into the dialog box, or manually select your files.
- In the left navigation menu under B2 Cloud Storage, click Browse Files to see your uploaded file and click the image filename to see more details.
Locate your Bucket Origin
- Sign in to the Backblaze web console.
- In the left navigation menu under B2 Cloud Storage, click Browse Files and navigate to the public bucket that you created.
- Click
 (info) for any file in the bucket.
 - Copy the origin of the friendly URL, for example,
f000.backblazeb2.com.
Configure Cloudflare
Before you begin: You must have a Cloudflare account. You can select the Cloudflare billing plan that is appropriate for you, but you can use the "Free Website" option to use with Backblaze B2. For more information about Cloudflare's capabilities, visit the service plan page.
- Sign in to your Cloudflare account, and click Get Started (if you have not yet added a website) or click Add a Site (if you already added a website).
- Add your domain, and click Continue. Your domain is the hostname suffix that is used to retrieve your Backblaze B2 bucket's content through Cloudflare, for example,
mydomain.com. - Select a plan and click Continue.
- If your domain is not yet active on Cloudflare, complete the nameserver setup process.
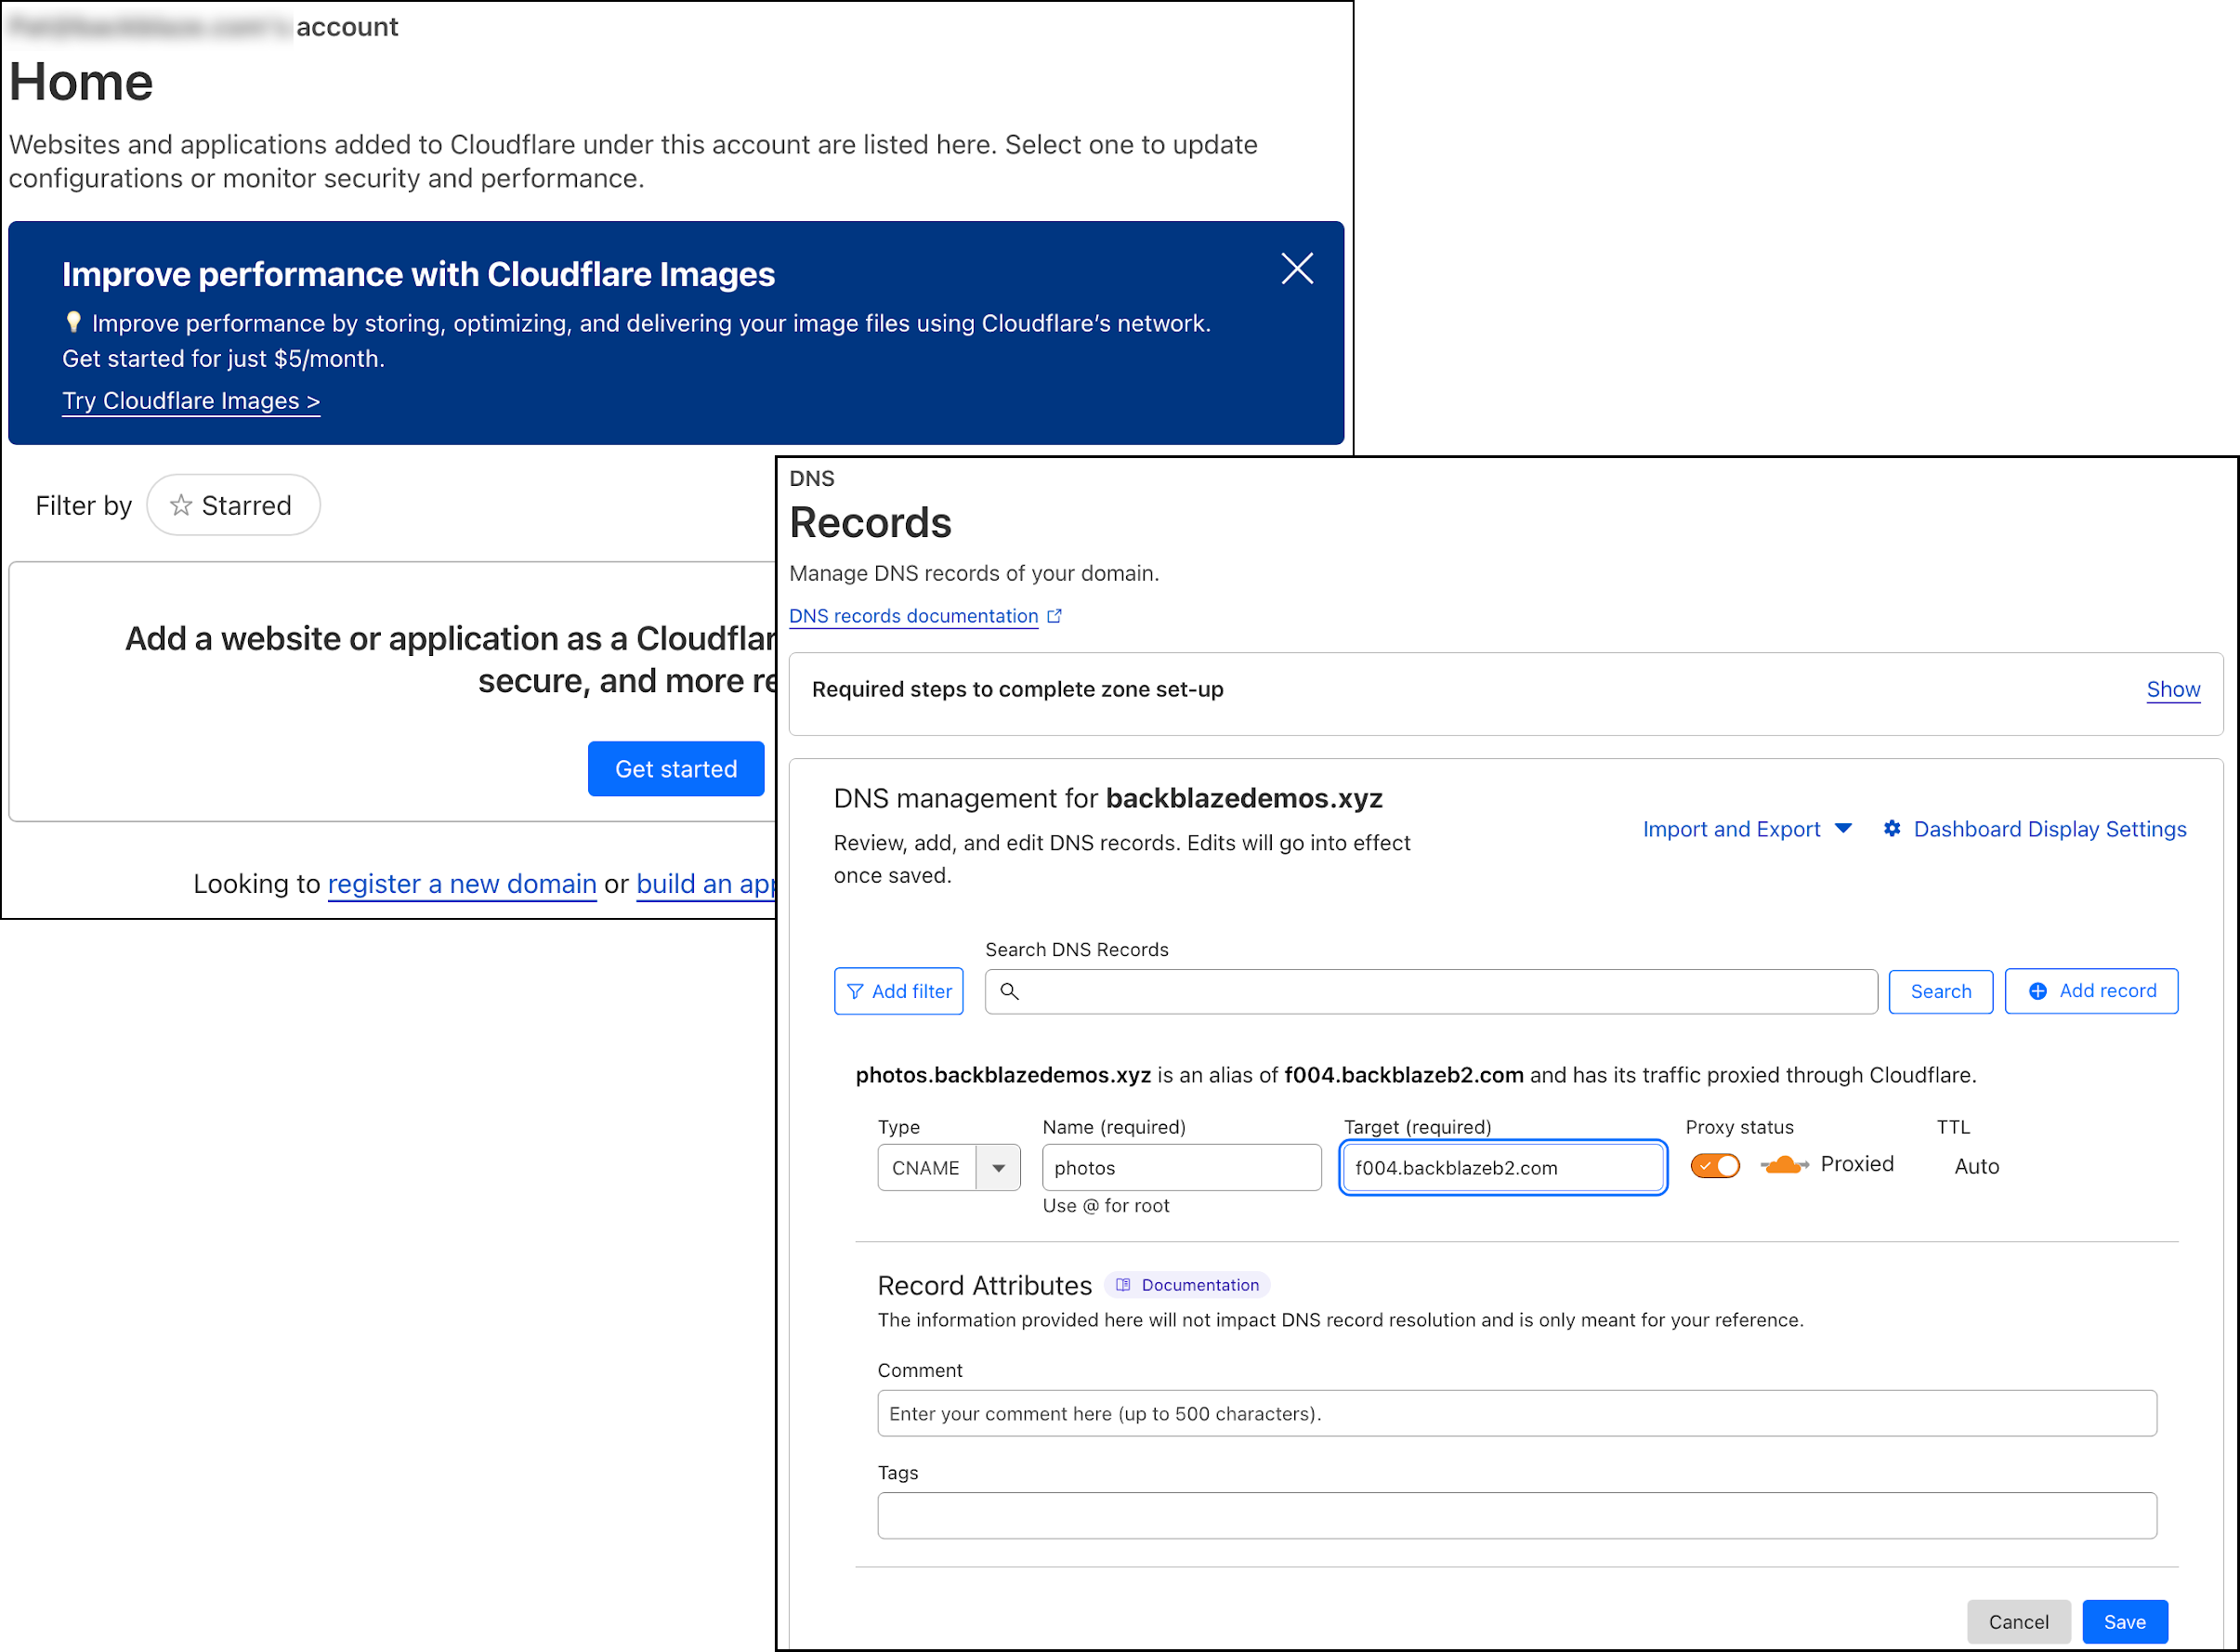
- In the left navigation menu, click DNS and click Records.
- Click Add record.
- Select a record type. For example, if your site has separate areas for photos and videos, select CNAME.
- Enter your hostname under Name. For example, if you want to map your bucket to photos.mydomain.com, enter photos.
- In the Target field, enter the origin of your bucket.
- Optionally, enter a comment or tags to help you manage the record.
- Ensure that Proxy status is enabled, and ensure that
 (Proxied) is orange.
 - Click Save.
Configure a Transform Rule
You must configure a Transform Rule, specifically a Rewrite URL rule, to allow Cloudflare to fetch only your Backblaze B2 bucket from your domain. The DNS configuration maps your domain to any content that is hosted on the same Backblaze B2 origin as your bucket. If you do not configure a rule, someone could use your domain to fetch content from another customer's public bucket. One way to ensure this does not happen, is to use a Transform Rule to scope requests to your bucket.
For each Backblaze B2 bucket that you want to use with Cloudflare, create a Transform Rule to rewrite incoming requests to specify your bucket in the URL path. In the following steps, the domain is mysite.com, the hostname is photos, and the bucket is mybucket.
- In the Cloudflare left navigation menu under Rules, select Overview.
- Click Create rule, and select URL Rewrite Rule.
- In the Templates tab, locate and select the template to rewrite a URL.
- Set the Field to Hostname.
- Set the Operator to equals.
- Set the Value to photos.mysite.com.
- In the field Set Rewrite parameters, click Path and click Rewrite to....
- Select Dynamic, and set the value to
concat("/file/mybucket", http.request.uri.path). - Click Deploy.
This rule configures Cloudflare to prepend the URL path from the incoming request with /file/mybucket, ensuring that no one can use your domain to fetch files from another public Backblaze B2 bucket. For example, a request for https://photos.mysite.com/myimage.jpg will be transformed into a request for https://f000.backblazeb2.com/file/mybucket/myimage.jpg.
Configure Cloudflare Caching
By default, Cloudflare respects the origin web server’s cache headers, and caches only certain files, based on the file extension; see Default Cache Behavior for details. You may need to customize your Cloudflare cache behavior to meet your requirements. See the Cloudflare Cache documentation for details of Cache Rules and other features.
Configure Your SSL/TLS Encryption Mode
Backblaze B2 serves files securely through HTTPS and not HTTP. You must ensure that your SSL/TLS encryption mode is set accordingly. For more information, see Cloudflare’s documentation on encryption modes.
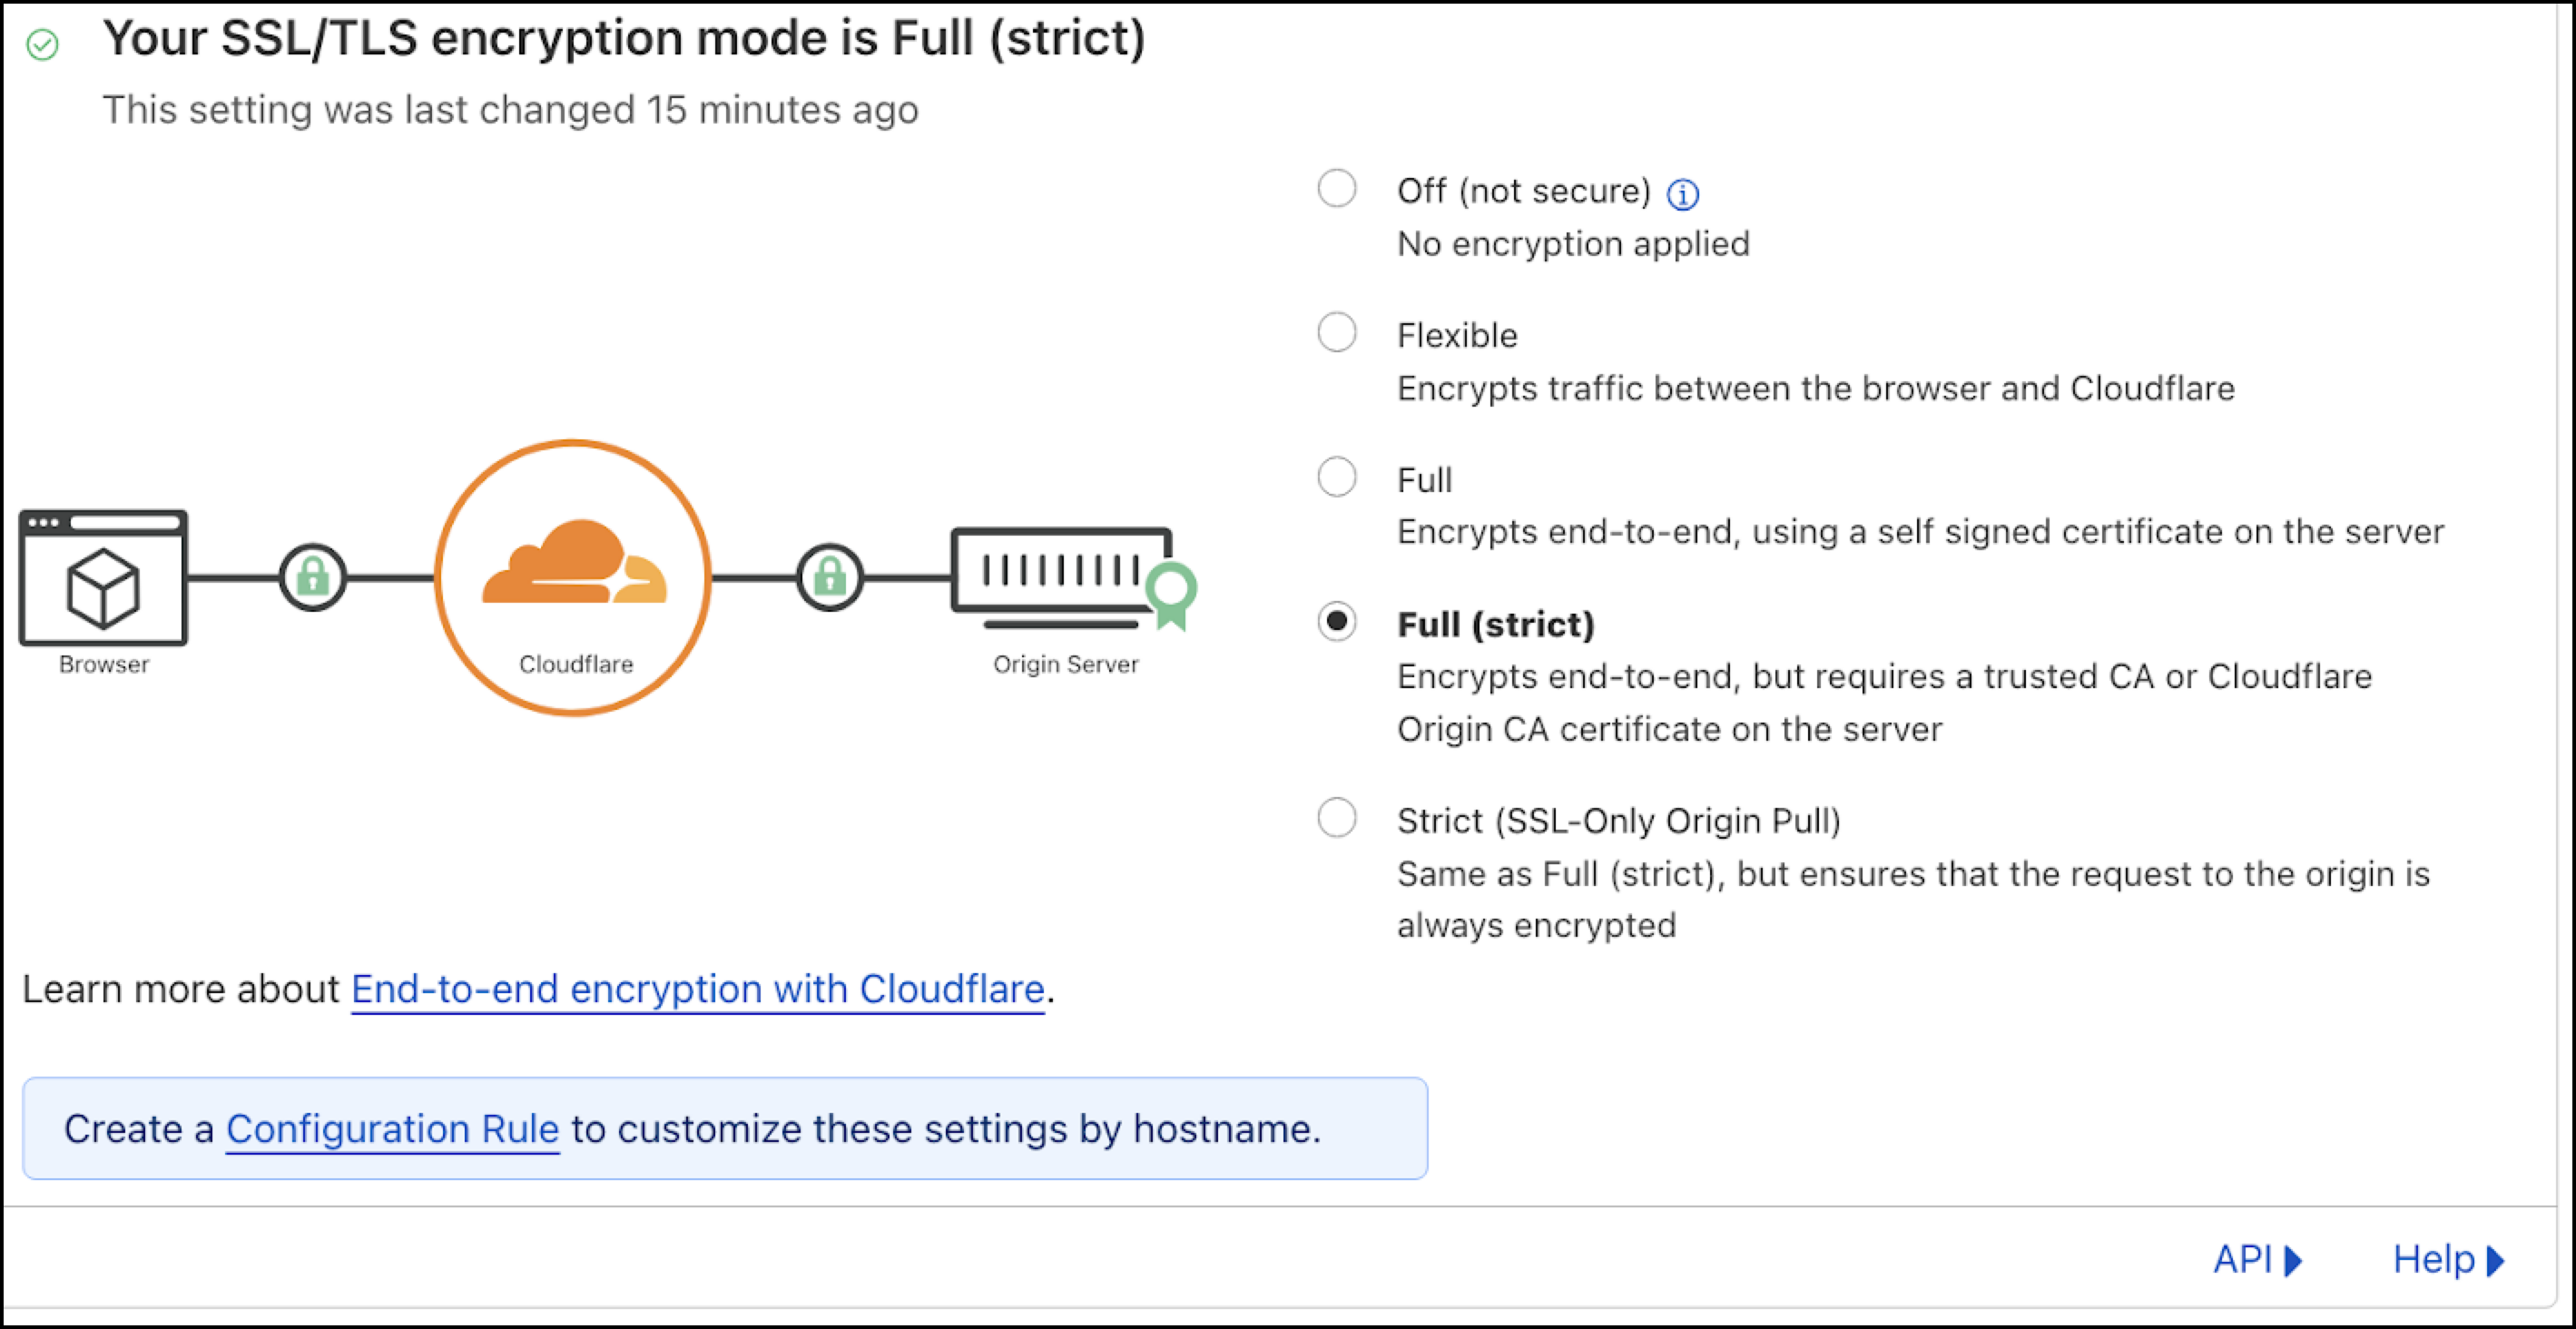
- In the Cloudflare left navigation menu, select SSL/TLS.
- Select Overview.
- Click Configure.
- Select Custom SSL/TLS.
- Select Full (Strict).
- Click Save.
Access your Backblaze B2 Bucket Content Through Cloudflare CDN
Use the format https://<hostname>.<domain>/<filename> to display your file.
For example, https://photos.mysite.com/img.jpg is mapped to https://f000.backblazeb2.com/file/xxx/img.jpg.
You must use an https:// (TLS-secured) URL. Backblaze does not support http:// URLs.
Configure a Home Page for your Domain
Note
This is an optional configuration.
You can configure a Transform Rule, to have Cloudflare serve an HTML file from your Backblaze B2 bucket in response to requests for the root URL of your domain, for example, https://photos.mysite.com/.
- In Cloudflare, navigate to Rules and select Transform Rules.
- Click Create Rule.
- Enter a descriptive name for the rule, for example,
Rewrite root to index. - In the field When incoming requests match…, click Custom filter expression.
- Set Field to URI Full.
- Set Operator to equals.
- Set Value to the root of your domain, for example, https://photos.mysite.com/.
- In the field Set Rewrite parameters, click Path and click Rewrite to....
- Select Static.
- Enter the target path, without the leading '/', for example, file/mybucket/index.html.
- Set Place at to First, so that this rule is applied before the existing rule.
- Click Deploy.
Now, when the incoming URL matches https://photos.mysite.com/, Cloudflare rewrites the path to file/mybucket/index.html, requests https://f000.backblazeb2.com/file/mybucket/index.html from the origin, and returns the HTML content to the client.
Help us improve this guide. If you find an error, notice outdated information, or have suggestions for improvement, email techpubs@backblaze.com.
Was this article helpful?