With CrashPlan deciding to leave the consumer backup space, CrashPlan for Home customers are now faced with having to migrate their data to a new cloud backup service. Uploading your data from your computer to a new service is onerous enough, but one thing that seems to be getting overlooked is the potential for the files that reside in CrashPlan Central, but not on your computer, to be lost during the migration to a new provider. Here’s an overview of the migration process to make sure you don’t lose data you wish to keep.
Why Would You Lose Files?
By default, CrashPlan for Home does not delete files from CrashPlan Central (their cloud storage servers) after they are uploaded from your computer. Unless you changed your CrashPlan “Frequency and versions” settings, all of the files you uploaded are still there. This includes all the files you deleted from your computer. For example, you may have a folder of old videos that you uploaded to CrashPlan and then deleted from your computer because of space concerns. This folder of old video files is still in your CrashPlan archive. It is very likely you have files stored in CrashPlan Central that are not on your computer. Such files are now in migration limbo, and we’ll get to those files in a minute, but first…
Get Started Now
CrashPlan was kind enough to make sure that everyone will have at least 60 days from August 22nd, 2017 to transfer their data. Most people will have more time, but everyone must be migrated by the end of October 2018.
Regardless, it’s better to get started now as it can take some time to upload your data to another backup provider. The first step in migrating your files is to choose a new cloud backup provider. Let’s assume you choose Backblaze Computer Backup.
CrashPlan Migration Steps
The first step is to migrate all the data that is currently on your computer to Backblaze. Once you install Backblaze on your computer, it will automatically scan your system to locate the data to upload to Backblaze. The upload will continue automatically. You can speed up or slow down how quickly Backblaze will upload files by adjusting your performance settings for your Mac or for your Windows PC. In addition, any changes and new files are automatically uploaded as well. Backblaze keeps up to 30 days’ worth of file versions and always keeps the most recent version of every data file currently on your computer.
Question: Should you remove CrashPlan from your computer before migrating to Backblaze?
Answer: No.
If your computer fails during the upload to Backblaze, you’ll still have a full backup with CrashPlan. During the upload period you may want to decrease the resources (CPU and network) used by CrashPlan and increase the resources available to Backblaze. You can “pause” CrashPlan for up to 24 hours, but that is a manual operation and may not be practical. In any case, you’ll also need to have CrashPlan around to recover those files in migration limbo.
Saving the Files in Migration Limbo
Let’s divide this process into two major parts: recovering the files and getting them stored somewhere else.
Recovering Files in Limbo
-
-
- Choose a recovery device: Right now you don’t know how many files you will need to recover, but once you know that information, you’ll need a device to hold them. We recommend that you use an external USB hard drive as your recovery device.
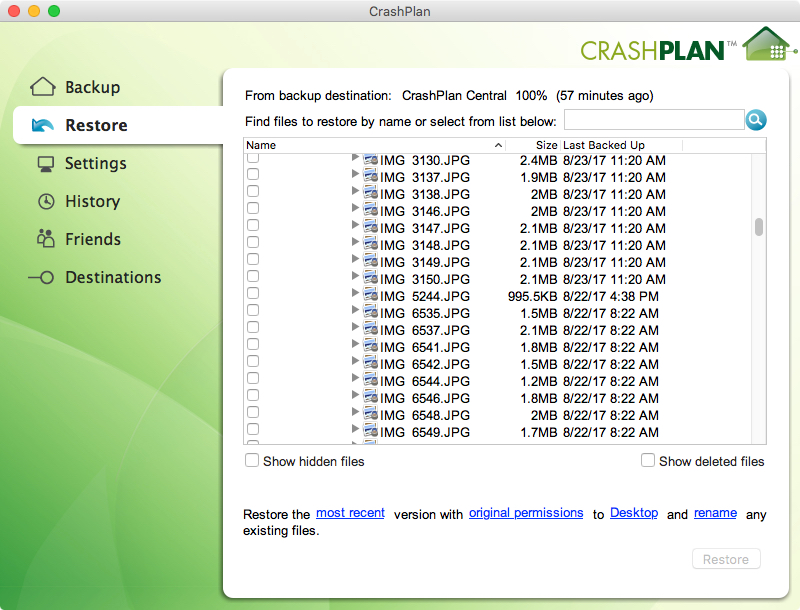
- Locate the limbo files: Open the CrashPlan app on your computer and select the “Restore” menu item on the left. As an example, you can navigate to a given folder and see the files in that folder as shown below:
-
-
-
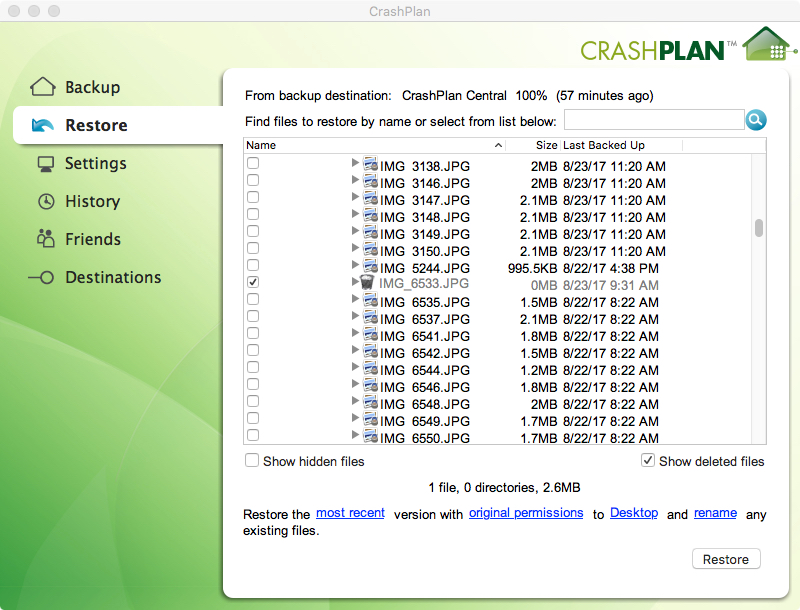
- Click on the “Show deleted files” box as shown below to display all the files, including those that are deleted. As an example, the same files listed above are shown below, and the list now includes the deleted file IMG_6533.JPG.
-
-
-
- Deleted files can be visually identified via the different icon and the text shown grayed out. Navigate through your folder/directory structure and select the files you wish to recover. Yes, this can take a while. You only need to click on the deleted files as the other files are currently still on your computer and being backed up directly to Backblaze.
- Make sure you change the restore location. By default this is set to “Desktop.” Click on the word “Desktop” to toggle through your options. Click on the option, and you’ll be able to change your backup destination to any mounted device connected to your system. As an example, we’ve chosen to restore the deleted files to the USB external drive named “Backblaze.”
- Click “Restore” to restore the files you have selected.
-
Storing the Restored Limbo Files
Now that you have an external USB hard drive with the recovered limbo files, let’s get them saved to the cloud. With Backblaze you have two options. The first option is to make the limbo files part of your Backblaze backup. You can do this in two ways.
-
-
- Copy the limbo files to your computer and they will be automatically backed up to Backblaze with the rest of your files.
-
or
-
-
- Connect the external USB hard drive to your computer and configure Backblaze to back up that device. This device should remain connected to the computer while the backup occurs, and then once every couple of weeks to make sure that nothing has changed on the hard drive.
-
If neither of the above solutions works for you, the other option is to use the Backblaze B2 Cloud Storage service.
What Is Backblaze B2 Cloud Storage?
B2 Cloud Storage is a service for storing files in the cloud. Files are available for download at any time, either through the API or through a browser-compatible URL. Files stored in the B2 Storage Cloud are not deleted unless you explicitly delete them. In that way it is very similar to CrashPlan. Here’s some help, if you are unsure about the difference between Backblaze Computer Backup and Backblaze B2.
There are four ways to access Backblaze B2: 1) a web GUI, 2) a command-line interface (CLI), 3) an API, and 4) via partner integrations, such a MSP360 (formerly CloudBerry Lab), Synology, Arq, QNAP, GoodSync, and many more you can find on our B2 Cloud Storage integrations page. Most CrashPlan users will find either the web GUI or a partner integration to be the way to go. Note: There is an additional cost to use the B2 Cloud Storage service, and we’ll get to that shortly.
- Since you already have a Backblaze account, you just have to log in to your account. Click on “My Settings” on the left hand navigation and enable B2 Cloud Storage. If you haven’t already done so you will be asked to provide a mobile number for contact and authentication purposes.
- To use the Backblaze B2 web GUI, you create a Backblaze B2 bucket and then drag and drop the files into the bucket.
- You can also choose to use a B2 Cloud Storage partner integration to store your data into Backblaze B2.
If you use B2 Cloud Storage to store your limbo files rescued from CrashPlan and you use Backblaze to back up your computer, you will be able to access and manage all of your data from your one Backblaze account.
What Does All This Cost?
If you are only going to use Backblaze Computer Backup to back up your computer, then you will pay $50/year per computer.
If you decide to combine the use of Backblaze Computer Backup and Backblaze B2, let’s assume you have 500GB of data to back up from your computer to Backblaze. Let’s also assume you have to store 100GB of data in Backblaze B2 that you rescued from CrashPlan limbo. Your annual cost would be:
To Back Up 500GB:
- Backblaze Computer Backup — one year/one computer — $50
To Archive 100GB:
- Backblaze B2 — 100GB @ $0.005/GB/month for 12 months — $6
The total annual cost to store your CrashPlan data in Backblaze, including your recovered deleted files, is $56.00.
Migrating From CrashPlan to Carbonite
If you are considering migrating your CrashPlan for Home account to Carbonite, you will still have to upload your data to Carbonite. There is no automatic process to copy the files from CrashPlan to Carbonite. You will also have to recover the limbo files we’ve been speaking about using the process we’ve outlined above. In summary, when moving from CrashPlan for Home to any other vendor you will have to reupload your data to the new vendor.
One More Option
There is one more option you can use when you move your data from CrashPlan to another cloud service. You can download all of your data from CrashPlan, including the active and deleted files, to a local computer or device such as an external USB hard drive. Then you can upload all that data to the new cloud backup provider. Of course this will mean all that data makes two trips through your local network—down and then back up. This will take time and could be very taxing on any bandwidth limits you may have in place from your network provider.
If you have the bandwidth and the time, this can be a good option, as all your files stored in CrashPlan Central are included in your backup. But, if you have a lot of data and/or a slow internet connection, this can take a really, really long time.
Watch Our Webinar for More Information
You can watch our webinar, “Migrating from CrashPlan for Home to Backblaze” if you’d like to learn more about the migration methods we covered today.
CrashPlan Replacement
Now that you are faced with replacing your CrashPlan for Home account, don’t wait until your contract is about to run out. Give yourself at least a couple of months to make sure all the data, including the limbo data, is safely migrated somewhere else.
Also, regardless of which option you chose for migrating your data from CrashPlan to a new cloud backup service, once everything is moved and you’ve checked to make sure you got everything, then and only then should you turn off your CrashPlan account and uninstall CrashPlan.
An Invitation
If you are a CrashPlan for Home user going through the migration to a new cloud backup service, and have ideas to help other users through the migration process, let us know in the comments. We’ll update this post with any relevant ideas from the community.