How to Integrate Synology Hyper Backup with Backblaze B2 and Fireball Rapid Ingest
- Print
- DarkLight
How to Integrate Synology Hyper Backup with Backblaze B2 and Fireball Rapid Ingest
- Print
- DarkLight
Article summary
Did you find this summary helpful?
Thank you for your feedback
Synology NAS owners can create Hyper Backup jobs and use a Backblaze B2 Cloud Storage Fireball as the destination. You can find the Fireball standard upload guide here.
Enable Backblaze B2
Before you begin: You must have a Backblaze B2 Cloud Storage account. If you already have a Backblaze account and the left navigation menu contains a B2 Cloud Storage section, your account is already enabled for Backblaze B2.
- Sign in to the Backblaze web console.
- In the user menu in the upper-right corner of the page, select My Settings.
- Under Enabled Products, select the checkbox to enable B2 Cloud Storage.
- Review the Terms and Conditions, and click OK to accept them.
Create a Bucket
- Sign in to your Backblaze account.
- In the left navigation menu under B2 Cloud Storage, click Buckets.
- Click Create a Bucket.
- Enter a name for your bucket.
Bucket names must be at least six characters and globally unique. A message is displayed if your bucket name is already in use. - Select a privacy setting: Private or Public.
Files that are in a private bucket require authentication to perform an action, for example, downloading. Public buckets do not require authentication so you can easily share files. You can change a bucket's privacy settings at any time. - If applicable, enable a Backblaze B2 server-side encryption key.
- Click Create a Bucket, and copy the value that is in the Endpoint field; you may need this value for other processes.
- Click Lifecycle Settings to control how long to keep the files in your new bucket.
Create an App key
Sign in to the Backblaze web console.
In the left navigation menu under B2 Cloud Storage, click Application Keys.
Click Add a New Application Key, and enter an app key name.
You cannot search an app key by this name; therefore, app key names are not required to be globally unique. Key names are limited to 100 characters and can contain letters, numbers, and "-", but not I18N characters, such as é, à, and ü.Select All or select a specific bucket in the Allow Access to Bucket(s) menu.
If you select a specific bucket, you can also select Allow List All Bucket Names.
This option is required for the B2 Native API b2_list_buckets and the S3-Compatible API S3 List Buckets operations.
(Optional) Select your access type (Read and Write, Read Only, or Write Only).
(Optional) Enter a file name prefix to restrict application key access only to files with that prefix.
Depending on what you selected in step #4, this limits application key access to files with the specified prefix for all buckets or just the selected bucket.(Optional) Enter a positive integer to limit the time, in seconds, before the application key expires.
The value must be less than 1000 days (in seconds).Click Create New Key, and note the resulting keyID and applicationKey values.
Note
When you create a new app key, the response contains the actual key string, for example N2Zug0evLcHDlh_L0Z0AJhiGGdY. You can always find the keyID on this page, but for security, the applicationKey appears only once. Make sure you copy and securely save this value elsewhere.
Set up the Synology NAS
Although the illustration shows only two drive bays, you must insert all eight of the included drives into the Synology NAS.
.png)
- Unpack the Synology NAS.
- Place the disks that are installed in trays into the Synology NAS in any order.
Connect the NAS to the Network
The Backblaze Fireball NAS must be connected directly to the network. At a small office, this might be a network switch or router.
The NAS cannot be directly connected to a computer. The NAS supports only a direct network connection using either the 1GigE or 10GigE ports.
You should connect the NAS to the data source over a wired connection. Wireless (Wi-Fi) connections have limited bandwidth, and data transfer will take much longer than with a direct connection. Also, network traffic to other devices on the wireless network can suffer performance loss when competing for bandwidth with the NAS.
- Connect the power cable to the NAS.
- Plug in the NAS.
- Turn on the NAS with the power button.
Obtain your Fireball Password and Encryption Key
The username for all Backblaze Fireballs is always backblaze.
- Sign in to your Backblaze account to which the data is to be transferred.
- In the left navigation menu under B2 Cloud Storage, click Fireball.
- Click the information icon that is associated with your Backblaze Fireball order, and copy your encryption key.
Enter Your Password and Encryption Key
To protect customer data, all of the data that is sent to Backblaze on the NAS is encrypted.
The encryption key is kept only in volatile storage (in memory) on the Backblaze Fireball. Every time you power down or reset the NAS, you must re-enter the configuration information (the encryption key). Scan your local network for all Synology devices.
- Go to find.synology.com.
- Double-click the Fireball in the list.
Your browser should directly connect to the Fireball's web page. If no Fireballs are detected, check your network connection with the Fireball and ensure that it is on the same subnet as your computer. - Sign in using
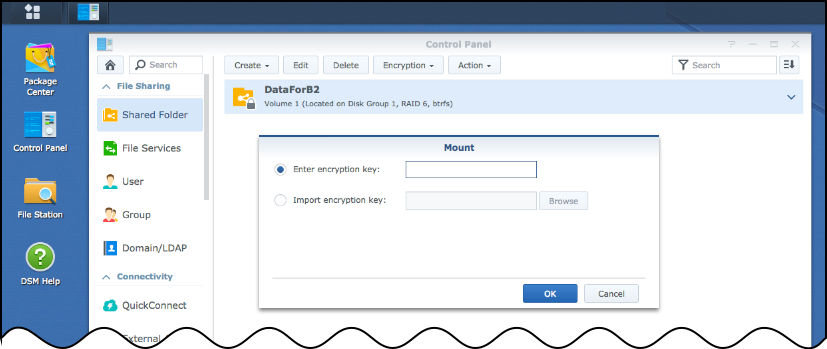
backblazeas the username, and enter the password that you obtained from your Backblaze B2 account. - Select Control Panel, and select Shared Folder.
- Click DataForB2, and click Encryption.
- Select Mount.
- Enter the encryption key that you obtained from your Backblaze B2 account.
- Close the window.
Enable Rsync on the Backblaze Fireball and the Synology NAS
- Open the Synology DiskStation Manager (DSM), and click Control Panel.
- Under File Sharing, click File Services.
- Click the Rsync tab, and select Enable sync service.
- Click Apply.
- Repeat these steps on your Synology device to enable rsync on both devices.
Create the Hyper Backup Job
- Sign in to the Synology DSM on your personal Synology device.
- Install Hyper Backup from the Package Center.
- Open Hyper Backup.
- In the bottom-left corner, click + (plus) and select Data backup task.
- Under backup destination, click rsync and click Next.
- Create a backup task, and click Next. Backblazerecommends the following settings:
- Server type:
Synology rsync server - Server name or IP Address:
fireball123.local (replace 123 with the number of your personal Fireball order) - Transfer Encryption:
Off - Port:
873 - Username:
Backblaze - Password:
(enter the password for your Fireball) - Shared Folder:
Select DataforB2 - Directory:
Leave as is, this field will auto-fill*
- Server type:
- Adjust Data Backup settings, Application Backup settings, Backup Settings, and Rotation Settings as desired.
- Start the backup.
When the backup is complete, a green checkmark is shown to indicate success.
* Leave this field as is for single backup jobs. When backing up a large Synology NAS using multiple Fireballs, Hyper Backup will not detect existing jobs across devices. If you leave the directory field unchanged, multiple rsync tasks may use the same name (for example, synology_nas_1.hbk). Manually enter a unique name in the directory field for each task, for example: synology_nas_A.hbk and synology_nas_B.hbk. This avoids conflicts and ensures reliable restores.
Return NAS Settings to Default
Warning
You should maintain a local copy of your data until you have verified that your Fireball was uploaded accurately and completely to your Backblaze B2 bucket.
If you made changes to the NAS device specific to your environment, such as network settings, set them back to the default settings. This makes uploading the data easier when Backblaze receives the unit. Shut down the NAS from the Synology web interface.
Uninstall the Hard Drives and Return the Fireball
- To ensure the integrity of the NAS and the hard drives, uninstall the hard drives from the NAS trays.
- Repack the hard drives and the NAS.
- Return all of the items back to Backblaze:
Backblaze Fireball Return
C/O Sungard
11085 Sun Center Dr
Rancho Cordova, CA 95670
When Backblaze receives the hard drives and the Fireball, the NAS is connected to an internal network and the file upload is completed at network traffic speeds.
Relink your Hyper Backup Job
After you return the Fireball, your data is uploaded to your Backblaze B2 bucket by Backblaze’s Physical Media team. When the upload is finished, you must re-link your Hyper Backup job.
Note
Hyper Backup integrates with Backblaze B2 Cloud Storage using S3-Compatible API.
- Open the Hyper Backup application on your Synology DSM.
- In the bottom-left corner, click + (plus) and select Data backup task.
- Select S3 Storage, and click Next.
- Select Relink to existing task.
- Enter the required fields:
- S3 Server:
Enter your custom server URL. - Server address:
Enter your bucket endpoint, for example, s3.us-west-002.backblazeb2.com. - Signature Version:
Enter v4. - Access Key & Secret Key:
Enter your Key ID and App key. - Bucket Name:
Select the bucket containing your Fireball data from the dropdown menu. - Directory:
Leave as is, this field auto-fills.
- S3 Server:
- Adjust Data Backup settings, Application Backup settings, Backup Settings, and Rotation Settings as desired.
When the setup is complete, allow time for the backup job to relink.
Was this article helpful?