- Print
- DarkLight
FileZilla Pro Integration with Backblaze B2
- Print
- DarkLight
FileZilla Pro is a File Transfer Protocol (FTP) tool that supports Backblaze B2 Cloud Storage. Using FileZilla Pro, you can quickly browse and transfer data into and out of your Backblaze B2 bucket.
This article provides the steps to configure and optimize FileZilla Pro on a Windows computer.
Enable Backblaze B2
Before you begin: You must have a Backblaze B2 Cloud Storage account. If you already have a Backblaze account and the left navigation menu contains a B2 Cloud Storage section, your account is already enabled for Backblaze B2.
- Sign in to the Backblaze web console.
- In the user menu in the upper-right corner of the page, select My Settings.
- Under Enabled Products, select the checkbox to enable B2 Cloud Storage.
- Review the Terms and Conditions, and click OK to accept them.
Create an Application Key
- Sign in to the Backblaze web console.
- In the left navigation menu under B2 Cloud Storage, click Application Keys.
- Click Add a New Application Key, and enter an app key name.
You cannot search an app key by this name; therefore, app key names are not required to be globally unique. Key names are limited to 100 characters and can contain letters, numbers, and "-", but not I18N characters, such as é, à, and ü. - Select All or select a specific bucket in the Allow Access to Bucket(s) menu.
- Optionally, select your access type (Read and Write, Read Only, or Write Only).
- Optionally, select Allow List All Bucket Names.
This option is required for the B2 Native API b2_list_buckets and the S3-Compatible API S3 List Buckets operations. - Optionally, enter a file name prefix to restrict application key access only to files with that prefix.
Depending on what you selected in step #4, this limits application key access to files with the specified prefix for all buckets or just the selected bucket. - Optionally, enter a positive integer to limit the time, in seconds, before the application key expires.
The value must be less than 1000 days (in seconds). - Click Create New Key, and note the resulting keyID and applicationKey values.
Set Up FileZilla Pro

Before you begin: You must download and install FileZilla Pro on your computer.
- Sign in to your FileZilla Pro account.
- In the menu bar, select File and select Site Manager.
- Click New Site.
- Change the name from New Site to a more descriptive name for the connection, for example, Backblaze B2.
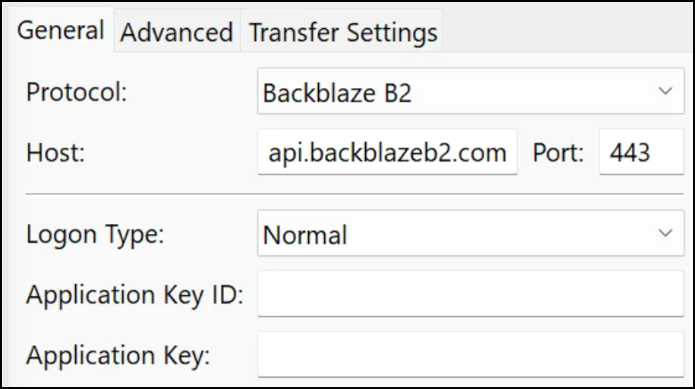
- Configure the settings on the General tab.
- Select Backblaze B2 in the Protocol field.
- Enter api.backblazeb2.com in the Host field.
- Enter 443 in the Port field.
- Enter your Backblaze B2 key ID in the Application Key ID field.
- Enter your Backblaze B2 application key in the Application Key field.
- Click OK.
Create a New Bucket
You can create a new Backblaze B2 bucket in FileZilla Pro. To create a bucket using the Backblaze web console, click here.
- In the menu bar, select File and select Site Manager.
- Double-click Backblaze B2 to connect to your account.
Your local files are displayed on the left side of the screen, and a list of the buckets in your Backblaze B2 account are displayed on the right side of the screen. - Right-click the right side of the screen, and select Create directory.
- Enter a globally unique name for your bucket.
Transfer Files
After you set up FileZilla Pro, you must connect FileZilla Pro to your Backblaze B2 account.
FileZilla Pro displays your local files on the left side of the screen and a list of the buckets in your Backblaze B2 account on the right side of the screen. You can use either of the following options to transfer your files.
- Drag and drop files from the left side of the screen to the right side of the screen.
- Select one or more files, right-click the files, and click Upload.
Optimize Reliability and Speed
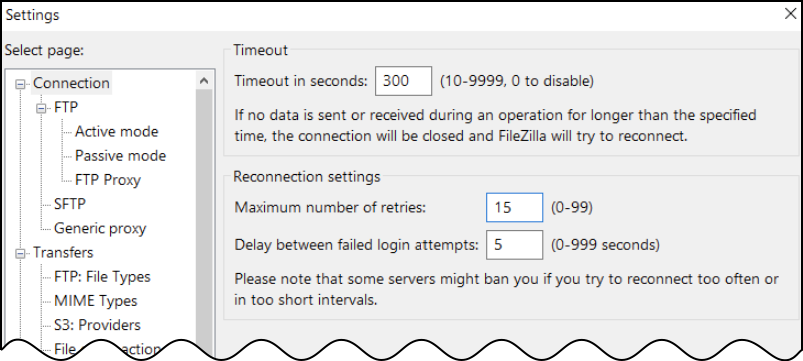
When transferring large files, a disruption in your Internet connection can result in your file failing to transfer. FileZilla Pro has optional settings that you can use to improve the reliability of your file transfers. Increasing the file timeout and number of connection retries can help prevent file transfer failure due to network disruptions.
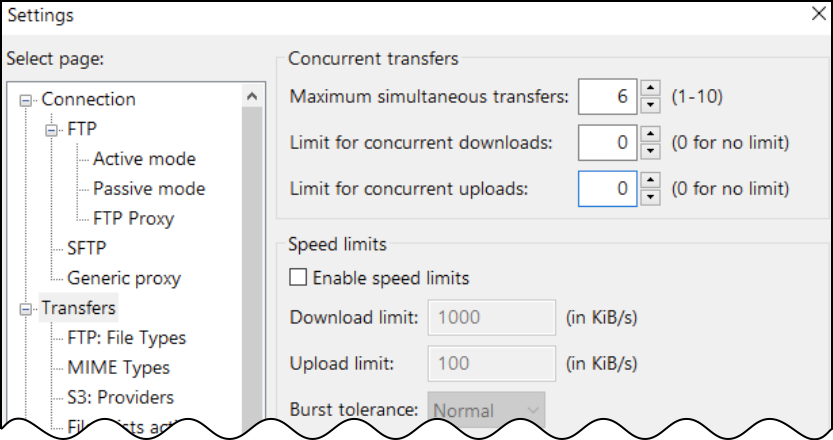
By default, FileZilla Pro only allows you to transfer one file at a time. But if you have a fast Internet connection, you may want to transfer multiple files at the same time. You can increase the number of concurrent file transfers up to a maximum of 10 files.
Improve Connection Performance

- In the menu bar, select Edit and select Settings.
- In the left side panel, click Connection.
- Enter 300 in the Timeout in seconds field.
- Enter 15 in the Maximum number of retries field.
Transfer Multiple Files
You can transfer multiple files at the same time if you have a fast Internet connection.

- In the menu bar, select Edit and select Settings.
- In the left side panel, click Transfers.
- Enter the number of file transfers that you want to run concurrently in the Maximum simultaneous transfers field.
- Enter 0 in the Limit for concurrent downloads field.
- Enter 0 in the Limit for concurrent uploads field.
