Apple’s Time Machine software helps you create a backup of your Mac hard drive. That’s great, but what if something happens to the external drive you’re using for the Time Machine backup? If you’re following our 3-2-1 Backup Strategy, then you’ll be protected, but you can do more, too.
How about using multiple backup drives with Time Machine? Here’s how.
Some Background on Time Machine
Time Machine is more than just backup software for your Mac. You can think of it as a tool that keeps moments in time for you to look back on, so you can recover deleted or missing files or even revert to older versions of files you’ve worked on.
Time Machine stores hourly backups for 24 hours, daily backups for the past month, and weekly backups for all previous months for as much space as you have on your Time Machine backup drive. The oldest backups get deleted when the drive fills up. That makes it great for backups, but not great for archives, which require long-term storage. For more on the difference between backups and archives, see our post, What’s the Diff: Backup vs Archive.
Which Storage Devices Can be used with Time Machine?
Time Machine supports any of the following external storage devices.
- External drive connected to your Mac, such as a USB, Thunderbolt, or FireWire drive
- External drive connected to an AirPort Extreme Base Station (802.11ac model) or AirPort
- Time Capsule (See our post, What’s the Diff: Time Machine vs. Time Capsule)
- AirPort Time Capsule
- Mac shared as a Time Machine backup destination
- Network-attached storage (NAS) device that supports Time Machine over SMB
What is less well known is that you can use a single Time Machine backup drive with multiple Macs. If you have a large disk, you can partition it and use part of it for regular data and part of it for a Time Machine backup.
You also can use your Mac with more than one Time Machine backup drive. Let’s see how that works.
Use More than One Backup Disk Using Disk Rotation
Disk rotation is a technique borrowed from corporate IT professionals. The adage, “Don’t put all your eggs in one basket,” is the reason. While Time Machine is great backup software, it’s not foolproof. If your Time Machine backup drive dies — as hard drives eventually do — all of that data will be gone.
Having Backblaze Personal Cloud Backup is a great way to fix that, of course, because your data is also backed up to the cloud. They’re complementary to one another: Backblaze tracks the last 30 days of changes to your files, for example, while Time Machine will keep track of as many changes as it can within the storage capacity of your backup drive. So it’s nice — ideal, really — to have both.
| Tip: If you have a Backblaze backup in addition to Time Machine, and you’re planning to restore from Time Machine, it’s a good idea to save a restore from Backblaze prior to initiating your Time Machine restore in case anything goes wrong. We wrote a help page on the topic, Before You Restore With Time Machine. |
Fortunately, Time Machine handles disk rotation with aplomb. You can attach a second hard drive and use it with Time Machine with only a couple of clicks. When Time Machine is connected to your first backup drive, it will back everything up. Then it’ll do the same for the second one. Time Machine backs up everything that’s changed on your Mac’s hard drive since the last time that backup drive was connected. So each drive will keep a complete Time Machine backup.
How to Use Multiple Backup Drives with Time Machine
- Connect your second hard drive to your Mac.
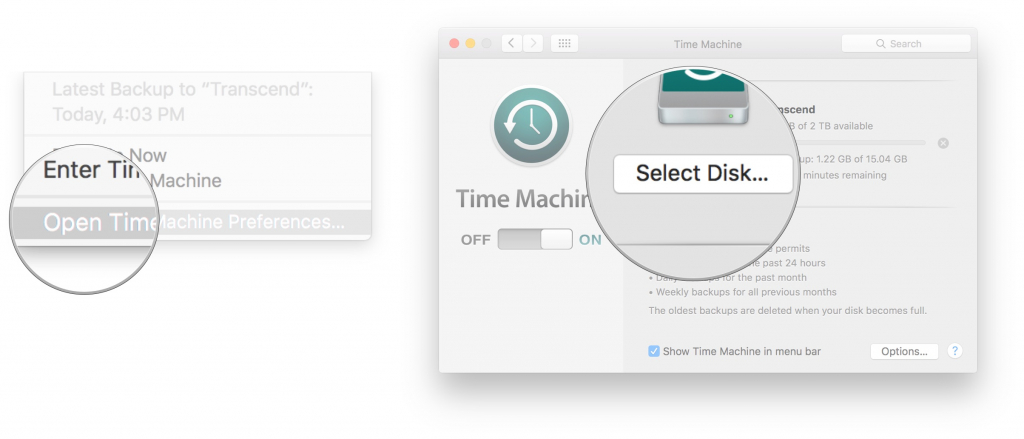
- Click on the Time Machine icon in the menu bar, then click on Open Time Machine preferences.
- Click Select Disk.
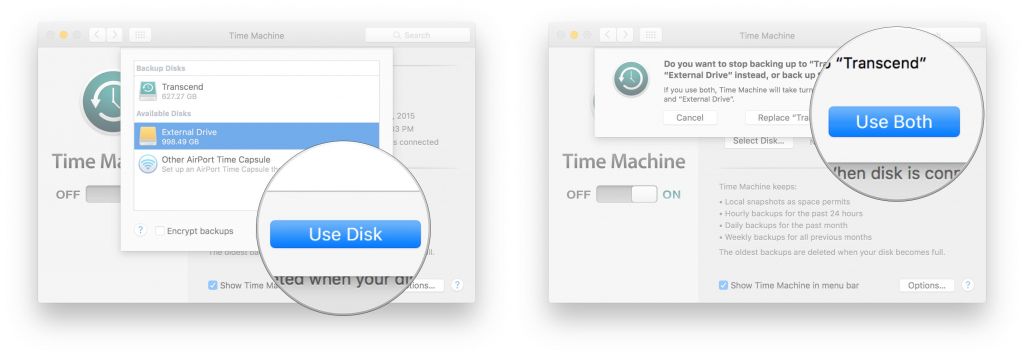
- Select the drive you want to rotate, then click Use Disk.
- Time Machine will ask you if you want to replace your existing Time Machine drive, or use both drives. Click Use Both.


Time Machine will now back up to each individual drive as they’re connected.
When you want to check on your Time Machine backups later, all you need to do is hold down the option key when clicking on the Time Machine icon in your menu bar. You’ll see Browse Other Backup Disks. You can use that to browse whichever Time Machine backup you’d like.
The same process works if you mix a Time Machine backup drive with Apple’s Time Capsule network device (a home Wi-Fi router with built in backup drive). You can back up to both without any problem.
Using this procedure, your data is backed up on two (or more) drives. You can leave one at home and leave the other in the office, for example. That way you’ll never be without a backup you can recover from quickly and easily.
Other Time Machine Backup Tips:
- To exclude items from your backup, open Time Machine preferences, click Options, then click the Add (+) button to add an item to be excluded. To stop excluding an item, such as an external hard drive, select the item and click the Remove (–) button.
- If using Time Machine to back up to a network disk, you can verify those backups to make sure they’re in good condition. Press and hold Option, then choose Verify Backups from the Time Machine menu.
- In OS X Lion v10.7.3 or later, you can start up from your Time Machine disk, if necessary. Press and hold Option as your Mac starts up. When you see the Startup Manager screen, choose “EFI Boot” as the startup disk.
- If you’re a Synology NAS user, you might be interested in our blog post, Backup and Restore Time Machine using Synology and the B2 Cloud.
Do You Use Time Machine for Local Backups?
Do you use Time Machine and have you set up a disk rotation scheme? Do you combine Time Machine with cloud backup? Or, do you still have questions? Let us know in the comments.
• • •
Editor’s Note: This post was updated from May 3, 2016.