Have you ever wished that you could have Time Machine, your Synology NAS, and Backblaze B2 Cloud Storage work together to automatically back up your Mac locally and to the cloud? That would be cool. Of course, you’d also want to be able to restore your Time Machine backup from your Synology NAS or the Backblaze B2 cloud. And while you’re wishing, it would be great if you could have an encrypted USB hard drive show up at your doorstep with your Time Machine backup. Stop wishing! You can do all that today. Here’s how.
Overview
Apple’s Time Machine app, included with every Mac, creates automatic backups of your Mac computer. Typically, these backups are stored on a local external hard drive. Time Machine backups can also be stored on other devices such as a network attached storage (NAS) system on your network. (You can even use Time Machine with multiple backup drives. See our post, “How to Use Multiple Hard Drives With Time Machine.”) If your computer crashes or you get a new computer, you can restore your data from the Time Machine backup.
We advocate a 3-2-1 backup strategy that combines local storage like a Time Machine backup with off-site backup to provide an additional layer of security and redundancy. That’s three copies of your data: two local (your “live” version and your Time Machine backup), and one off-site. If something happens to your computer or your NAS—if they’re stolen, or if some sort of disaster strikes—you can still count on your cloud backup to keep you safe.
You can use Backblaze to back up your computer to the cloud and use Time Machine to create a local backup. In fact, many of our customers do exactly that. But there’s another way to approach this that’s more efficient: Make a copy of the Time Machine backup and send it off-site automatically.
A Streamlined 3-2-1 Backup Plan
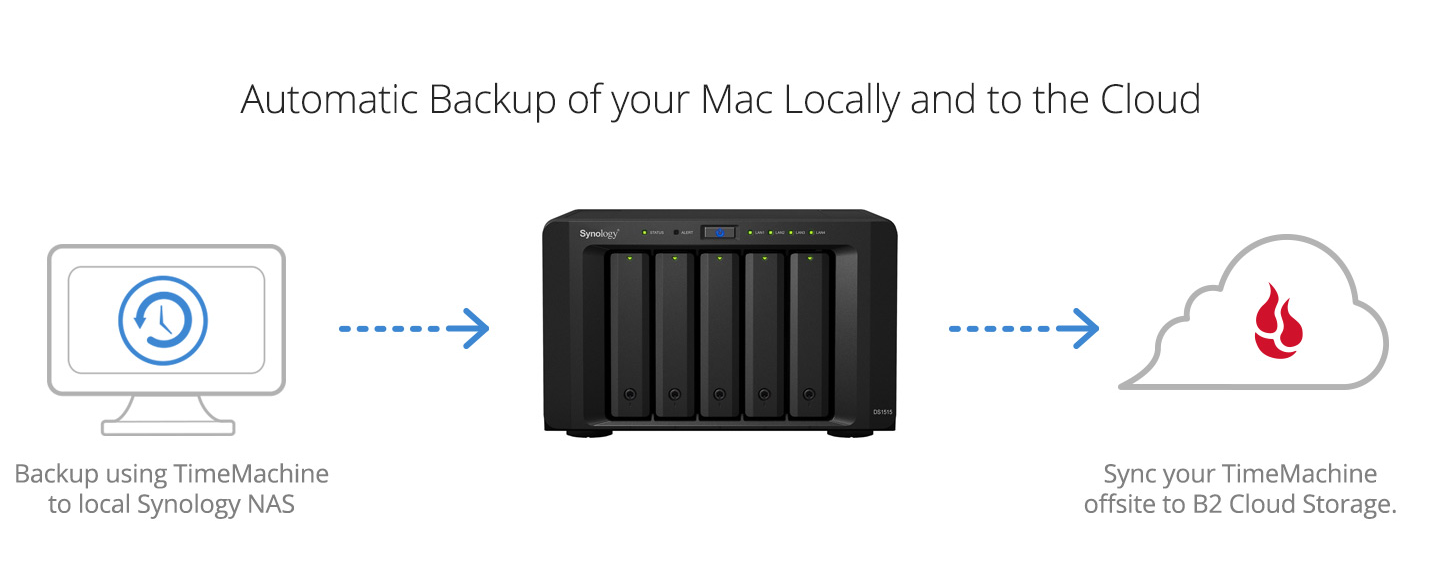
The idea is simple: Have Time Machine store its backup on your Synology NAS device, then sync the Time Machine backup from the Synology NAS to Backblaze B2 Cloud Storage. Once this is set up, the 3-2-1 backup process occurs automatically and your fi
les are stored locally and off-site.
We’ve prepared a guide titled “How to back up your Time Machine backup to Synology and Backblaze B2” in the Backblaze Knowledge Base to help you with the setup of Time Machine, Synology, and Backblaze B2. Please read through the instructions before starting the actual installation.
Restoring Your Time Machine Backup
The greatest backup process in the world is of little value if you can’t restore your data. With your Time Machine backup now stored on your Synology NAS and in B2 Cloud Storage, you have multiple ways to restore your files.
Day to Day Restores
From time to time you may need to restore a file or two from your local backup, in this case, your Time Machine backup stored on your Synology NAS. This works just like having your Time Machine backup stored on a locally connected external hard drive:
- On the Mac menu bar (top right) locate and click on the Time Machine icon.
- Select “Enter Time Machine.”
- Locate the file or files you wish to restore.
- Click “Restore” to restore the selected file(s).
The only thing to remember is that your Synology NAS device needs to be accessible via your network to access the Time Machine backup.
Full Restores
Most often you would do a full restore of your Time Machine backup if you are replacing your computer or the hard/SSD drive inside.
Method 1: Restore from the Synology NAS device.
The most straightforward method is to restore the Time Machine backup directly from the Synology NAS device. You can restore your entire Time Machine backup to your new or reformatted Mac by having Apple’s Migration Assistant app use the Time Machine backup stored on the Synology NAS as the restore source. The Migration Assistant app is included with your Mac.
Of course, in the case of a disaster or theft, the Synology NAS may suffer the same fate as your Mac. In that case, you’ll want to restore your Time Machine backup from Backblaze B2. Here’s how.
Method 2: Restore a Time Machine Backup from Backblaze B2 via a USB hard drive.
The second method is to prepare a B2 Cloud Storage snapshot of your Time Machine backup and then have the snapshot copied to a USB hard drive you purchase from Backblaze. Think of a snapshot as a container that holds a copy of the files you wish to download. Instead of downloading each file individually, you create a snapshot of the files and download one item, the snapshot. In this case, you create the snapshot of your Time Machine backup, and we copy the snapshot to the hard drive and FedEx it to you. You then use the USB hard drive as a restore source when using Migration Assistant.
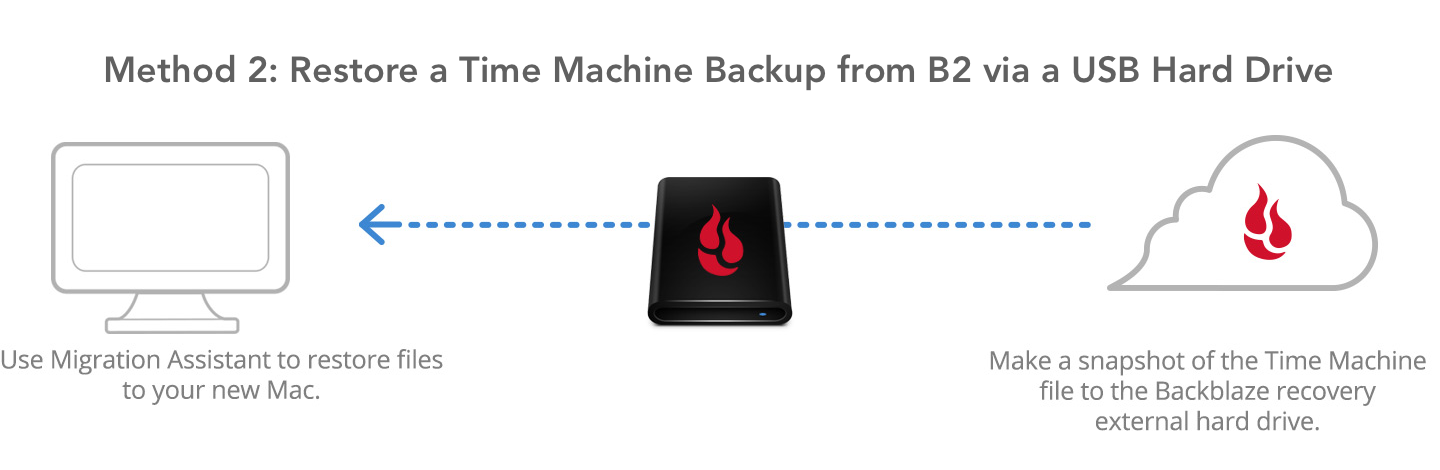
We’ve prepared a guide titled, “How to restore your Time Machine backup from Backblaze B2” in the Backblaze Knowledge Base to walk you through the process of restoring your Time Machine backup from Backblaze B2 using an encrypted USB hard drive.
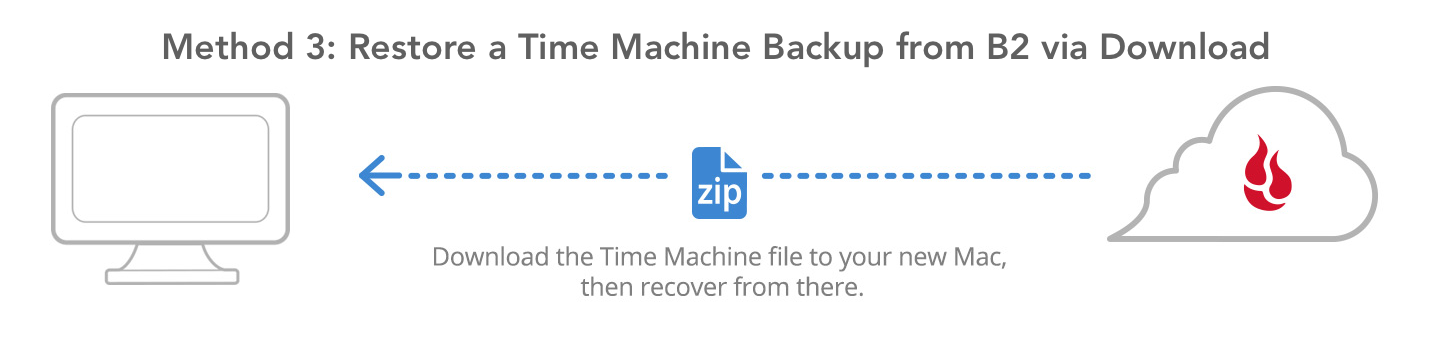
Method 3: Restore a Time Machine Backup from Backblaze B2 via download.
When using this method, give consideration to the size of the Time Machine backup. It is not uncommon for this file to be several hundred gigabytes or even a terabyte or two. Even with the reasonably fast network connection downloading such a large file can take a considerable amount of time.
Prepare a snapshot of your Time Machine backup from B2 Cloud Storage and download it to your “new” Mac. After you “unzip” the file you can use Migration Assistant on your new Mac to restore the Time Machine backup using the unzipped file as the restore source.
Summary
As we noted earlier, you can use Backblaze Computer Backup to back up your computer to the cloud and use Time Machine to create a local backup. That works fine, but if you are using a Synology NAS device in your environment, the 3-2-1 strategy discussed above gives you another option. In that case, all of the Time Machine backups in your home or office can reside on the Synology NAS. Then you don’t need an external drive to store the Time Machine backup for each computer and all of the Time Machine backups can sync automatically to Backblaze B2 Cloud Storage.
In summary, if you have a Mac, a Synology NAS, and a Backblaze B2 account, you can have an automatic 3-2-1 Time Machine backup of the files on your computer. You don’t have to drag and drop files into backup folders, remember to hit the “Back Up Now” button, or hoard backup external USB drives in your closet. Enjoy automatic, continuous backup, locally and in the cloud. 3-2-1 backup has never been so easy.