Do you have an old PC lying around that you’d love to throw away or donate? Before you take it to the recycling center, you definitely want to scrub it of all your data. And there’s a bit more to it than just deleting your files and emptying the recycle bin.
This guide will help you make sure all of your personal data is wiped from the machine so you can be confident it’s all gone before you give it away or recycle it.
First things first: Back up your computer
Before you do anything, make sure your data is backed up. You want to be able to load it all on to a new computer, or at least keep it in an archive, so you can access it after you dispose of your old machine. The best plan for backing anything up is the 3-2-1 backup strategy where you keep three copies of your data on two types of media with one copy off-site. Your first copy is the one on your computer. Your second copy can be kept on an external hard drive or other external media. And, your third copy should be kept in an off-site location like the cloud. If you’re not backing up an off-site copy, now is a great time to get started.
You can easily create a backup using Windows Backup on Windows 7, 8, 8.1, 10, and 11. If you save that to an external hard drive, you can then move your files to a new computer or just keep it as a local backup. Once you’re backed up, you’re ready to wipe your PC’s internal hard drive.
How to completely wipe a PC
In most cases, wiping a PC involves simply reformatting the disk and reinstalling Windows using the Reset function. If you are recycling, donating, or selling your PC, the Reset function makes data recovery sufficiently difficult, especially if your data is encrypted (more on that later). This process is straightforward in Windows versions 8, 8.1, 10, and 11, and works for both hard disk drives (HDDs) and solid state drives (SSDs).
How to reset Windows 10 and 11
Follow these instructions for different versions of Windows to reset your PC:
- Go to Settings → System (In Windows 10: Update & Security) → Recovery.
- Under Reset this PC, click Reset PC. (In Windows 10: Click Get Started.)
- Choose Remove everything. If you’re not getting rid of your PC, you can use Keep my files to give your computer a good cleaning to improve performance.
- You will be prompted to choose to reinstall Windows via Cloud download or Local reinstall. If you’re feeling generous and want to give your PC’s next owner a fresh version of Windows, choose Cloud download. This will use internet data. If you’re planning to recycle your PC, Local reinstall works just fine.
- In Additional settings, click Change settings and toggle Clean data to on. This takes longer, but it’s the most secure option.
- Click Reset to start the process.
How to reset Windows 8 and 8.1
- Go to Settings → Change PC Settings → Update and Recovery → Recovery.
- Under Remove everything and reinstall Windows, click Get started, then click Next.
- Select Fully clean the drive. This takes longer, but it’s the most secure option.
- Click Reset to start the process.
Secure erase using third-party tools
If the reset option doesn’t totally put your mind at ease, or if you have a PC running Windows 7 or older, you have another option—third-party tools. There are a number of good third-party tools you can use to securely erase your disk, which we’ll get into below. These are different depending on whether you have an internal HDD or an SSD.
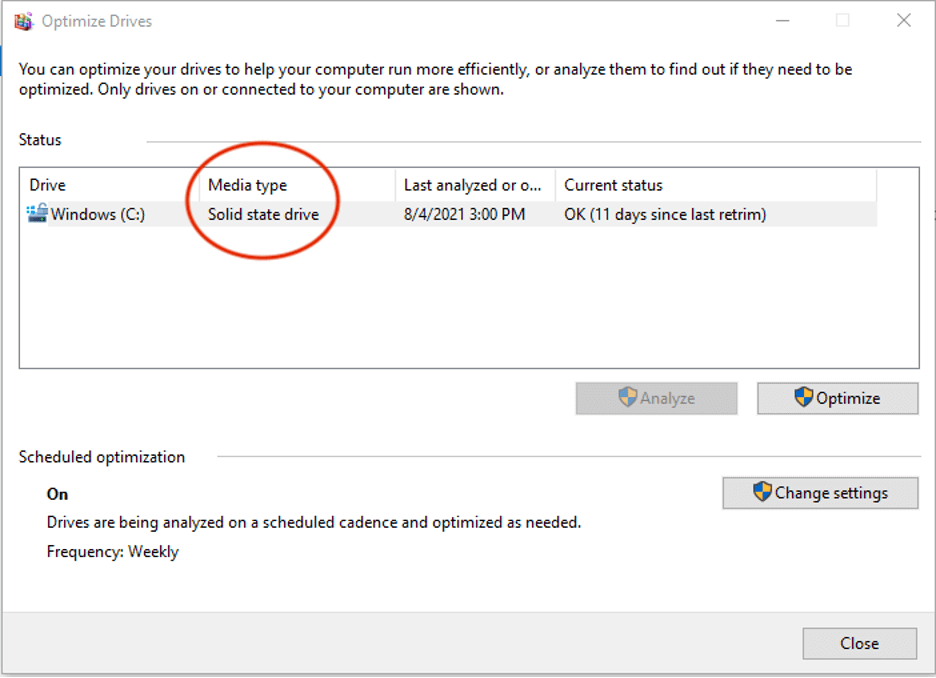
How do I find out I have an HDD or SSD in my Windows laptop?
Most desktops and laptops sold in the last few years will have an SSD, but you can easily check to be sure:
- Open Settings.
- Type “Defragment” in the search bar.
- Click on Defragment and Optimize Your Drives.
- Check the media type of your drive.
How to securely erase your Windows drive using third-party tools
Now that you know what kind of drive you have, here are your options for wiping your Windows drive:
Securely erase an HDD
The process for erasing an HDD involves overwriting the data, and there are many utilities out there to do it yourself:
- DBAN: Short for Darik’s Boot and Nuke, DBAN has been around for years and is a well-known and trusted drive wipe utility for HDDs. It does multiple pass rewrites (binary ones and zeros) on the disk. You’ll need to download it to a USB drive and run it from there.
- Disk Wipe: Disk Wipe is another free utility that does multiple rewrites of binary data. You can choose from a number of different methods for overwriting your disk. Disk Wipe is also portable, so you don’t need to install it to use it.
- Eraser: Eraser is also free to use. It gives you the most control over how you erase your disk. Like Disk Wipe, you can choose from different methods that include varying numbers of rewrites, or you can define your own.
Keep in mind, any disk erase utility that does multiple rewrites is going to take quite a while to complete.
If you’re using Windows 7 or older and you’re just looking to recycle your PC, you can stop here. If you intend to sell or donate your PC, you’ll need the original installation discs (yes, that’s discs with a “c”…remember? Those round shiny things?) to reinstall a fresh version of Windows.
Securely erase an SSD
You have a few options for securely erasing an SSD. These third-party tools will do the trick:
- Parted Magic: Parted Magic is the most regularly recommended third-party erase tool for SSDs, but it does cost $11. It’s a bootable tool like some of the HDD erase tools—you have to download it to a USB drive and run it from there.
- ATA Secure Erase: ATA Secure Erase is a command that basically shocks your SSD. It uses a voltage spike to flush stored electrons. While this sounds damaging (and it does cause some wear), it’s perfectly safe. It doesn’t overwrite the data like other secure erase tools, so there’s actually less damage done to the SSD.
Encrypting data on a Windows PC
Even if you’re not getting rid of your computer, encrypting your data is a good idea. If your laptop falls into the wrong hands, encryption makes it that much harder for criminals to access your personal information. But, if you have an SSD, encrypting your data is even more important, both before you get rid of it and just in general. Why? The way SSDs store and retrieve data is different from HDDs.
HDDs store data at specific physical locations on the drive platter. In contrast, SSDs use electronic circuits and memory cells, which are organized into pages and blocks, to store data. Constant writing and rewriting to the same blocks can wear out an SSD over time. To mitigate this, SSDs employ a technique called “wear leveling,” which distributes data across the entire drive, preventing it from being stored in just one physical location.
When you tell an SSD to erase data, it doesn’t overwrite the existing data. Instead, it writes new data to a different block. Consequently, some of your old data may remain on the SSD until the wear leveling process eventually overwrites those cells. So, it’s smart to encrypt your data before erasing it from an SSD. This ensures that any residual data is protected. If any data is left lurking, at least no one will be able to read it without an encryption key.
Encrypting your data first isn’t necessarily a requirement, but if Windows Reset is not enough for you and you’ve come this far, we figure it’s a step you’d want to take. The process isn’t complicated, but not every Windows machine is the same. First, check to see if your device is encrypted by default:
- Open the Start menu.
- Scroll to the Windows Administrative Tools dropdown menu.
- Select System Information. You can also search for “system information” in the taskbar.
- If the Device Encryption Support value is “Meets prerequisites,” you’re good to go—encryption is enabled on your device.
If not, your next step is to check if your device has BitLocker built in:
- Open Settings.
- Type “BitLocker” in the search bar.
- Click Manage BitLocker.
- Click Turn on BitLocker and follow the prompts.
If neither of those options are available, you can use third-party software to encrypt your internal SSD. VeraCrypt and AxCrypt are both good options. Just remember to record the encryption passcode somewhere and also the operating system (OS), OS version, and the encryption tool you used so you can recover the files later on if desired.
The nuclear option
Encrypting, resetting, and/or wiping your drive with a third-party tool should be more than enough to make sure your data is protected and your laptop or desktop is clean before you donate or recycle it. But maybe you’re still feeling wary about it. In that case, you always have the option to destroy the drive yourself.
When nothing less than total destruction will do, just make sure you do it safely. The safest and most secure way to destroy an HDD, and the only way we’d recommend physically destroying an SSD, is to shred it. Check with your local electronics recycling center to see if they have a shredder you can use. (And, you absolutely want to ask if you can watch as giant metal gears chomp down on your drive. Metal.) Shredding it should be a last resort though. Drives typically last five to 10 years, and millions get shredded every year before the end of their useful life.
Still have questions about how to securely erase or destroy your hard drives? Let us know in the comments. And if you’re curious about how to erase a Mac HDD or SSD, read our guide here.
FAQs
In most cases, wiping a PC involves simply reformatting the disk and reinstalling Windows using the Reset function. If you are recycling, donating, or selling your PC, the Reset function makes data recovery sufficiently difficult, especially if your data is encrypted. You can also use third-party tools to securely wipe a PC drive.
First, check to see if your device is encrypted by default. You can search “system information” in the search bar. If the Device Encryption Support value is “Meets prerequisites,” you’re good to go—encryption is enabled on your device. If not, your next step is to check if your device has BitLocker built in. Type “BitLocker” in the search bar, click Manage BitLocker, then click Turn on BitLocker and follow the prompts. If neither of those options are available, you can use third-party software to encrypt your internal SSD. VeraCrypt and AxCrypt are both good options.
The safest and most secure way to destroy an HDD, and the only way we’d recommend physically destroying an SSD, is to shred it. Check with your local electronics recycling center to see if they have a shredder you can use (or if they’ll at least let you watch as giant metal gears chomp down on your drive). Shredding it should be a last resort though. Drives typically last five to 10 years, and millions get shredded every year before the end of their useful life.