Increasing storage density is a fancy way of saying we are replacing one drive with another drive of a larger capacity; for example replacing a 4TB drive with a 16TB drive—same space, four times the storage. You’ve probably copied or cloned a drive or two over the years, so you understand the general process. Now imagine having 270,000 drives that over the next several years will need to be replaced, or migrated as is often the term used. That’s a lot of work. And when you finish—well actually you’ll never finish as the process is continuous for as long as you are in the cloud storage business. So, how does Backblaze manage this ABC (Always Be Copying) process? Let me introduce you to CVT Copy or CVT for short.
CVT Copy is our in-house purpose-built application used to perform drive migrations at scale. CVT stands for Cluster, Vault, Tome, which is engineering vernacular mercifully shortened to CVT.
Before we jump in, let’s take a minute to define a few terms in the context of how we organize storage.
- Drive: The basic unit of storage ranging in our case from 4TB to 22TB in size.
- Storage Server: A collection of drives in a single server. We have servers of 26, 45, and 60 drives. All drives in a storage server are the same logical size.
- Backblaze Vault: A logical collection of 20 Storage Pods or servers. Each storage server in a Vault will have the same number of drives.
- Tome: A tome is a logical collection of 20 drives, with each drive being in one of the 20 storage servers in a given Vault. If the storage servers in a Vault have 60 drives each, then there will be 60 unique tomes in that Vault.
- Cluster: A logical collection of Vaults, grouped together to share other resources such as networking equipment and utility servers.
Based on this, a Vault consisting of 20, 60-drive storage servers will have 1,200 drives, a Vault with 45-drive storage servers will have 900 drives, and a Vault with 26-drive servers will have 520 drives. A cluster can have any combination of Vault sizes.
A Quick Review on How Backblaze Stores Data
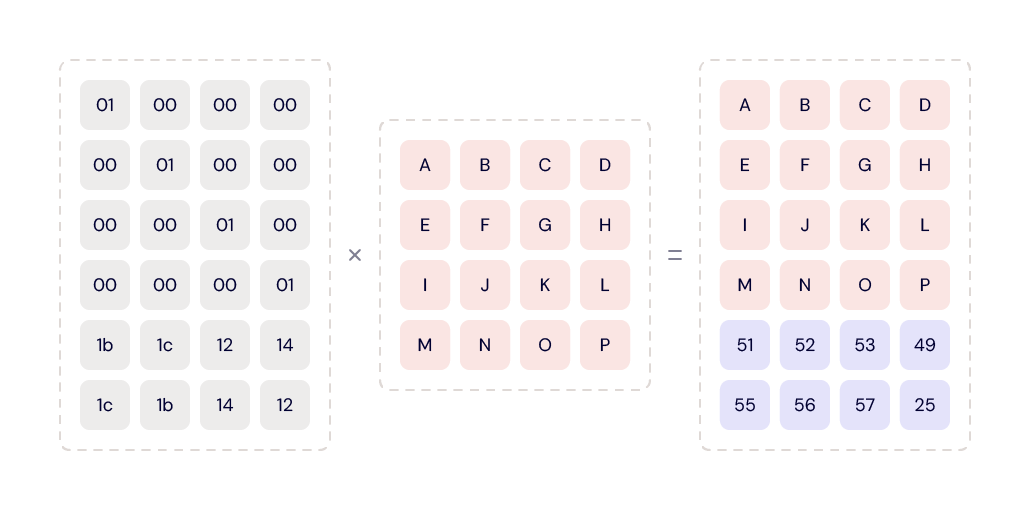
Data is uploaded to one of the 20 drives within a tome. The data is then divided into parts, called data shards. At this point, we use our own Reed-Solomon erasing coding algorithm to compute the parity shards for that data. The number of data shards plus the number of parity shards will equal 20, i.e. the number of drives in a tome. The data and parity shards are written to their assigned drives, one shard per drive. The ratios of data shards to parity shards we currently use are 17/3, 16/4, and 15/5 depending primarily on the size of the drives being used to store the data—the larger the drive, the higher the parity.

Using parity allows us to restore (i.e. read) a file using less than 20 drives. For example, when a tome is 17/3 (data/parity), we only need data from any 17 of the 20 drives in that tome to restore a file. This dramatically increases the durability of the files stored.
CVT Overview
For CVT, the basic unit of migration is a tome, with all of the tomes in a source Vault being copied simultaneously to a new destination Vault which is typically new hardware. For each tome, the data, in the form of files, is copied file-by-file from the source tome to the destination tome.
The CVT Process
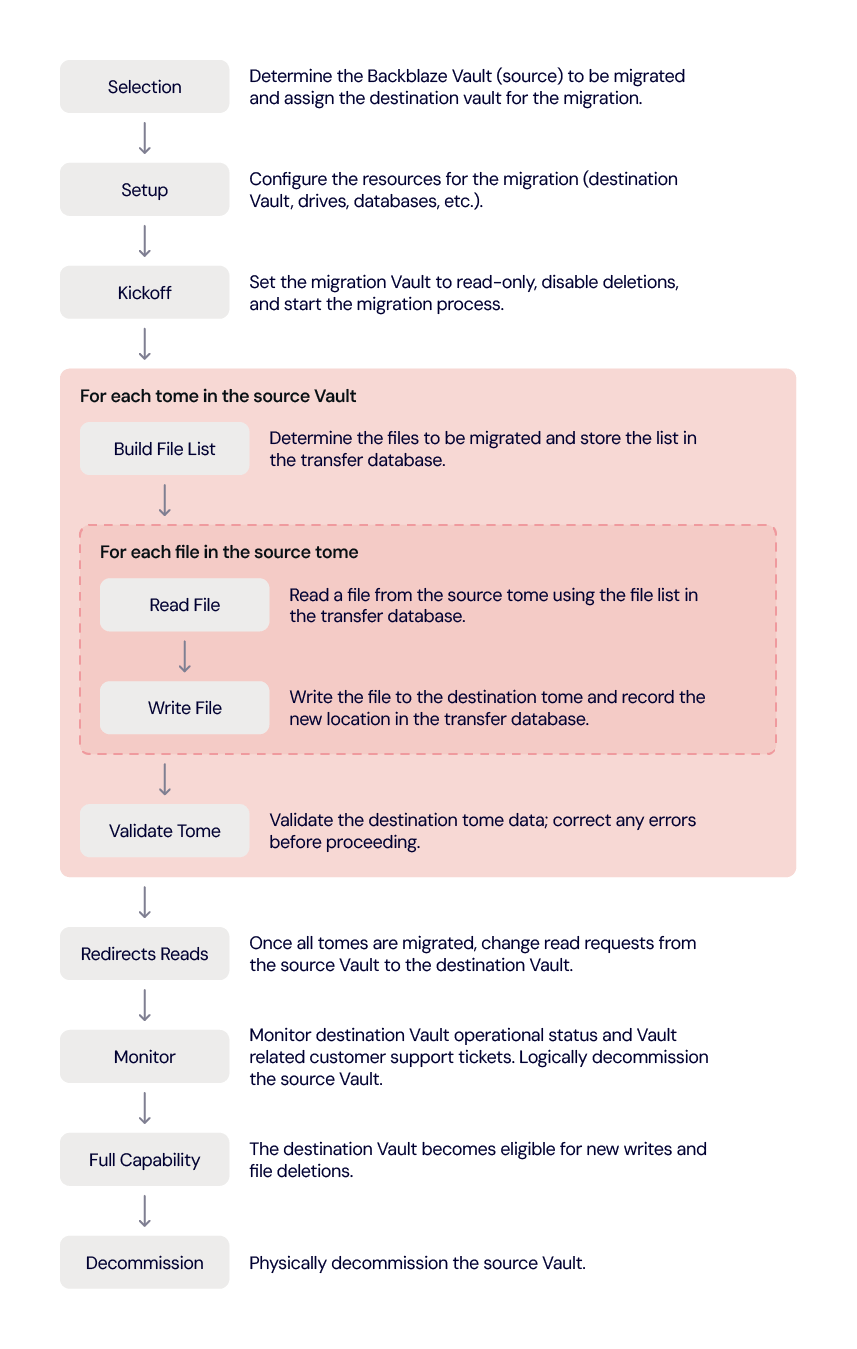
An overview of the CVT process is below, followed by an explanation of each task noted.

Selection
Selecting a Vault to migrate involves considering several factors. We start by reviewing current drive failure rates and predicted drive failure rates over time. We also calculate and consider overall Vault durability; that is, our ability to safeguard data from loss. In addition, we need to consider operational needs. For example, we still have Vaults using 45-drive Storage Pods. Upgrading these to 60-drive storage servers increases drive density in the same rack space. These factors taken together determine the next Vault to migrate.
Currently we are migrating systems with 4TB drives, which means we are migrating up to 3.6 petabytes (PB) of data for a 900 drive Vault or 4.8PB of data for a 1,200 drive Vault. Actually, there are no limitations as to the size of the source system drives, so Vaults with 6TB, 8TB, and larger sized drives can be migrated using CVT with minimal setup and configuration changes.
Once we’ve identified a source Vault to migrate we need to identify the target or destination system. Currently, we are using destination vaults containing 16TB drives. There is no limitation as to the size of the drives of the destination Vault, so long as they are at least as large as those in the source Vault. You can migrate the data from any sized source Vault to any sized destination Vault as long as there is adequate room on the destination Vault.
Setup
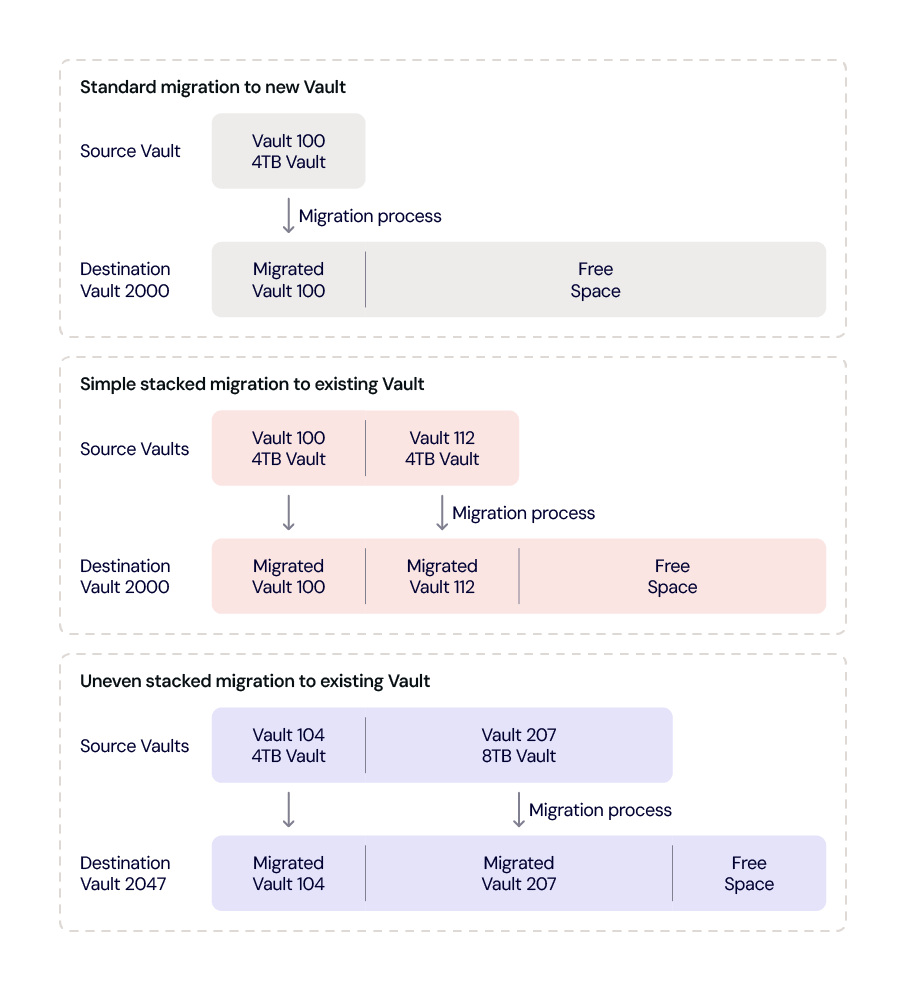
Once the source Vault and destination Vault are selected, the various Technical Operations and Data Center folks get to work on setting things up. If we are not using an existing destination Vault, then a new destination Vault is provisioned. This brings up one of the features of CVT: The migration can be to a new clean Vault or an existing Vault; that is, one with data from a previous migration on it. In the latter case, the new data is just added and does not replace any of the existing data. The chart below are examples of the different ways a destination Vault can be filled from one or more source Vaults.

In any of these scenarios, the free space can be used for another migration destination or for a Vault where new customer data can be written.
Kickoff
With the source and destination Vaults identified and setup, we are now ready to kick-off the CVT process. The first step is to put the source Vault in a read-only state and to disable file deletions on both the source and destination Vaults. It is possible that some older source Vaults may have already been placed in read-only state to reduce their workload. A Vault in a read-only state continues to perform other operations such as running shard integrity checks, reporting Drive Stats statistics and so on.
CVT and Drive Stats
We record Drive Stats data from the drives in the source Vault until the migration is complete and verified. At that point we begin recording Drive Stats data from the drives in the destination Vault and stop recording Drive Stats data from the drives in the source Vault. The drives in the source Vault are not marked as failed.
Build the File List
This step and the next three steps (read files, write files, and validate) are done as a consecutive group of steps for each tome in a source Vault. For our purpose here, we’ll call this group of steps the tome migration process, although they really don’t have such a name in the internal documentation. The tome migration process is for a single tome, but, in general, all tomes in a Vault are migrated at the same time, although due to their unique contents, they most likely will complete at different times.
For each tome, the source file list is copied to a file transfer database and each entry is mapped to its new location in the destination tome. This process allows us to maintain the same upload path while copying the data as the customer used to initially upload their data. This ensures that from the customer point of view, nothing changes in how they work with their files even though we have migrated them from one Vault to another.
Read Files
For each tome, we use the file location database to read the files. One file at a time. We use the same code in this process that we use when a user requests their data from the Backblaze B2 Storage Cloud. As noted earlier, the data is sharded across multiple drives using the preset data/parity scheme, for example 17/3. That means, in this case we only need data from 17 of the drives to read the file.
When we read a file, one advantage we get by using our standard read process is a pristine copy of the file to migrate. While we regularly run shard integrity checks on the stored data to ensure a given shard of data is good, media degradation, cosmic rays and so on can affect data sitting on a hard drive. By using the standard read process, we get a completely clean version of each file to migrate.
Write Files
The restored file is sent to the destination vault, there is no intermediate location where the file resides. The transfer is done over an encrypted network connection typically within the same data center, preferably on the same network segment. If the transfer is done between data centers, it is done over an encrypted dark fiber connection.
The file is then written to the destination tome. The write process is the same one used by our customers when they upload a file and given that process has successfully written hundreds of billions of files we didn’t need to invent anything new.
At this point, you could be thinking that’s a lot of work to copy each file one by one. Why not copy and transfer block by block, for example? The answer lies in the flexibility we get by using the standard file-based read and write processes.
- We can change the number of tomes. Let’s say we have 45 tomes in the source Vault and 60 tomes in the destination Vault. If we had copied blocks of data the destination Vault would have 15 empty tomes. This creates load balancing and other assorted performance problems when that destination Vault is opened up for new data writes at a later date. By using standard read and write calls for each file, all 60 of the destination Vault’s tomes fill up evenly, just like they do when we receive customer data.
- We can change parity of the data. The source 4TB drive Vaults have a data/parity ratio of 17/3. By using our standard process to write the files, the data/parity ratio can be set to whatever ratio we want for the destination Vault. Currently, the data/parity ratio for the 16TB destination Vaults is set to 15/5. This ratio ensures that the durability of the destination Vault and therefore the recoverability of the files therein is maintained as a result of migrating the data to larger drives.
- We can maximize parity economics. Increasing the number of parity drives in a tome from three to five decreases the number of data drives in that tome. That would seem to increase the cost of storage, but the opposite is true in this case. Here’s how:
- Using 4TB drives for 16TB of data stored
- Our average cost for a 4TB drive was $120 or $0.03 per GB.
- Our cost of 16TB of storage, using 4TB drives, was $480 (4 x $120).
- Using a 17/3 data/parity scheme means:
- Data storage: We have 13.6TB of data storage at $0.03/GB ($30/TB) which costs us $408.
- Parity storage: We have 2.4TB of parity storage at $0.03/GB ($30/TB) which costs us $72.
- Using 16TB drives for 16TB of data stored
- Our average cost for a 16TB drive is $232 or $0.0145 per GB.
- Our cost of 16TB of storage is $232.
- Using a 15/5 data/parity scheme means:
- Data storage: We have 12.0TB of data storage at $0.0145/GB ($14.5/TB) which costs us $174.
- Data parity: We have 4.0TB of parity storage at $0.0145/GB ($14.5/TB) which costs us $58.
- In summary, increasing the data/parity ratio to 15/5 for the 16TB drives is less expensive ($58) than the cost of parity when using our 4TB drives ($72) to provide the same 16TB of storage. The lower cost per TB of the 16TB drives allows us to increase the number of parity drives in a tome. Therefore, the cost of increasing the parity of the destination tome not only enhances data durability, it is economically sound.
- Obviously a 16TB drive actually holds a bit less data due to formatting and overhead and four 4TB drives hold even less data. In other words, even with formatting and so on, the math still works out in favor of using the 16TB drives.
- Using 4TB drives for 16TB of data stored
Validate Tome
The last step in migrating a tome is to validate the destination tome is the same as the source tome. This is done for each tome as they complete their copy process. If the source and destination tomes are not consistent, shard integrity check data can be reviewed to determine any errors and the system can retransfer individual files, up to and including the entire tome.
Redirect Reads
Once all of the tomes within the Vault have completed their individual migrations and have passed their validation checks, we are ready to redirect customer reads (download requests) to the destination Vault. This process is completely invisible to the customer as they will use the same file handle as before. This redirection or swap process can be done tome by tome, but is usually done once the entire destination Vault is ready.
Monitor
At this point all download requests are handled by the destination Vault. We monitor the operational status of the Vault, as well as any failed download requests. We also review inputs from customer support and sales support to see if there are any customer related issues.
Once we are satisfied that the destination Vault is handling customer requests, we will logically decommission the source Vault. Basically, that means while the source Vault continues to run, it is no longer externally reachable. If a significant problem were to arise with the new destination Vault, we can swap in the source Vault. At this point, both Vaults are read-only, so the swap would be straightforward. We have not had to do this in our production environment.
Full Capability
Once we are satisfied there are no issues with the destination Vault, we can proceed one or two ways.
- Another migration: We can prepare for the migration of another source Vault to this destination Vault. If this is the case, we return to the Selection step of the CVT process with the Vault once again being assigned as a destination Vault.
- Allow new data: We allow the destination Vault to accept new data from customers. Typically, the contents of multiple source Vaults have been migrated to the destination Vault before this is done. Once new customer writes have been allowed on a destination Vault, we won’t use it as a destination Vault again.
Decommission
After three months the source Vault is eligible to be physically decommissioned. That is, we turn it off, disconnect it from power and networking, and schedule it to be disassembled. This includes wiping the drives and recycling the remaining parts either internally or externally. In practice, we will wait to decommission at least two Vaults at once as it is more economical in dealing with our recycling partners.
Automation
You’re probably wondering how much of this process is automated or uses some type of orchestration to align and accomplish tasks. We currently have monitoring tools, dashboards, scripts, and such, but humans, real ones not AI generated, are in control. That said, we are working on orchestration of the setup and provisioning processes as well as upleveling the automation in the tome migration process. Over time, we expect the entire migration process to be automated, but only when we are sure it works—the “run fast, break things” approach is not appropriate when dealing with customer data.
Not for the Faint of Heart
The basic idea of copying the contents of a drive to another larger drive is straightforward and well understood. As you scale this process, complexity creeps in as you have to consider how the data is organized and stored while keeping it secure and available to the end user.
If your organization manages your data in-house, the never-ending task of simultaneously migrating hundreds or perhaps thousands of drives falls to you or perhaps the contractor you hired to perform the task if you lack the experience or staffing. And this is just one of the tasks you are faced with in operating, maintaining, and upgrading your own storage infrastructure.
In addition to managing a storage infrastructure, there are the growing environmental concerns of data storage. The amount of data generated and stored each year continues to skyrocket and tools such as CVT allow us to scale and optimize our resources in a cost efficient, yet environmentally sensitive way.
To do this, we start with data durability. Using our Drive Stats data and other information, we optimize the length of time a Vault should be in operation before the drives need to be replaced, that is before the drive failure rate impacts durability. We then consider data density, how much data can we pack into a given space. Migrating data from 4TB to 16TB drives, for example, not only increases data density, it uses less electricity per stored terabyte of data and reduces the amount of waste if, for example, we had continued to buy and use 4TB drives instead of upgrading to 16TB drives.
In summary, CVT is more than just a fancy data migration tool: It is part of our overall infrastructure management program addressing scalability, durability, and environmental challenges faced by the ever-increasing amounts of data we are asked to store and protect each day.
Kudos
The CVT program is run by Bryan with the wonderfully descriptive title of Senior Manager, Operations Analysis and Capacity Management. He is assisted by folks from across the organization. They are, in no particular order, Bach, Lorelei (Lo), Madhu, Mitch, Ben, Rodney, Vicky, Ryan, David M., Sudhi, David W., Zoe, Mike, and unnamed others who pitch in as the process rolls along. Each person brings their own expertise to the process which Bryan coordinates. To date, the CVT Team has migrated 24 Vaults containing over 60PB of data—and that’s just the beginning.


