While Backblaze B2 Cloud Storage is a popular backup service for SQL, Exchange, Linux, and Mac servers, most of our customers run Windows servers. In general, almost 75% of servers globally run Windows as their primary operating system. And backing up your server is an essential task to protect your business from an on-premises data disaster, like a ransomware attack or natural disaster.
Server backup doesn’t have to be complicated. In fact, you can check it off your to-do list in a matter of minutes by utilizing the seamless joint solution from Backblaze and our featured integration partner, MSP360 (formerly CloudBerry Lab).
In this post, we’ll walk through step-by-step instructions for configuring backups for single Windows servers or multiple Windows servers with MSP360 and Backblaze B2. Read on, and you can have backups configured today.
Get Your Guide to Server Backup
There are lots of things to consider when you’re creating a solid server backup strategy. Use our guide to learn how to safeguard your server data with backups that preserve your information in case of disaster.

About MSP360 Backup
MSP360 was established in 2011 and has over 450,000 users. It’s the #1 backup software for managed service providers (MSPs) but it’s also widely used by small and medium-sized businesses and their IT departments.
While MSP360 also offers remote desktop and remote monitoring and management solutions, there are two primary products for backing up Windows servers. If you have just one server to back up, CloudBerry Backup is a great solution. CloudBerry Backup for Windows Server protects your backups with advanced encryption and provides ransomware protection. You can perform image-based backups and bare-metal recovery. If you have multiple servers, or if you need centralized monitoring and job management, check out MSP360 Managed Backup Service (MBS). With Backblaze as your cloud storage provider and MSP360 as your backup software for Windows server backup, you’ll have easy and affordable set-it-and-forget-it protection for your business.
How to Back Up a Single Windows Server With Backblaze B2 and MSP360 Using CloudBerry Backup
You can quickly and easily get started with Backblaze B2 and MSP360 with our online onboarding tool, which walks you through the process of setting up both accounts.
-
- Start here and fill out the form for “Single Server.”
- The CloudBerry Backup software will automatically download. You’ll have 15 days to try out the software and when you’re ready to purchase, you can learn more about pricing and licenses here. Note that the Windows server edition has a 1TB storage limit; if you need more storage than that, you will need to upgrade to the Ultimate edition.
- Next, set up your Backblaze B2 account by logging in here and verifying your phone number.
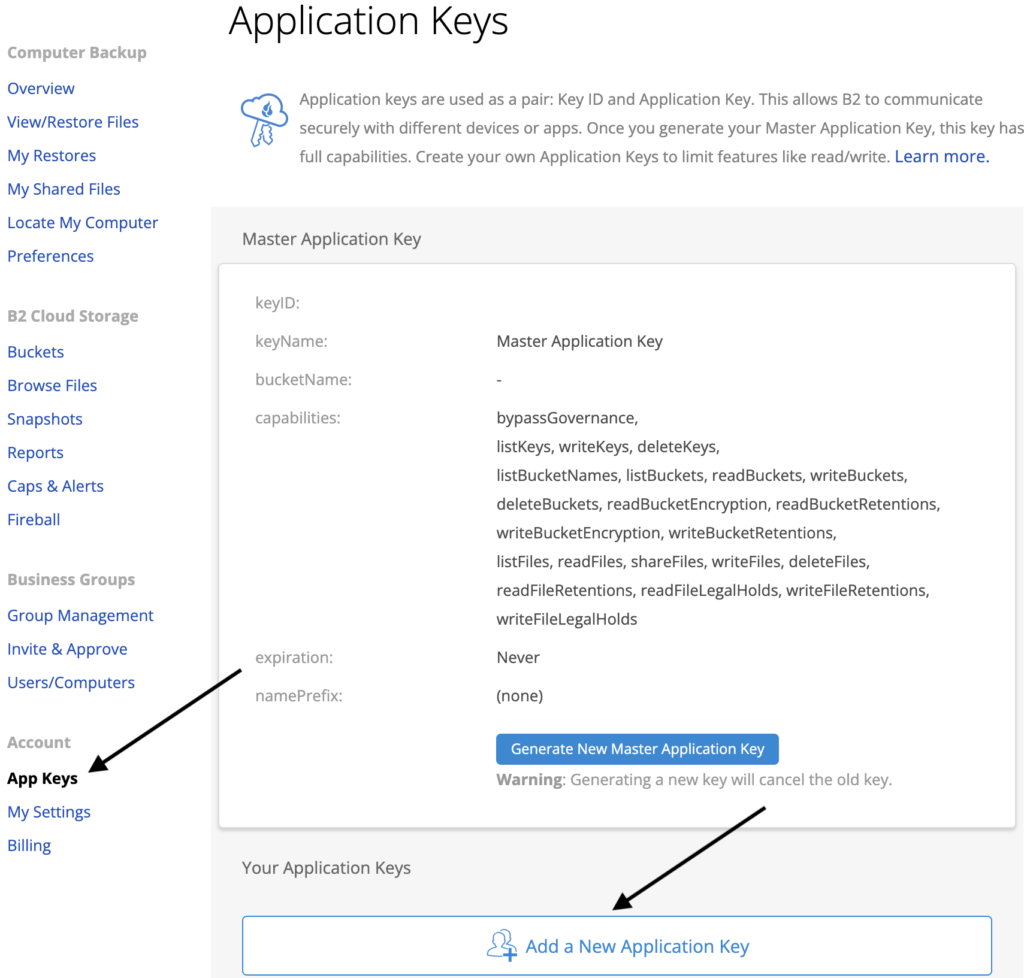
- Click on App Keys and then click on the link that reads “Add a New Application Key.”
-
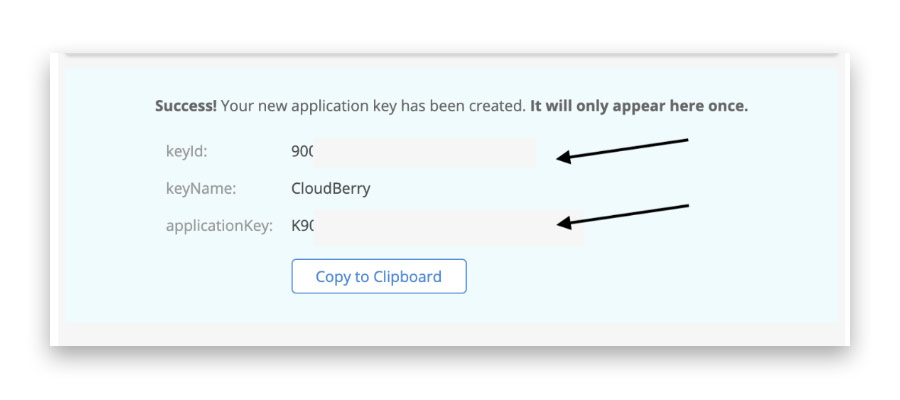
- You can then enter a name for the key and click on the button that says “Create New Key.”

-
- When you have the Key ID and the Application Key, be sure to copy them and keep both of these in a safe location.
IMPORTANT: If you lose the Application Key, you will need to create another Application Key. The new Key that you create will invalidate the old one.
- When you have the Key ID and the Application Key, be sure to copy them and keep both of these in a safe location.
-
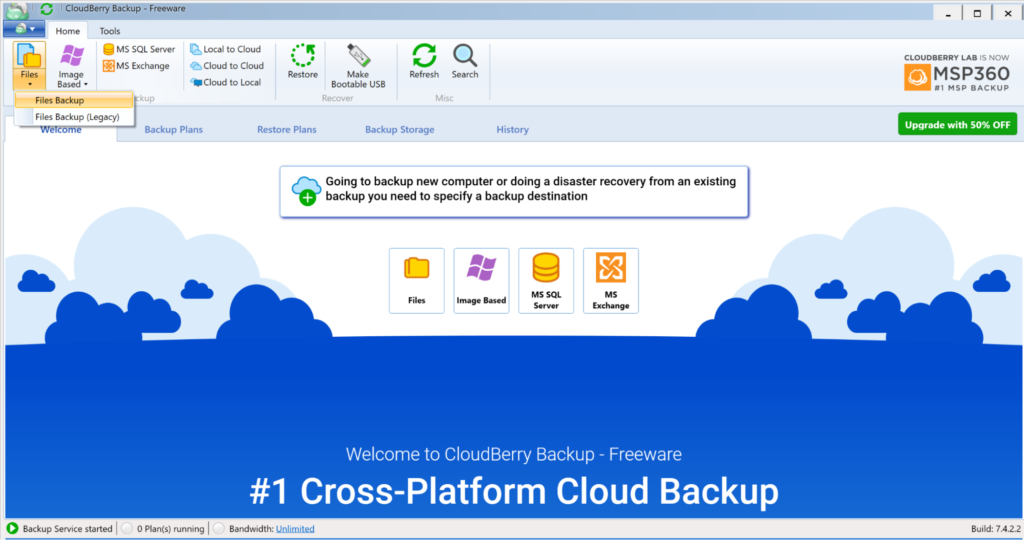
- Now, open your CloudBerry Backup application (assuming you have already installed it). Click on the “Files” button to start setting up your backup plan. (If you want to perform an image backup, you can follow similar steps to do so, but you will need to purchase a license first, as the free trial version does not support it.)
-
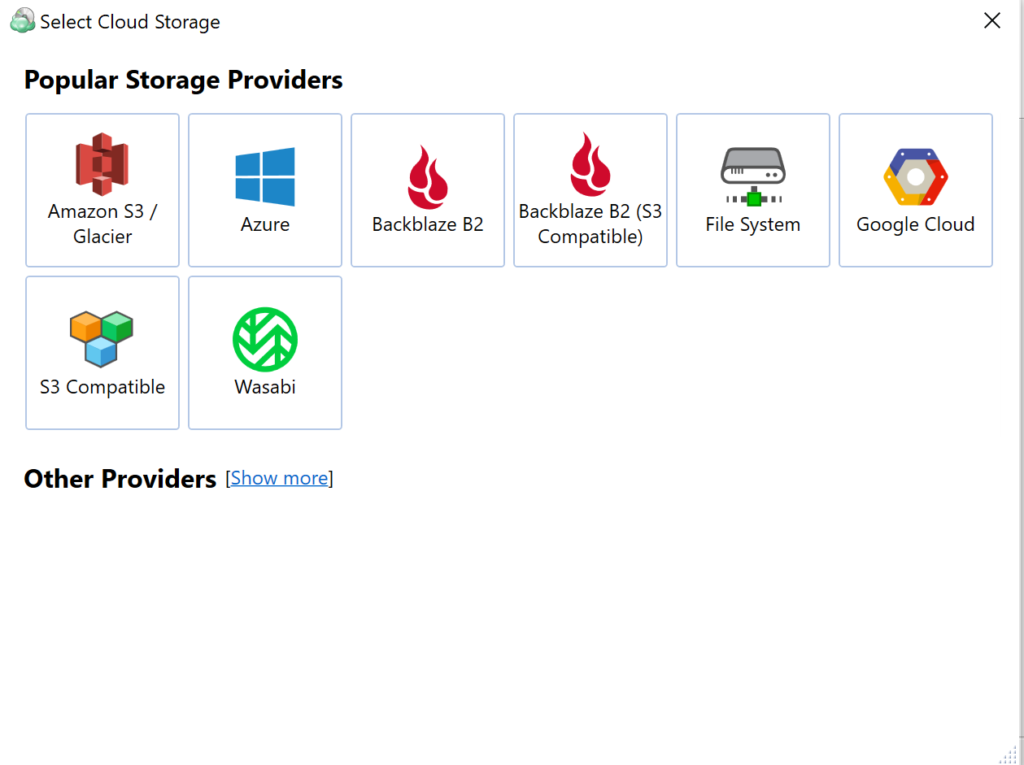
- The next window will have “Local or Cloud Backup” selected. Click “Next.” Then, click the link to “Add New Storage Account.” A cloud storage selector will pop up. Choose one of the Backblaze B2 options as your storage target. If you would like to utilize synthetic full backups, which are highly recommended, you will want to choose the S3-compatible option as that feature requires the Backblaze S3 Compatible API.
-
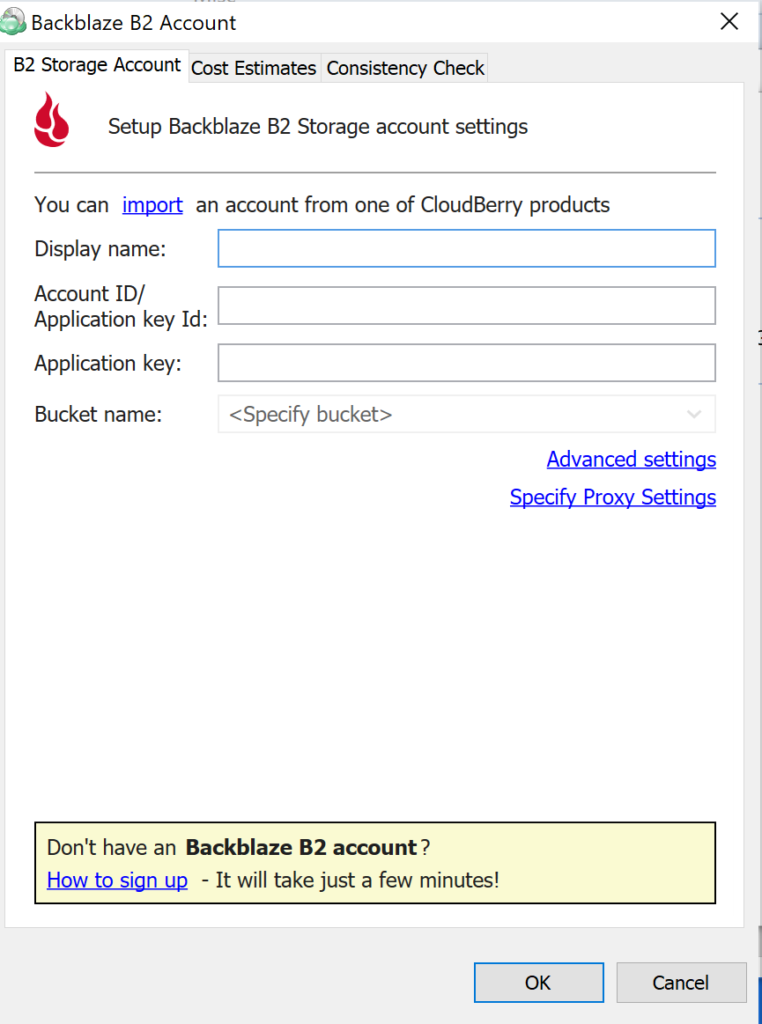
- Enter a display name. If you have copied your Key ID and Application Key, you can enter them now. Then, in the “Bucket Name” dropdown, you can create a new bucket and assign a name to it. Click the “OK” button.
- Now that you’ve created a connection between MSP360 Backup and Backblaze B2, you just have to follow the steps of the backup plan wizard to back up your Windows server. You can find out more about these options by viewing our complete Quickstart Guide for Single Server Backup with Backblaze B2 and MSP360.
How to Back Up Multiple Windows Servers With Backblaze B2 and MSP360 Using Managed Backup Service
Our online onboarding tool (linked below) will walk you through the process of setting up both Backblaze B2 and MSP360 accounts.
-
- You can then enter a name for the Key and click on the button that says “Create New Key.”
-
- When you have the Key ID and the Application Key, be sure to copy them and keep both of these in a safe location.
IMPORTANT: If you lose the Application Key, you will need to create another Application Key. The new key that you create will invalidate the old one.
- When you have the Key ID and the Application Key, be sure to copy them and keep both of these in a safe location.
-
- Now, check your email for an automated message from MSP360 with your log in credentials and a link to the MBS Control Panel. The subject line of this email is “Managed Backup Service Login Information.” Click the link in the email to access the MSP360 Admin Console and log in with the credentials provided to you in the email. You can learn more about MBS versions, features, and pricing here.
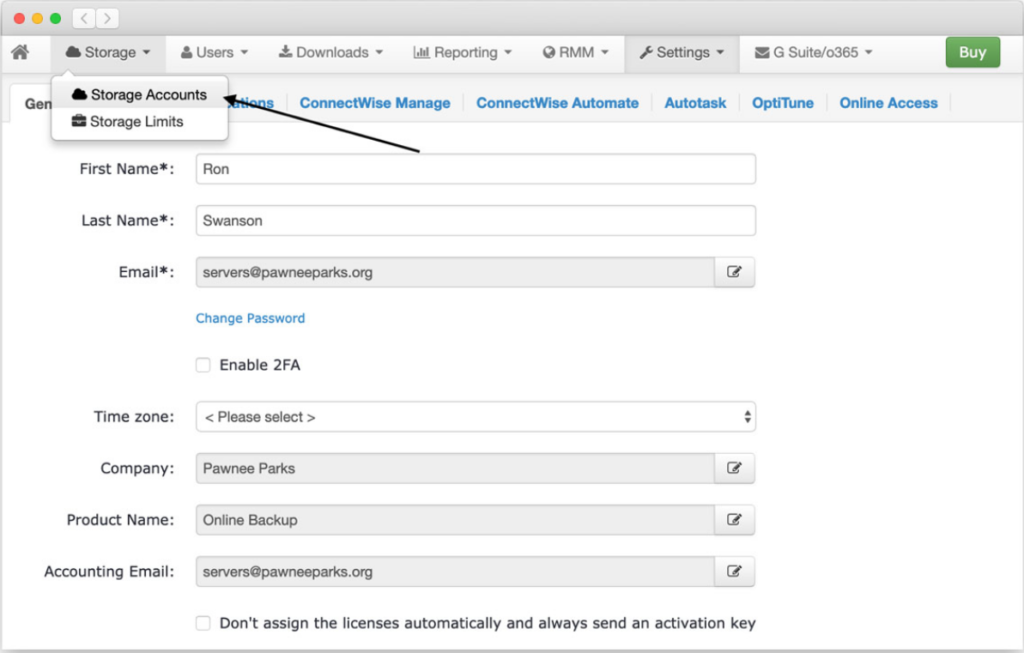
- Add B2 Cloud Storage as the target for your server backups. Click on “Storage,” select “Storage Accounts,” and choose Backblaze B2.
-
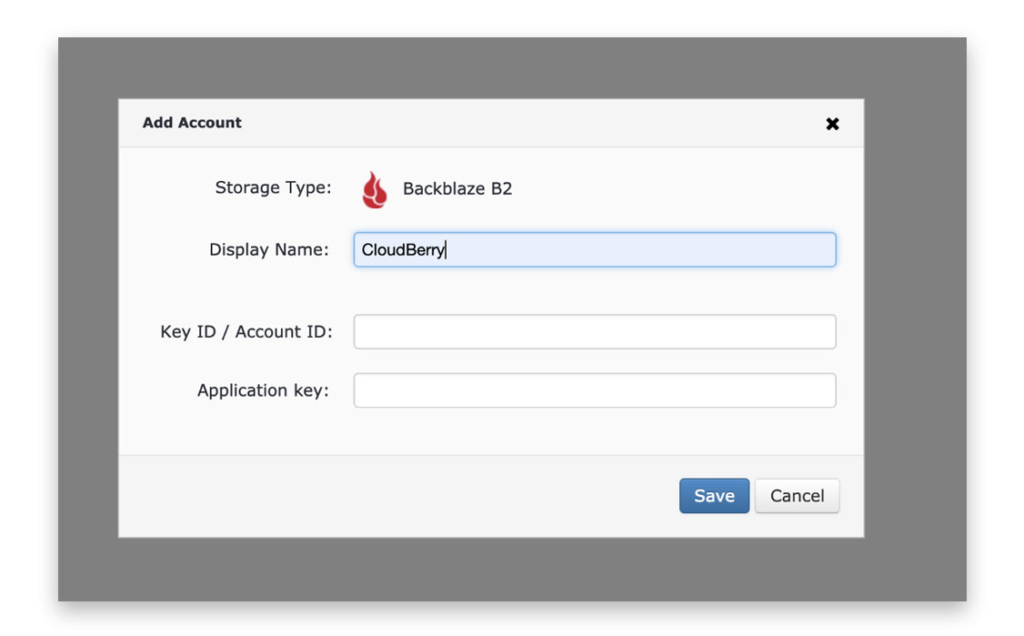
- Enter a display name. If you have copied your Key ID and Application Key, you can enter them now.
-
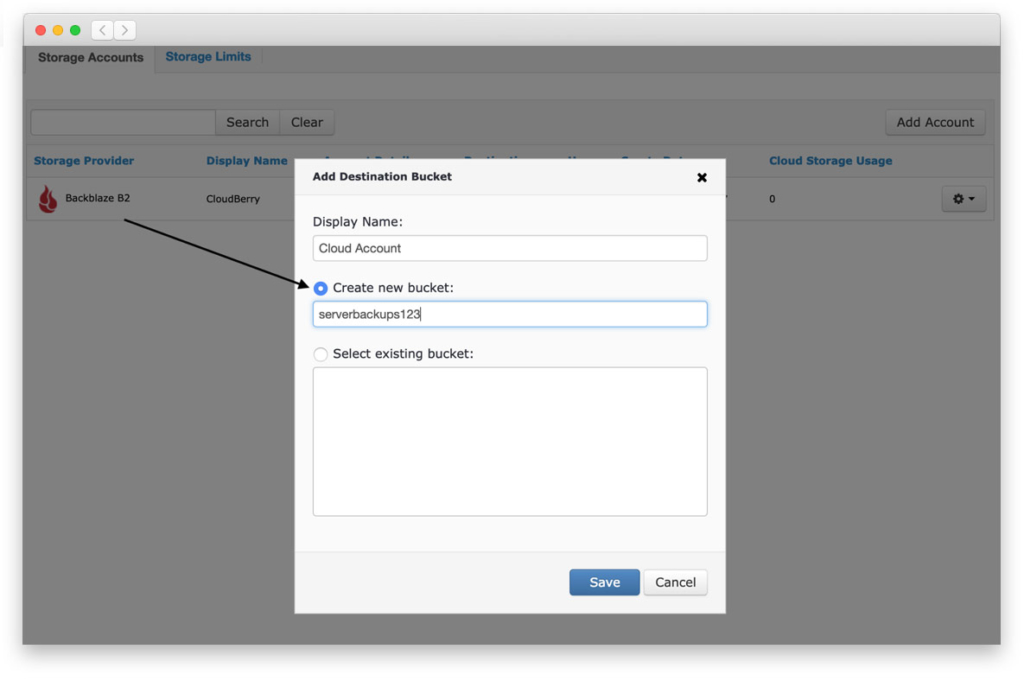
- Then create a new bucket and assign a name to it.
-
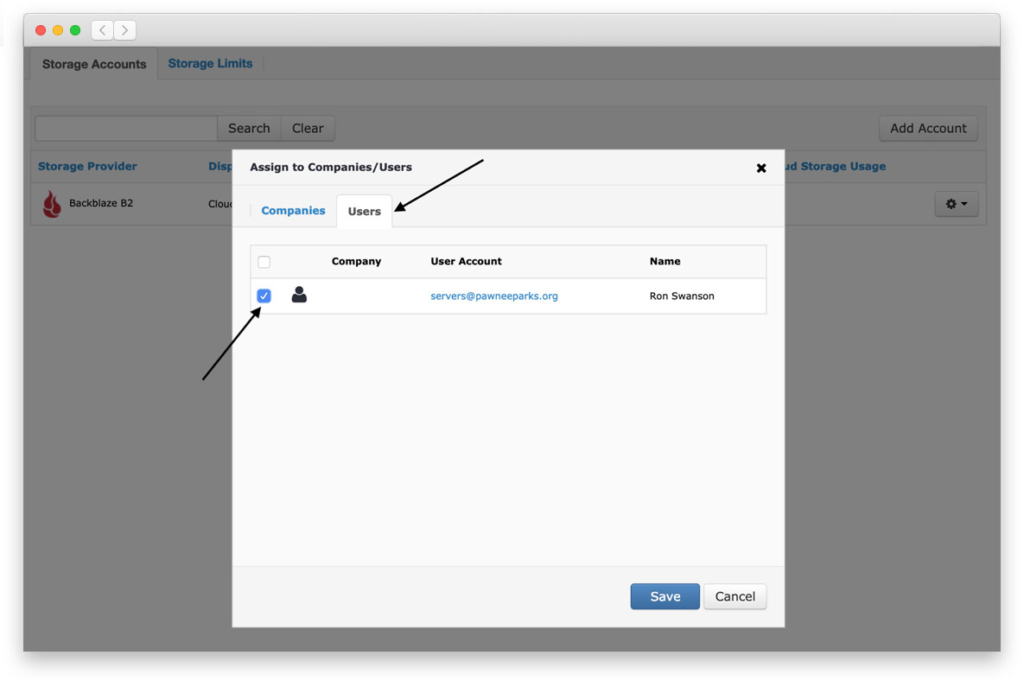
- You can then click on “Users” and select your user to allow them to use your B2 Cloud Storage bucket.
- You can now download and install the MSP360 client on your server. This will install a free, fully functional 15-day trial for your use. Now that you’ve created a connection between MSP360 Backup and Backblaze B2, you just have to follow the steps of the backup plan wizard to back up your Windows server. You can find out more about these options by viewing our complete Quickstart Guide for Multiple Server Backup with Backblaze B2 and MSP360.
Why You Should Choose Backblaze B2 and MSP360 to Back Up Your Windows Server
In short, there are four main reasons you should choose Backblaze B2 and MSP360 to back up your Windows servers: flexibility, control, cost, and a fast, self-serve setup.
- Flexibility: MSP360 has loads of options to help you customize what part of your Windows server you’re backing up, where it’s going, and how it gets there. Back up selected folders, include and exclude specific file types, exclude files that are greater than a specific size—it’s up to you.
- Control: You also have control over encryption, scheduling, and a host of other options to help tailor your Windows server backup. MSP360’s robust support of cloud storage services makes it a natural integration for Backblaze B2.
- Cost: While you need to purchase a separate license for MSP360’s backup application, you’ll find that the cost of MSP360 plus Backblaze’s extremely affordable B2 Cloud Storage at $6/TB per month is still more cost-effective than other all-in-one solutions. By choosing Backblaze B2 as your cloud storage target for MSP360’s client application, you’ll save up to 75% over the cost of Amazon S3, Google Cloud, and Microsoft Azure.
- Fast, Self-serve Setup: Most users can get set up in under 30 minutes on their own using our Quickstart Guides. If you need help getting set up, you can always contact our Sales team for additional support, but be sure to check out our Quickstart Guides first (for single server backup or multiple server backup with Backblaze B2 and MSP360).
Once your backup plan is in place, you can sleep easier at night knowing your Windows server is protected from a data disaster—all without breaking the bank.
Editor’s Note: This post refers to past pricing; please refer to Backblaze Pricing Comparison.