How to Use Rclone with Backblaze B2 Cloud Storage
- Print
- DarkLight
How to Use Rclone with Backblaze B2 Cloud Storage
- Print
- DarkLight
Article summary
Did you find this summary helpful?
Thank you for your feedback
Rclone is a third-party integration that you can use with Backblaze B2 Cloud Storage.
View the following short tutorial to quickly get up and running with Rclone and Backblaze B2.
Enable Backblaze B2
Before you begin: You must have a Backblaze B2 Cloud Storage account. If you already have a Backblaze account and the left navigation menu contains a B2 Cloud Storage section, your account is already enabled for Backblaze B2.
- Sign in to the Backblaze web console.
- In the user menu in the upper-right corner of the page, select My Settings.
- Under Enabled Products, select the checkbox to enable B2 Cloud Storage.
- Review the Terms and Conditions, and click OK to accept them.
Create a Bucket
Sign in to the Backblaze web console.
In the left navigation menu under B2 Cloud Storage, click Buckets.
Click Create a Bucket.
Enter a name for your bucket.
A message is displayed if your bucket name is already in use.Select a privacy setting: Private or Public.
Note
You can change a bucket's privacy settings at any time.
Files that are in a private bucket require authentication to perform an action, for example, downloading.
Public buckets do not require authentication so you can easily access files. If this is your first time creating a public bucket, complete the following tasks to ensure that you have the correct permissions to create a public bucket:
Verify your email address.
Have a payment history on file, or use the credit card form to pay a small fee that is credited to your account balance.
If applicable, enable a Backblaze B2 server-side encryption key.
Enable Object Lock to restrict a file from being modified or deleted for a specified period of time.
Click Create a Bucket, and copy the value that is in the Endpoint field; you may need this value later.
Click Lifecycle Settings to control how long to keep the files in your new bucket.
Create an Application Key
Sign in to the Backblaze web console.
In the left navigation menu under B2 Cloud Storage, click Application Keys.
Click Add a New Application Key, and enter an app key name.
You cannot search an app key by this name; therefore, app key names are not required to be globally unique. Key names are limited to 100 characters and can contain letters, numbers, and "-", but not I18N characters, such as é, à, and ü.Select All or select a specific bucket in the Allow Access to Bucket(s) menu.
If you select a specific bucket, you can also select Allow List All Bucket Names.
This option is required for the B2 Native API b2_list_buckets and the S3-Compatible API S3 List Buckets operations.
(Optional) Select your access type (Read and Write, Read Only, or Write Only).
(Optional) Enter a file name prefix to restrict application key access only to files with that prefix.
Depending on what you selected in step #4, this limits application key access to files with the specified prefix for all buckets or just the selected bucket.(Optional) Enter a positive integer to limit the time, in seconds, before the application key expires.
The value must be less than 1000 days (in seconds).Click Create New Key, and note the resulting keyID and applicationKey values.
Note
When you create a new app key, the response contains the actual key string, for example N2Zug0evLcHDlh_L0Z0AJhiGGdY. You can always find the keyID on this page, but for security, the applicationKey appears only once. Make sure you copy and securely save this value elsewhere.
Create and Install Rclone
Download Rclone here or, depending on your operating system, install it from your system's default repository:
- Linux:
yum install rclone - Mac:
brew install rclone - Windows:
choco install rclone - Debian:
apt install rclone
Configure Rclone
- Open a command prompt or terminal window, and enter the following command:
rclone configYou will see your currently configured accounts (if any) and a list of the menu commands.
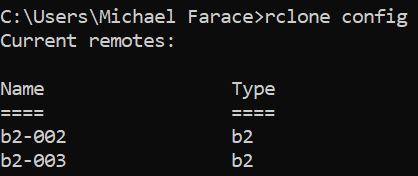
- To create a new configuration, enter n for new, and enter a name for the configuration. A list of cloud accounts is shown. Each account has an alias and a number.
This name is used in every command so short descriptive names are best. This guide uses "b2."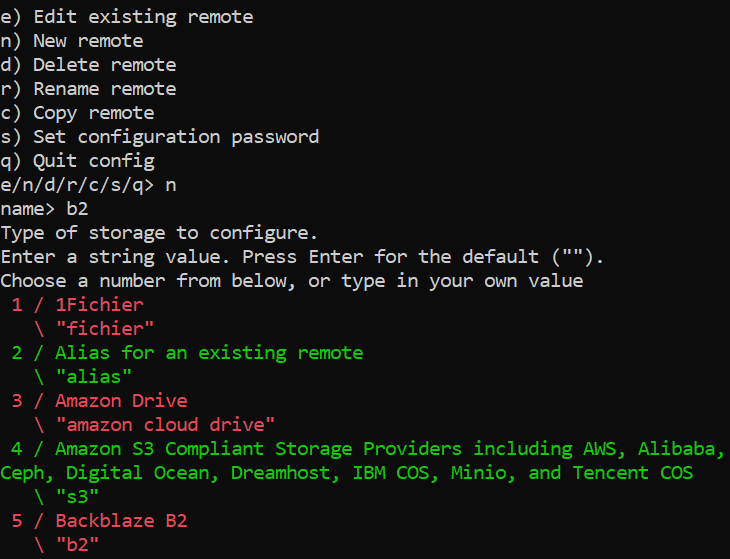
- Choose the number or alias of the account you want to use.
- Enter your App key and Key ID, and press Enter at the hard_delete prompt to accept the default.
- Press Enter again to skip the advanced configuration page.
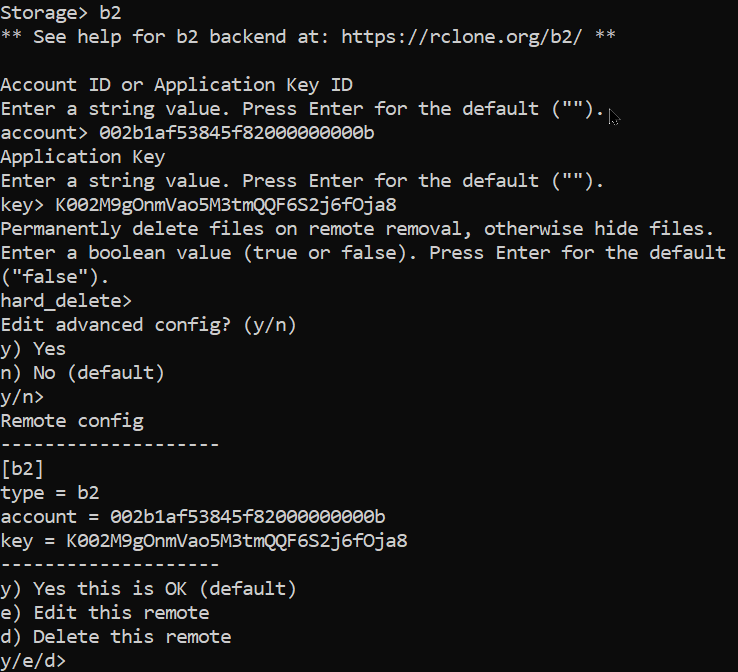 You can edit the configuration at any time to review or change options.
 - Review the configuration summary screen, and press Enter to accept it.
- To test the configuration, enter the following command to list all of the buckets in your account:
rclone lsd b2:
Use the Rclone Text-Based GUI to Browse Buckets and Files
Rclone has a text-based GUI inspired by Norton Commander, called ncdu.
- Enter the following command to browse the buckets that are in your account.
rclone ncdu b2: If the ncdu command encounters difficulty with files or directory structures it displays errors. Press Ctrl+L on Linux or MacOS, or resize the DOS window to clear the screen.
 - Navigate to a bucket, and press Enter to browse the files in the bucket.
- Press ? to see a list of all of the commands.

Use the Rclone Web GUI to Configure or Browse Buckets
Rclone also has a web interface. The Rclone web interface is experimental.
- Enter the following command to access the Rclone web interface:
rclone rcd --rc-web-gui - Select Configs in the left navigation menu to browse, edit, or add new configs.
- Select Explorer in the left navigation menu, and select an account to browse buckets.
Useful Commands
lsd- Lists buckets/directories (depending on whether you are at the top level in your account or inside a bucket).ls- Lists files.mkdir- Creates a bucket/directory. Buckets are automatically “private.”copy- Copies files.sync- Syncs files. This creates a mirror copy so both sides match.
Examples
The following examples show commands to perform common tasks.
Note:
The following examples use sample directory and configuration names.
List Directories
rclone lsd b2:List Buckets and Files
rclone ls b2:my-bucketCreate a New Bucket
rclone mkdir b2:new-unique-bucketCreate a New Folder
rclone mkdir b2:my-bucket/new folderCopy or Sync Files
rclone copy myfiles.zip b2:mybucketrclone sync C:\Downloads b2:mybucket/DownloadsCopy or Sync from Backblaze B2 to a Local File System
rclone copy b2:mybucket/myfiles.zip /home/mfaracerclone sync b2:mybucket/downloads /home/mfarace/downloadsFast List Option
By default, Rclone lists the contents of a Backblaze B2 bucket one directory at a time (one directory per API call). But, with the --fast-list option, it retrieves a listing of all of the files in the bucket, consuming just one API call per 1,000 files. The --fast-list option uses more memory, but it consumes fewer API transactions. Therefore, Backblaze strongly recommends that you use this option with every Rclone command.
You can set an environment variable so you do not need to include the flag every time you enter an Rclone command:
export RCLONE_FAST_LIST=1For more information about the fast-list option, see the Rclone guide here.
Performance
Parallel File Transfers
The --transfers flag controls how many files Rclone transfers simultaneously. This is useful when uploading or downloading multiple files at once. The default is four concurrent file transfers.
Example:
rclone --transfers 10 copy my-folder/ b2:mybucketFor most connections, 10–20 transfers is sufficient. If you have an Internet connection that is 100 Mbps or faster, you can try 50–100 transfers. More transfers use more memory. If you are transferring files over a long distance, increasing the number of transfers helps compensate for latency.
Multipart Upload Concurrency
When uploading large files, Rclone splits them into chunks and uploads the chunks as a multipart upload. The --b2-upload-concurrency flag controls how many chunks Rclone uploads simultaneously for each large file. The default is four concurrent chunk uploads.
Example:
rclone --b2-upload-concurrency 8 copy large-file.iso b2:mybucketYou can combine both flags to maximize throughput when uploading many large files:
rclone --transfers 10 --b2-upload-concurrency 8 copy my-folder/ b2:mybucketRclone Mount
Rclone Mount allows you to mount a bucket from your account to a local directory. To use Rclone Mount, you must install a Filesystem in Userspace (FUSE) layer on your operating system. FUSE is a software interface for Unix and Unix-like computer operating systems that lets non-privileged users create their own file systems without editing kernel code.
Install Rclone Mount
You can install Rclone Mount using the following steps based on your operating system.
MacOS
For Catalina (10.15) use OSXFuse 3.10.6. Starting with OSXFuse 3.11, there are changes for OSX 11 / BigSur and Intel Silicon chip support that cause problems for OSX 10.x.
Use Homebrew to install Rclone Mount using the brew install rclone command or download the Mac DMG.
Example:
On Mac, use the “mount2” command, instead of “mount.” Commands otherwise work exactly the same as on Linux systems.
rclone mount2 b2:mybucket /Users/mfarace/b2bucketLinux
For Linux, the FUSE file system is bundled with s3fs in linux repositories, so install s3fs-fuse, and then install Rclone.
Example:
sudo apt-get install s3fs-fuse rclonesudo apt-get install rcloneOn Linux systems, you must mount the bucket to an empty directory. Rclone Mount runs in the foreground by default. On Linux systems, the --daemon option runs Rclone Mount as a background process.
Use case #1 - Mount a read-only bucket
mkdir /mnt/b2bucketrclone mount b2:fuse-mf1 /mnt/b2bucket --daemonUse case #2 - Mount a bucket for writes
rclone mount --vfs-cache-mode writes b2:fuse-mf1 /mnt/b2bucket --daemonApplications expect to be able to write into the middle of a file; they cannot do so without this option.
Windows
For Windows, install winfsp for the same functionality as FUSE has on Mac/Linux. You can choose github or a chocolatey repository as safe sources to install from.
Example:
Windows does not have the option to run Rclone Mount in the background. You can give it a volume name and assign it a drive letter, which is not available on Mac or Linux. If you want to mount the bucket to a directory, the directory must not exist, and also must not be at the top level of a drive. It must be a non-existent sub-directory. All other options work the same.
rclone mount b2:fuse-mf1 Z: -o volname=B2bucketrclone mount b2:fuse-mf1 C:\Users\mfarace\non-existent-directoryAdjust Performance for Rclone Mount
If you experience performance issues, adjust the Rclone Mount options as shown in the following example:
Vfs-cache-mode:          disabled  (read only mode)


Vfs-read-chunk-size:     128 MB    (read objects from the buckets in chunks)


Dir-cache-time:          5 mins    (limits how often a bucket is scanned)


Vfs-cache-poll-interval: 1 min     (when to check cache for file changes)


Vfs-cache-max-age:       1 hour
“VFS Cache Mode” is disabled by default. Enabling VFS Cacha Mode uses memory to improve file operations.
Additional options:
--vfs-cache-mode=minimal   (minimal read/write buffering to disk, but not enough to do seeks in a file that is open, and if an upload fails, it won’t retry).


--vfs-cache-mode=writes     (writes are buffers but reads are not)


--vfs-cache-mode=full       (reads and writes are buffered)


--vfs-cache-mode full       (no equal sign on Windows)
Vfs cache mode is important when you copy large files to and from your mounted bucket. If you are on Windows, the following example shows the suggested command:
rclone --vfs-cache-mode full --transfers 40 mount b2:fuse-mf1 Z:The following options can also be adjusted as needed to improve performance:
--buffer-size        VFS cache size buffered in memory


--vfs-read-ahead      VFS cache size buffered to disk


--dir-cache-time 60m   Use to minimize bucket reads on buckets that rarely change.
Advanced Options
--bw-limit           Limits the maximum bandwidth rclone can use.


--no-modtime          Don't read/write the modification time (can speed things up)


--use-server-modtime   Use the server’s recorded time of the file modification
Was this article helpful?