How to Forward Backblaze B2 Event Notifications from SNS to Lambda
- Print
- DarkLight
How to Forward Backblaze B2 Event Notifications from SNS to Lambda
- Print
- DarkLight
Article summary
Did you find this summary helpful?
Thank you for your feedback
If you use Amazon S3, you may have integrations that run in AWS that rely on event notifications through Amazon SNS topics or Amazon SQS queues. This tutorial shows you how to deploy a serverless function in AWS Lambda to forward incoming event notification messages from Backblaze B2 Cloud Storage to an Amazon SNS topic or an Amazon SQS queue (depending on which of those options you choose) using the same message structure as Amazon S3. This approach may allow you to migrate data from Amazon S3 to Backblaze B2 while making few or no changes to your integrations in AWS.
Note
The code in this tutorial assumes that all AWS resources are located in the same region. As you create each resource, verify that you are in the same AWS region (this is shown in the upper-right corner of the AWS console).
Note
To enable this feature, contact the Support team to request access.
Currently, Group admins cannot manage Event Notification rules in a Group member’s account.
Currently, Group admins cannot manage Event Notification rules in a Group member’s account.
Create an Amazon SNS Topic
- Sign in to the AWS console, and go to the Amazon SNS Topics page.
- Create an SNS topic.
- Click Create topic.
- For purposes of this guide, select Standard as the type since it allows a wider range of subscription protocols.
- Enter a topic name.
- Optionally, enter a display name.
- Scroll to the bottom of the page, and click Create topic.
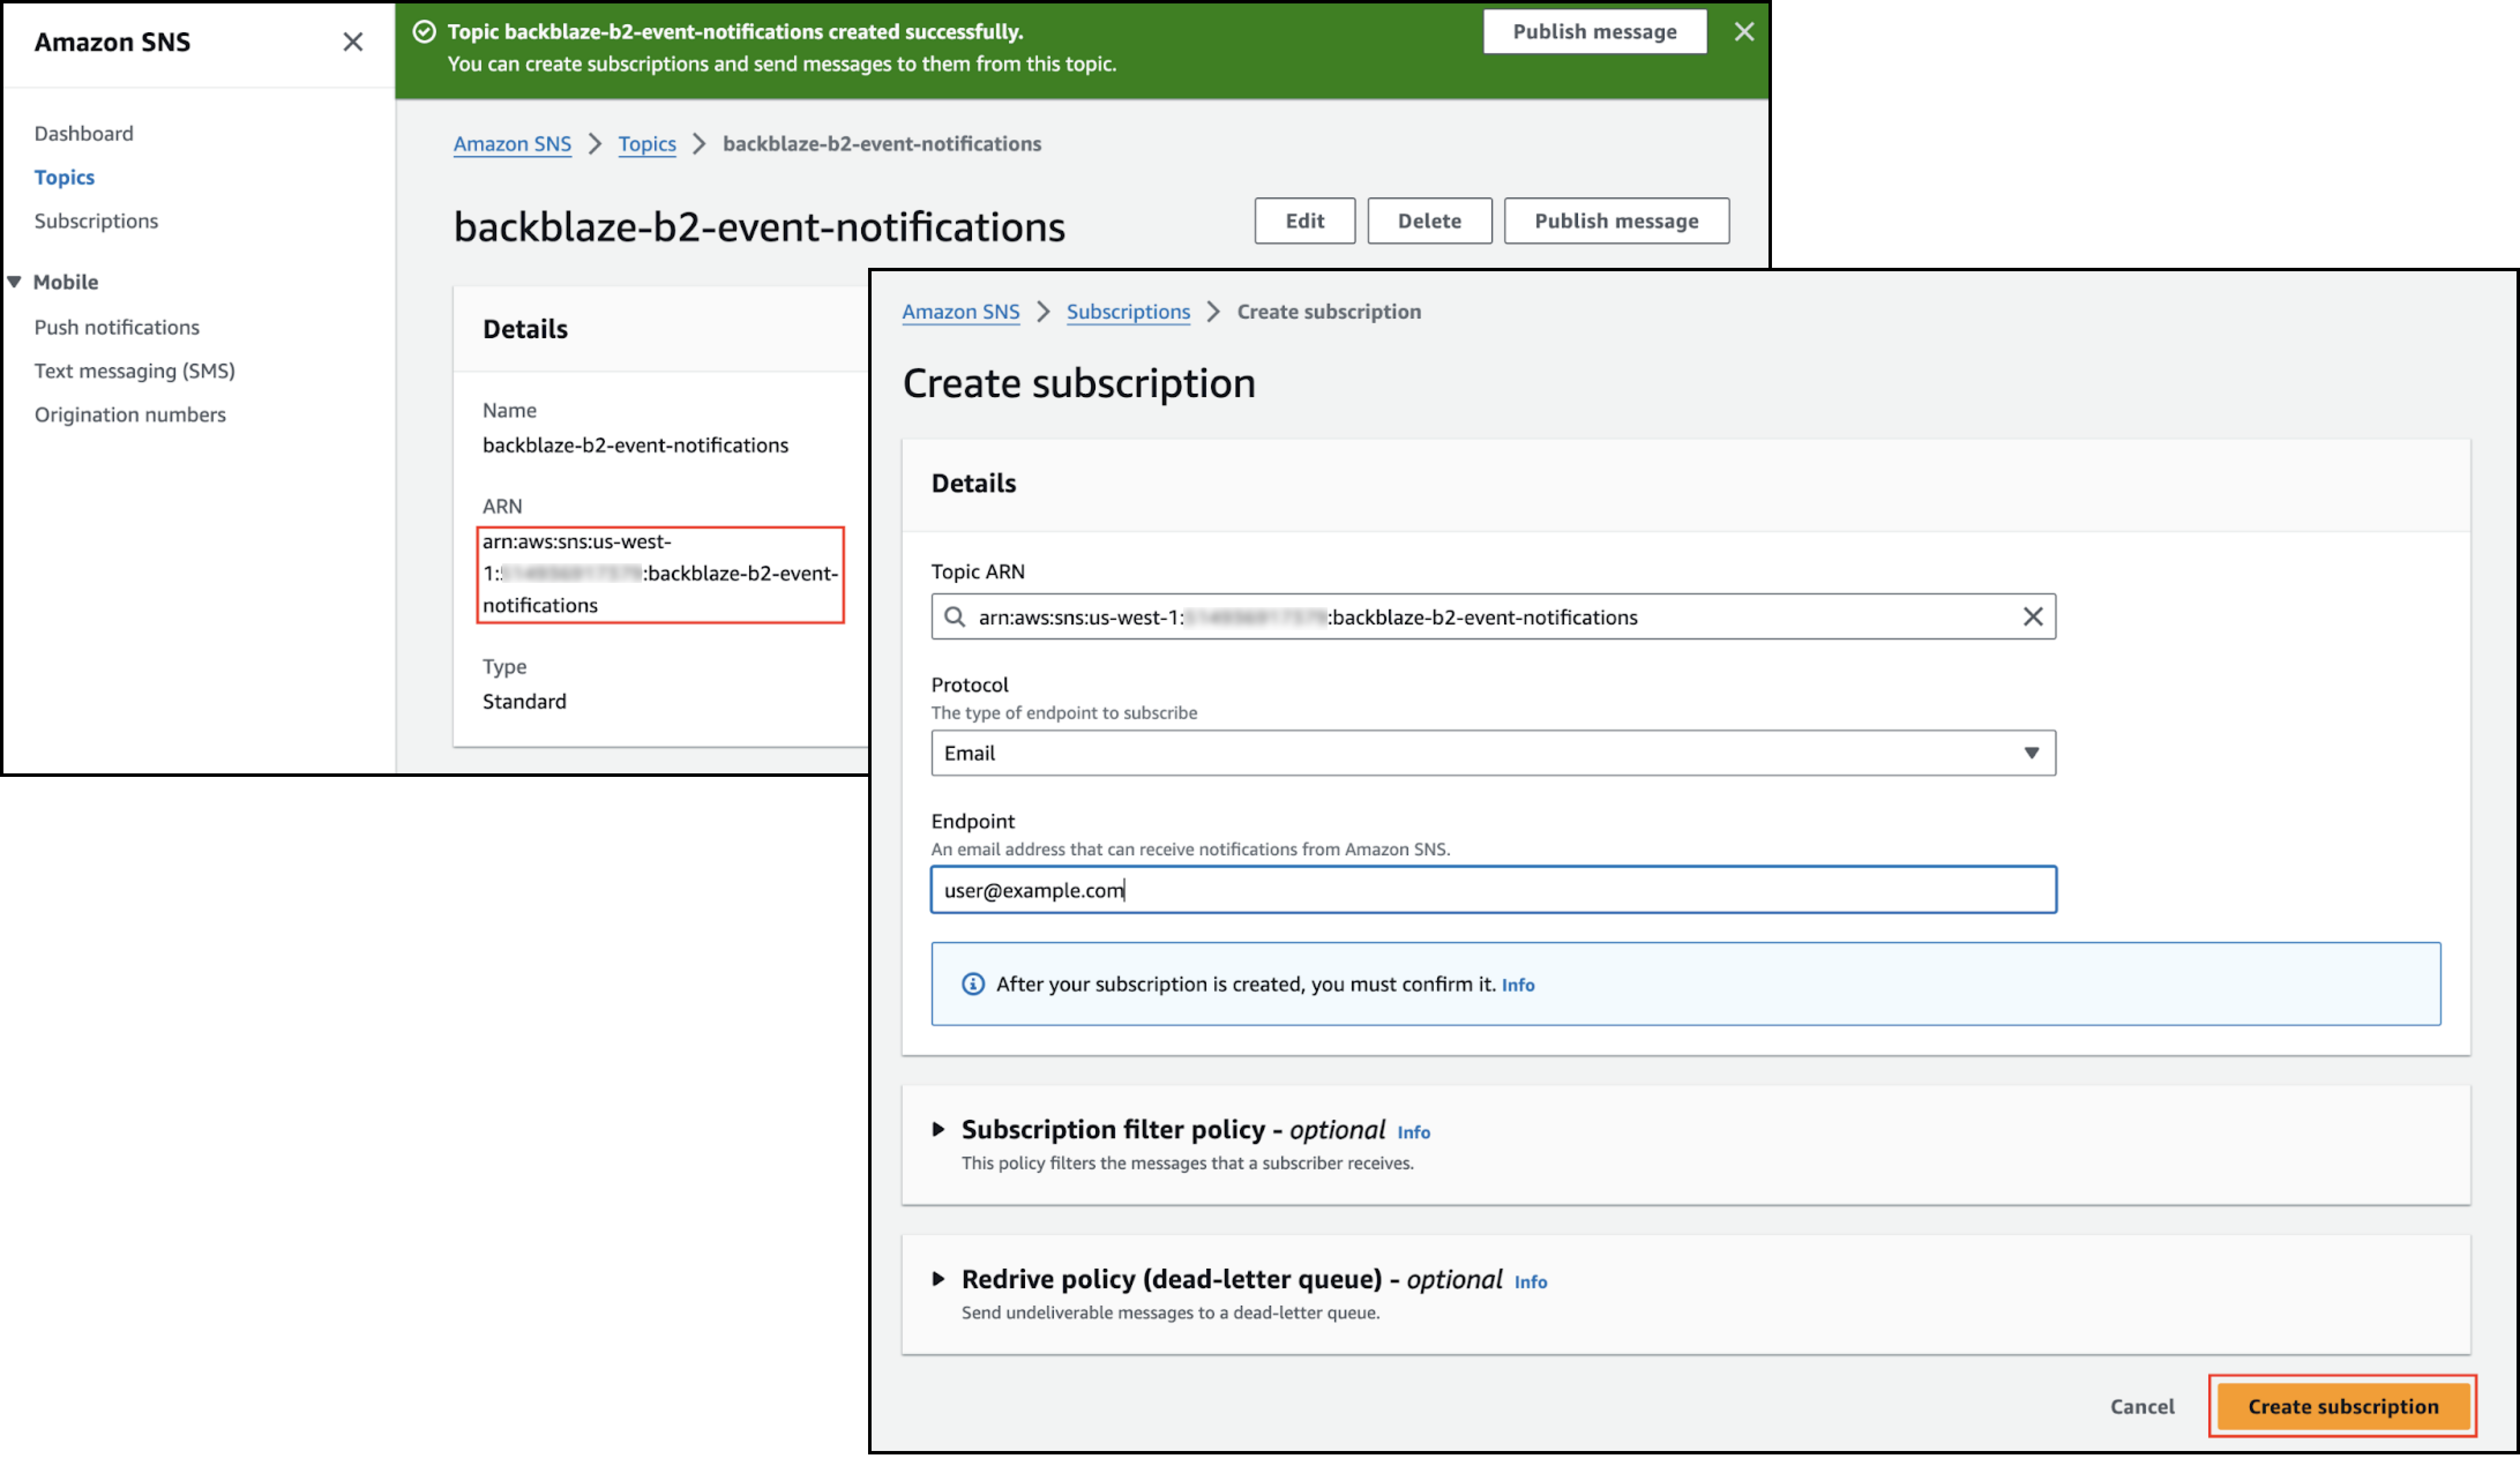
- Copy the topic's ARN value, and save it for use in another step.
- Create a subscription.
- Click Create subscription.
- For purposes of this guide, select Email as the protocol.
- Enter your email address as the endpoint.
- Click Create subscription.
- Check your email inbox for the SNS subscription confirmation email.
- Click Confirm subscription in the email.
An email is sent to you whenever a message is sent to your SNS topic.
Create an Amazon SQS Queue
- Sign in to the AWS console, and go to the Amazon SQS Queue page.
- Create a queue.
- Click Create queue.
- For purposes of this guide, select Standard as the type.
- Enter a queue name.
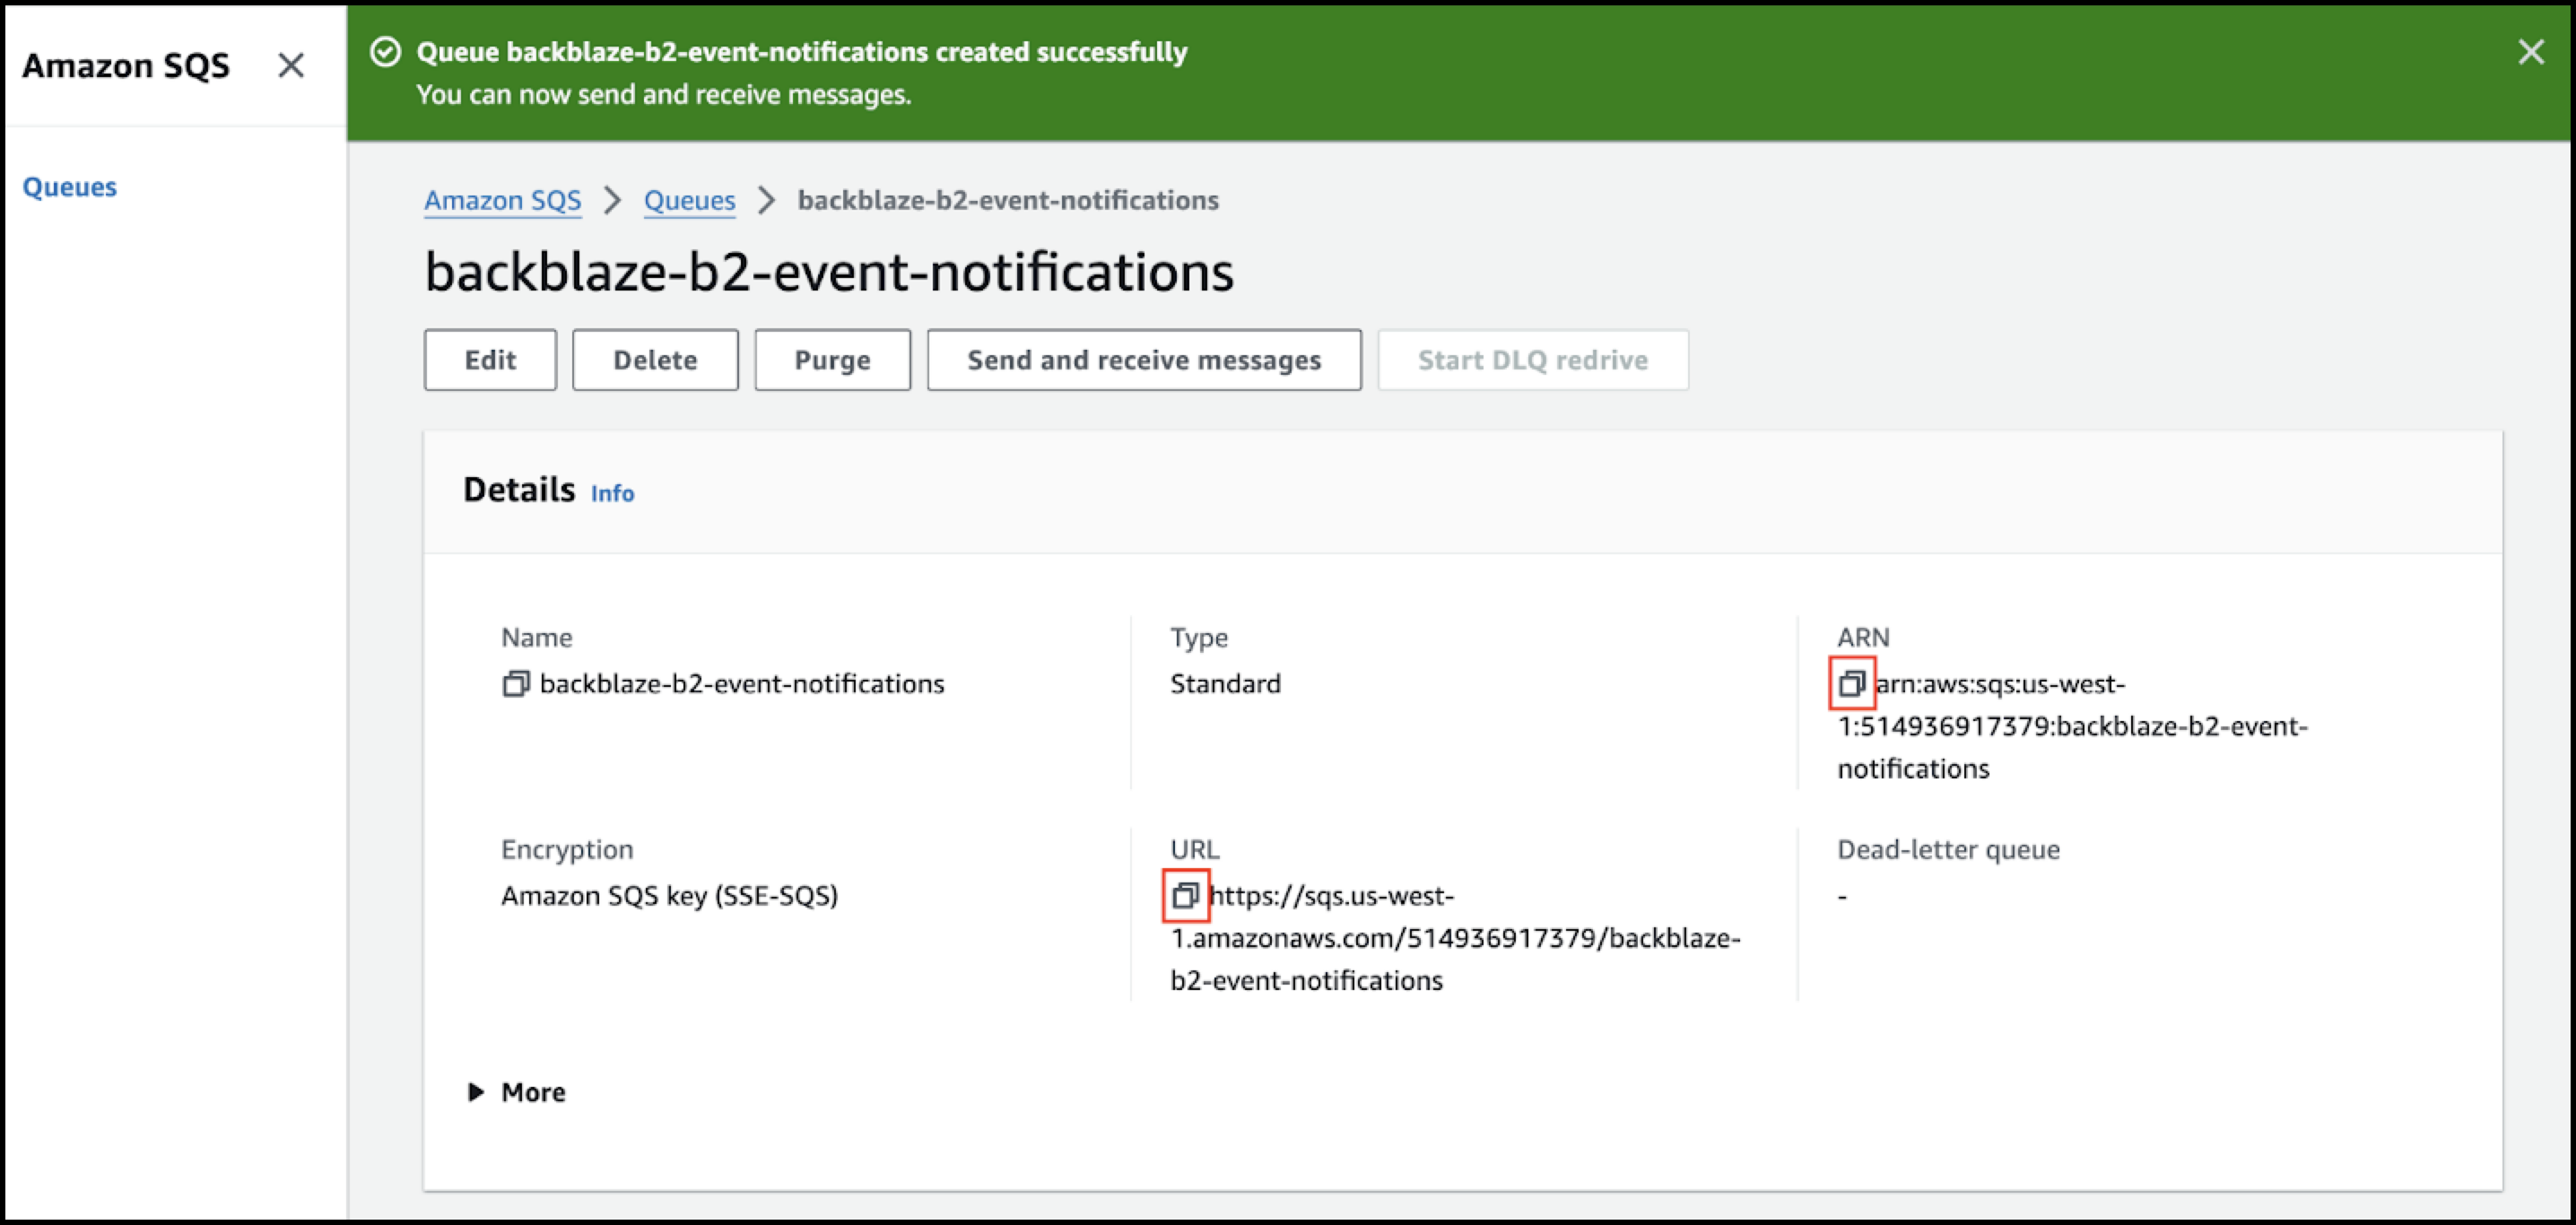
- Scroll to the bottom of the page, and click Create queue.
- Copy both of the queue's ARN and URL values, and save them for use in another step.
Create an AWS Lambda Function
- Sign in to the AWS console, and go to https://console.aws.amazon.com/lambda/home.
- Create a function.
- Click Create Function.
- Leave Author from scratch as the default value.
- Enter a function name.
- Select Python 3.12 as the Runtime.
- If necessary, scroll to and select Advanced Settings.
- Select Enable function URL.
- Select None as the auth type.
You will implement your own authorization logic in your function. - Click Create function.
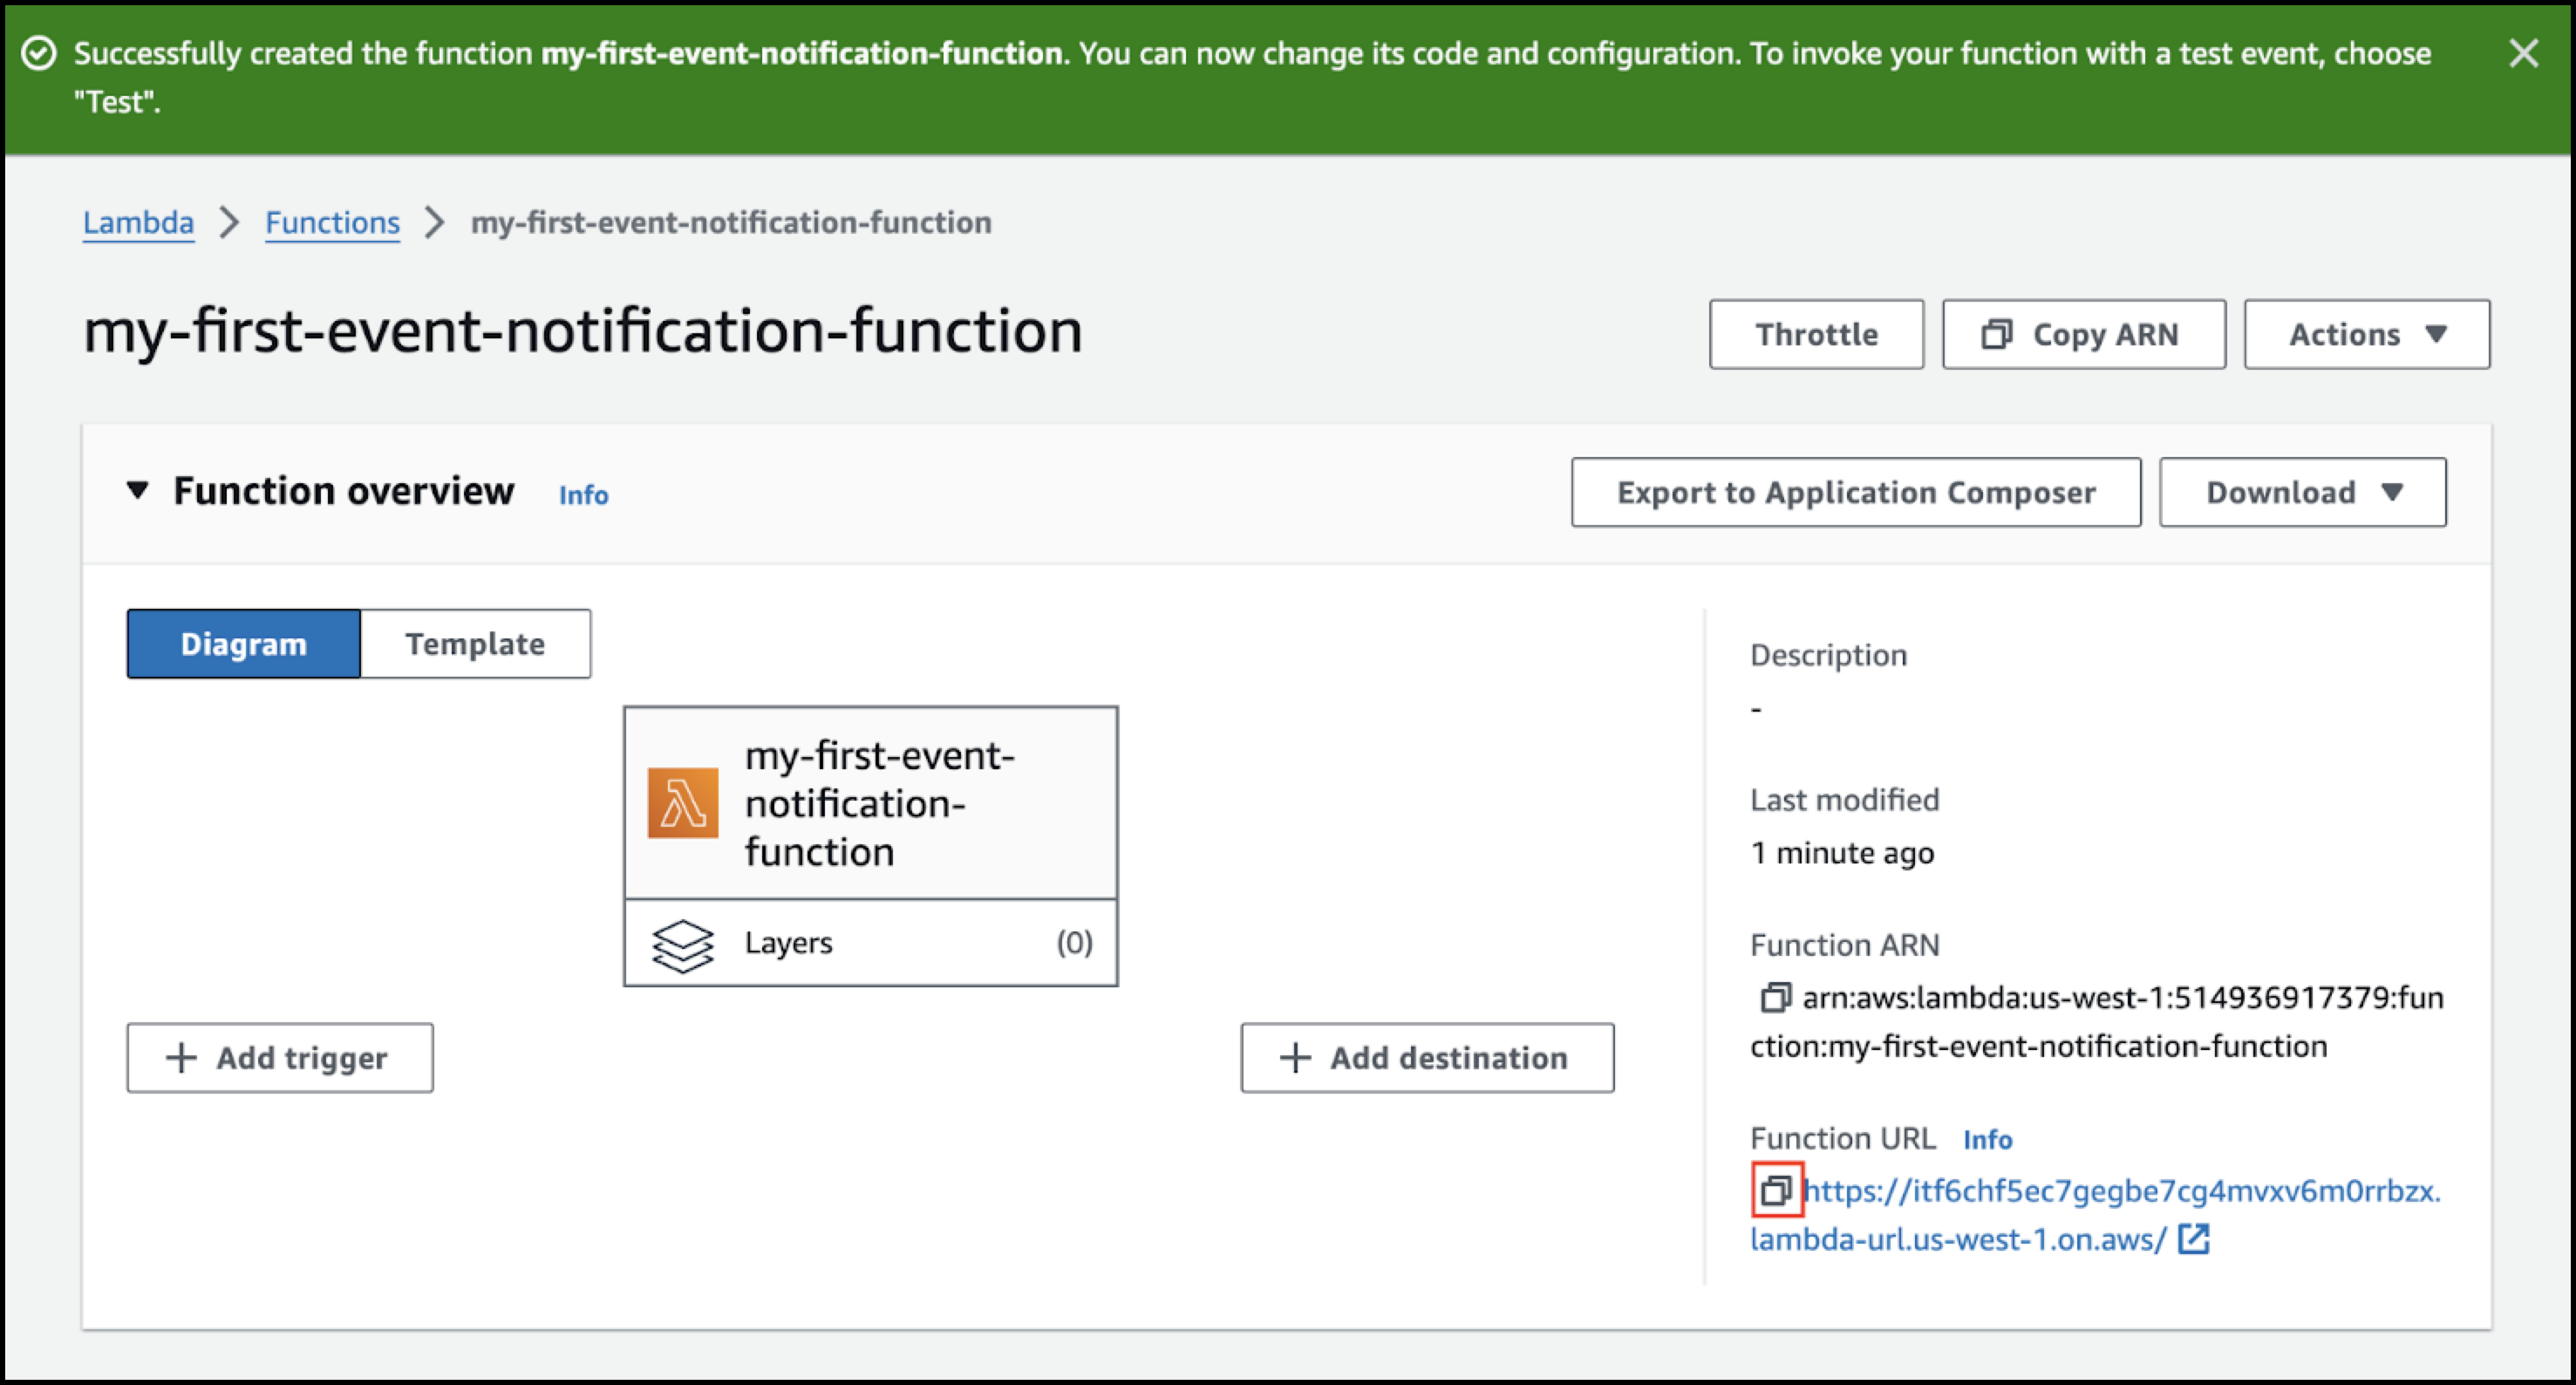
The default “Hello World” example returns an HTTP 200 status code with a JSON body, so it suffices for testing the event notification rule.
- In the Function URL field, click
 (copy) and save the value.
Edit and Test your Event Notification Rule
- Sign in to your Backblaze account.
- In the left navigation menu under B2 Cloud Storage, click Buckets.
- Click Edit Event Notification.
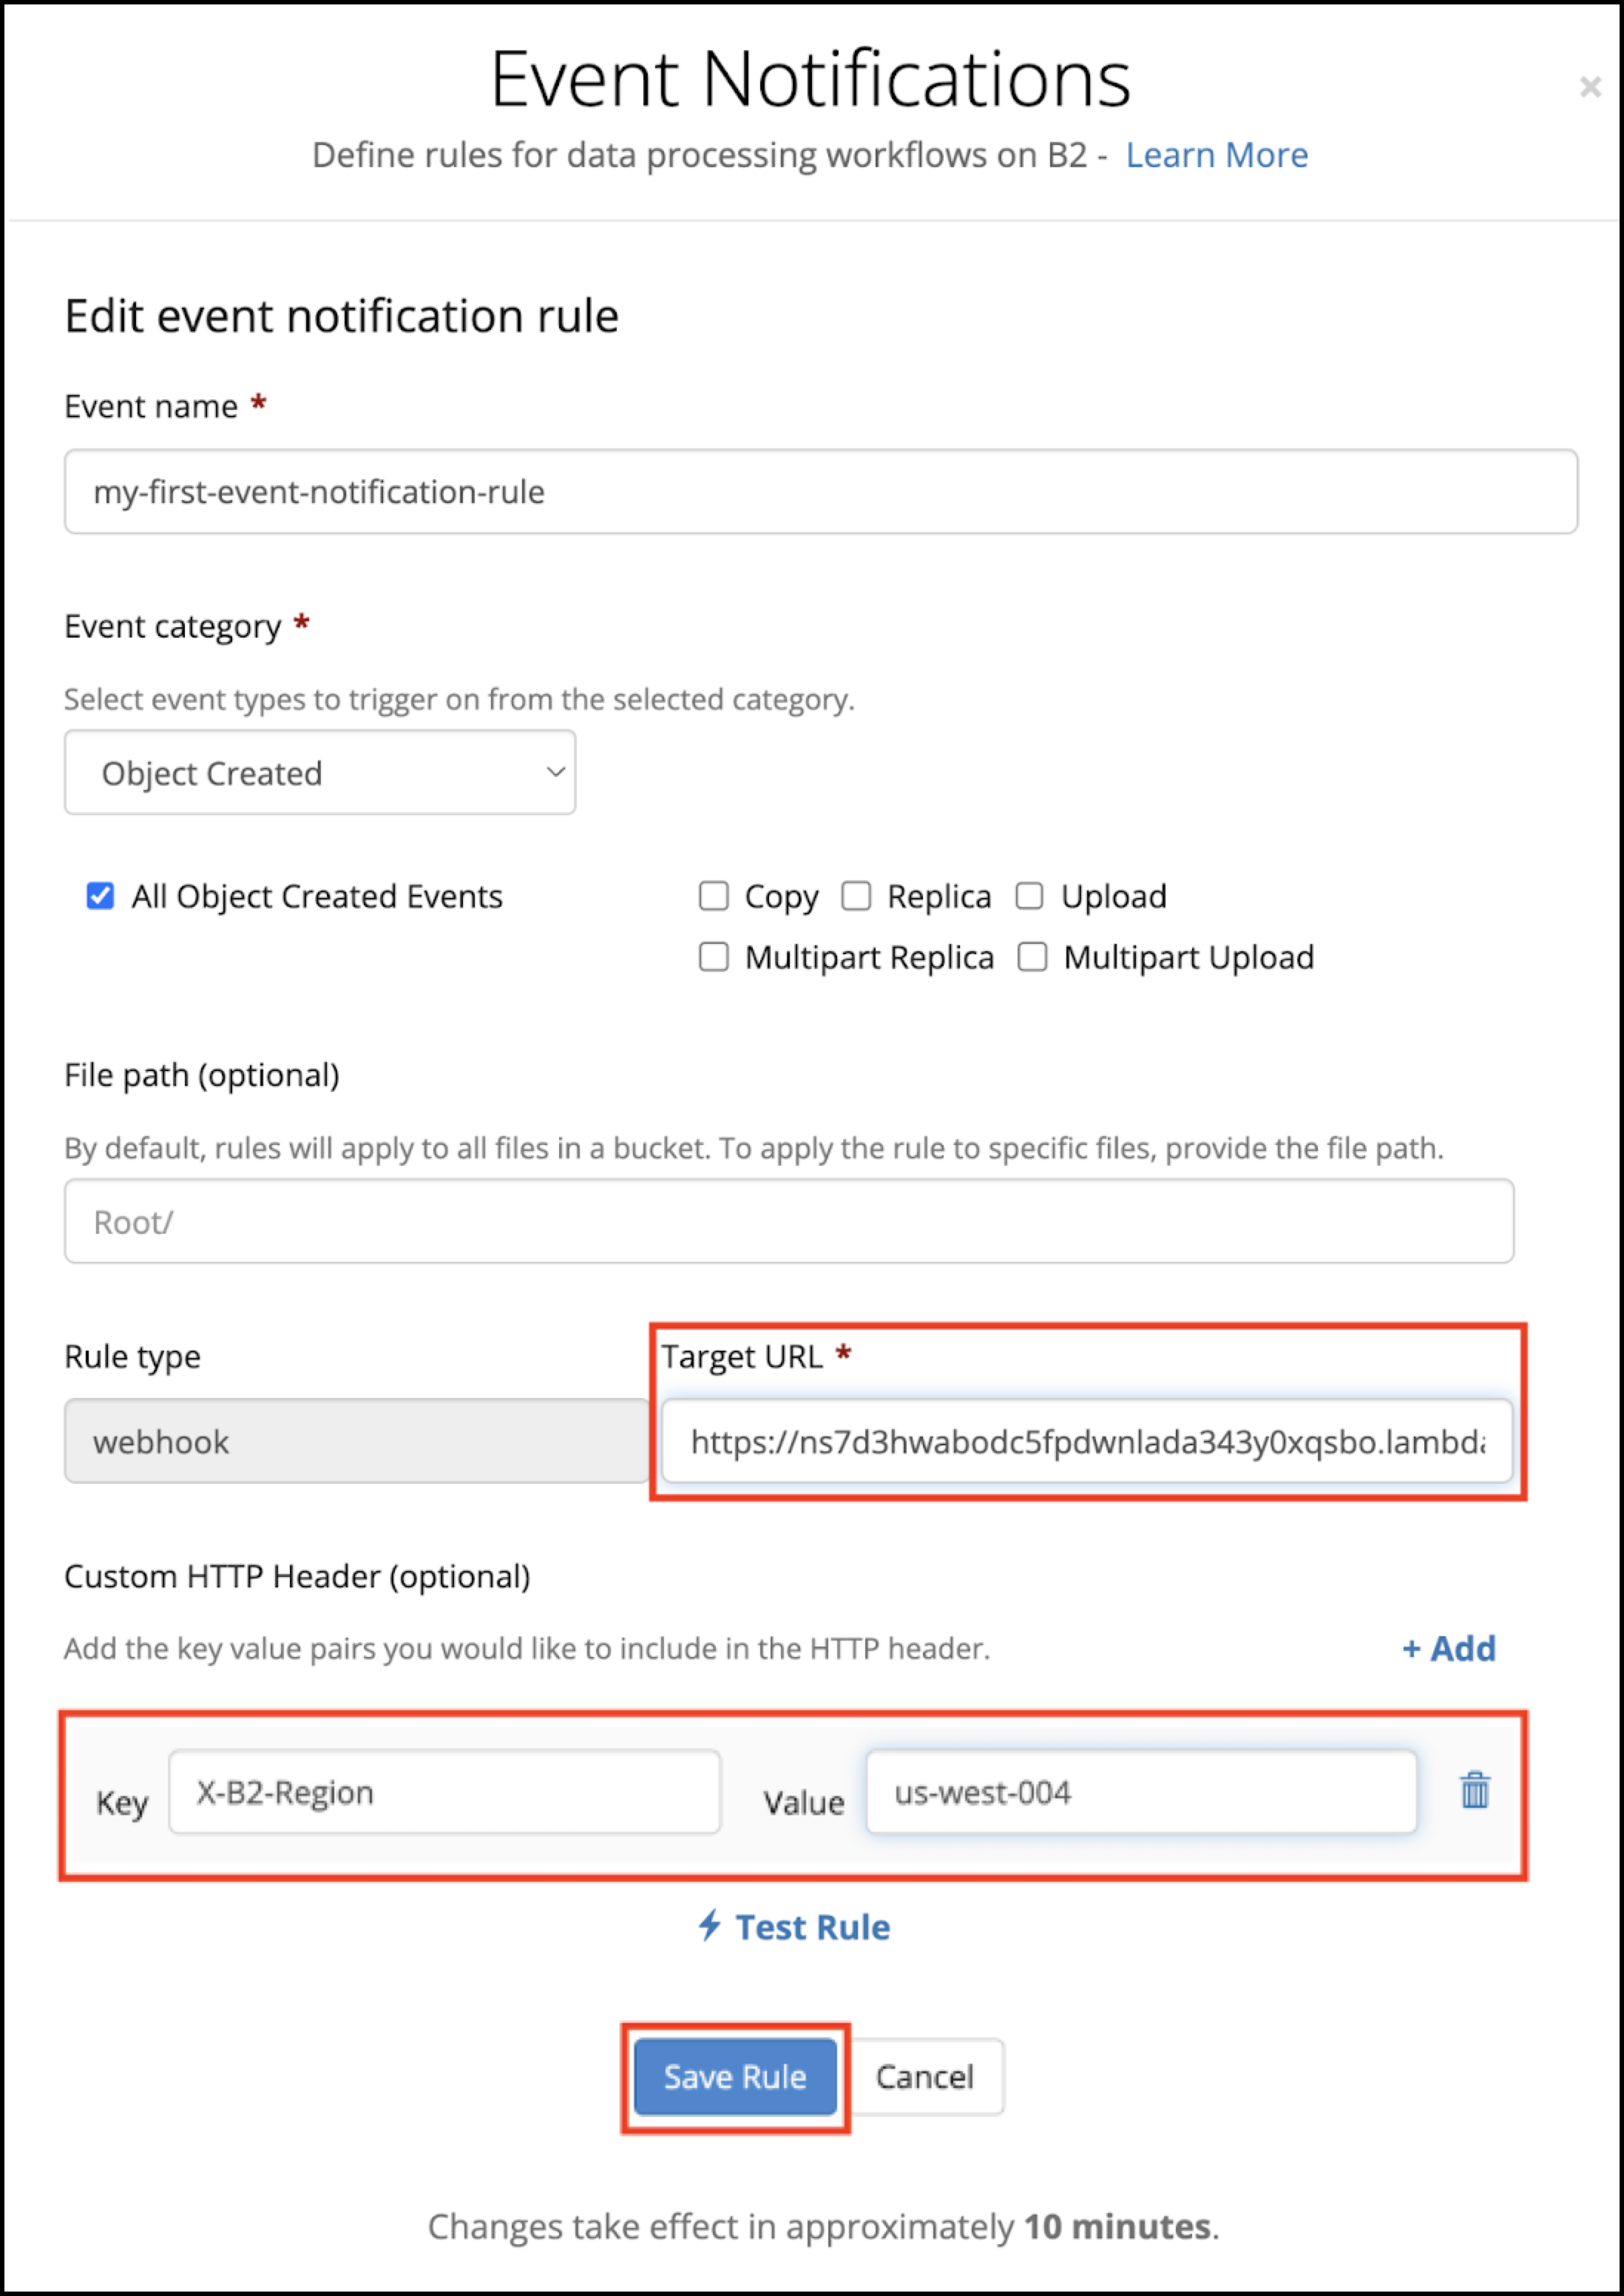
- Replace the Target URL with your Lambda function URL that you copied in a previous step.
- Click Test Rule.
A success message is displayed if there are no errors. - In the Custom HTTP Header section, enter X-B2-Region as the Key.
- In the Value field, enter the region from your bucket’s endpoint. For example, in the endpoint “s3.us-west-004.backblazeb2.com,” the region is “us-west-004.”
- Click Save Rule, and close the Event Notifications dialog.
Assign a New Permission to the AWS Lambda Function
Now you need to give your Lambda function permission to publish to your SNS topic or SQS queue.
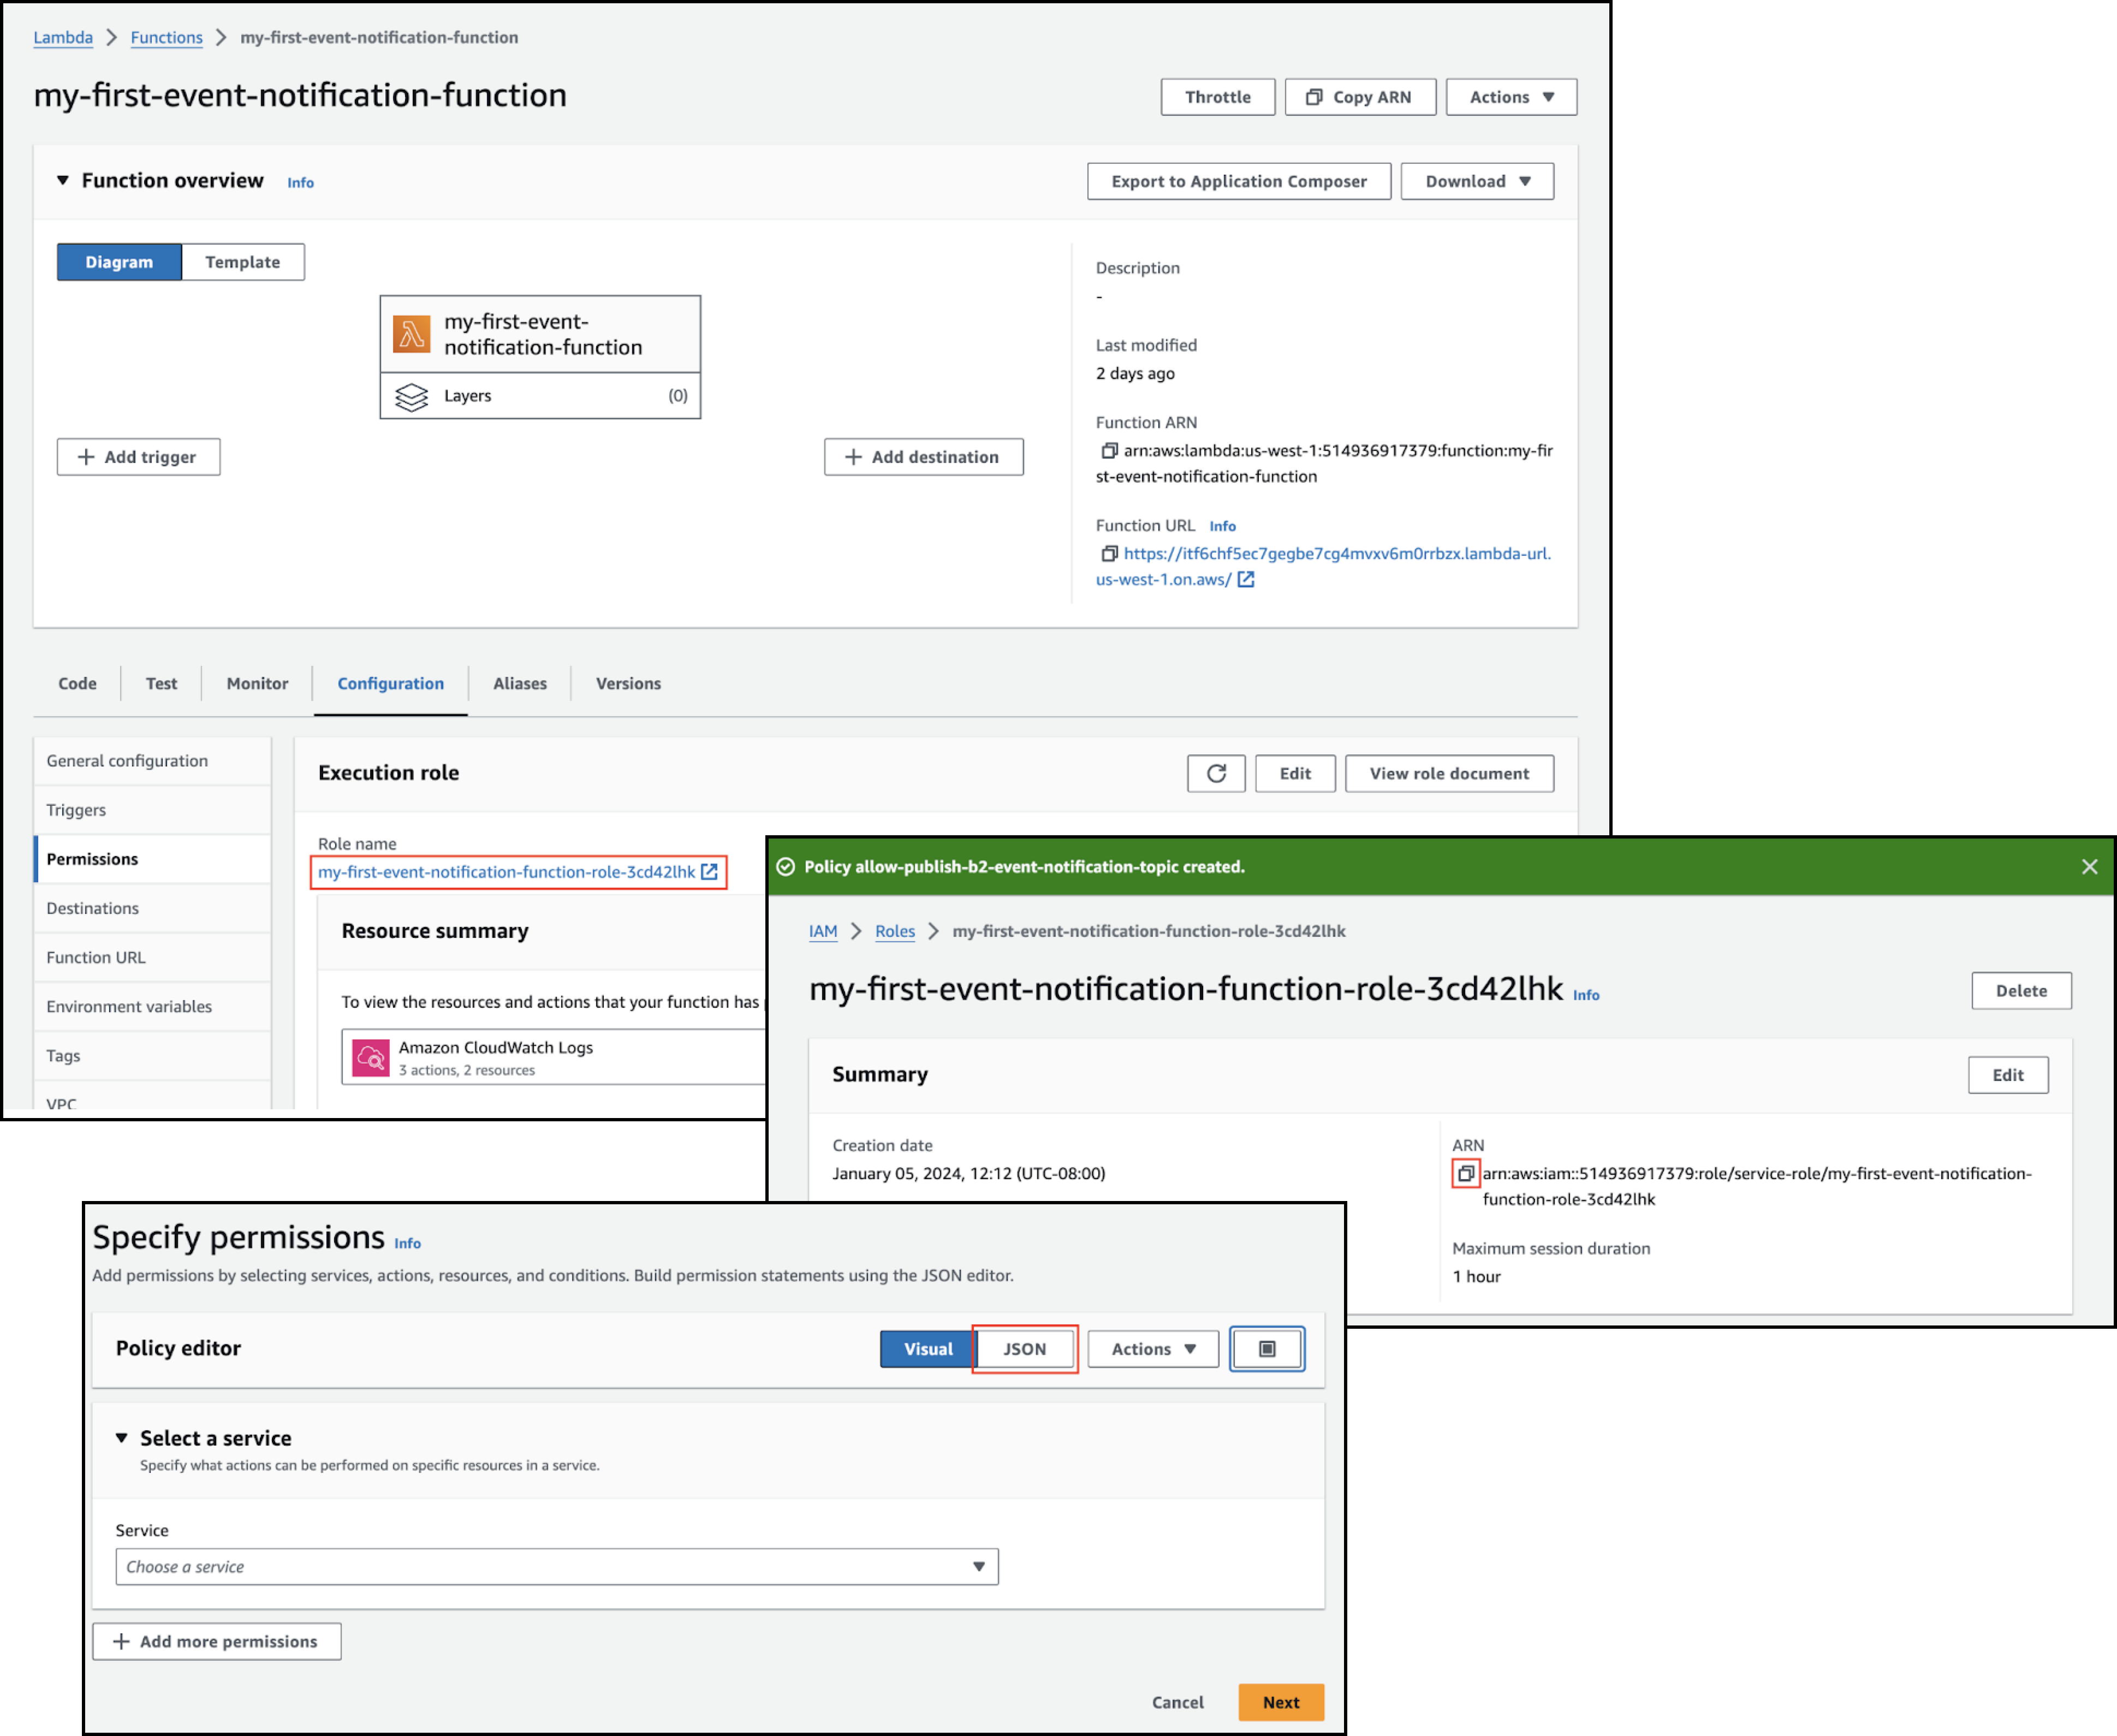
- In your AWS Lambda Console, select the Configuration tab.
- Click Permissions in the left menu.
- Click the link under Role name to open the Lambda function’s execution role page.
- Copy the execution role’s ARN, and save it for use in a later step.
- Scroll to and select the Add Permissions menu, click Create inline policy, and click JSON.
- If you created an SNS topic, replace the policy editor template with the following JSON, replacing the Resource value with the SNS topic ARN that you copied earlier.
{ "Version": "2012-10-17", "Statement": [ { "Sid": "PublishSNSMessage", "Effect": "Allow", "Action": "sns:Publish", "Resource": "<sns-topic-arn>" } ] } - If you created an SQS queue, replace the policy editor template with the following JSON, replacing the Resource value with the SQS queue ARN that you copied earlier.
{ "Version": "2012-10-17", "Statement": [ { "Sid": "SendSQSMessage", "Effect": "Allow", "Action": "sqs:SendMessage", "Resource": "<sqs-queue-arn>" } ] } - Click Next.
- Enter a policy name.
- Click Create policy.
Add the Signing Secret to AWS Secrets Manager
You should securely store credentials such as the event notification rule’s signing secret rather than simply pasting the value into source code. Create a secret in AWS Secrets Manager for this purpose.
- Sign in to the AWS console, and go to https://console.aws.amazon.com/secretsmanager/listsecrets.
- Click Store a new secret.
- Select Other type of secret as the secret type.
- Enter SigningSecret as the key, and enter the value of the secret that you copied from the Event Notifications dialog earlier.
- Click Next.
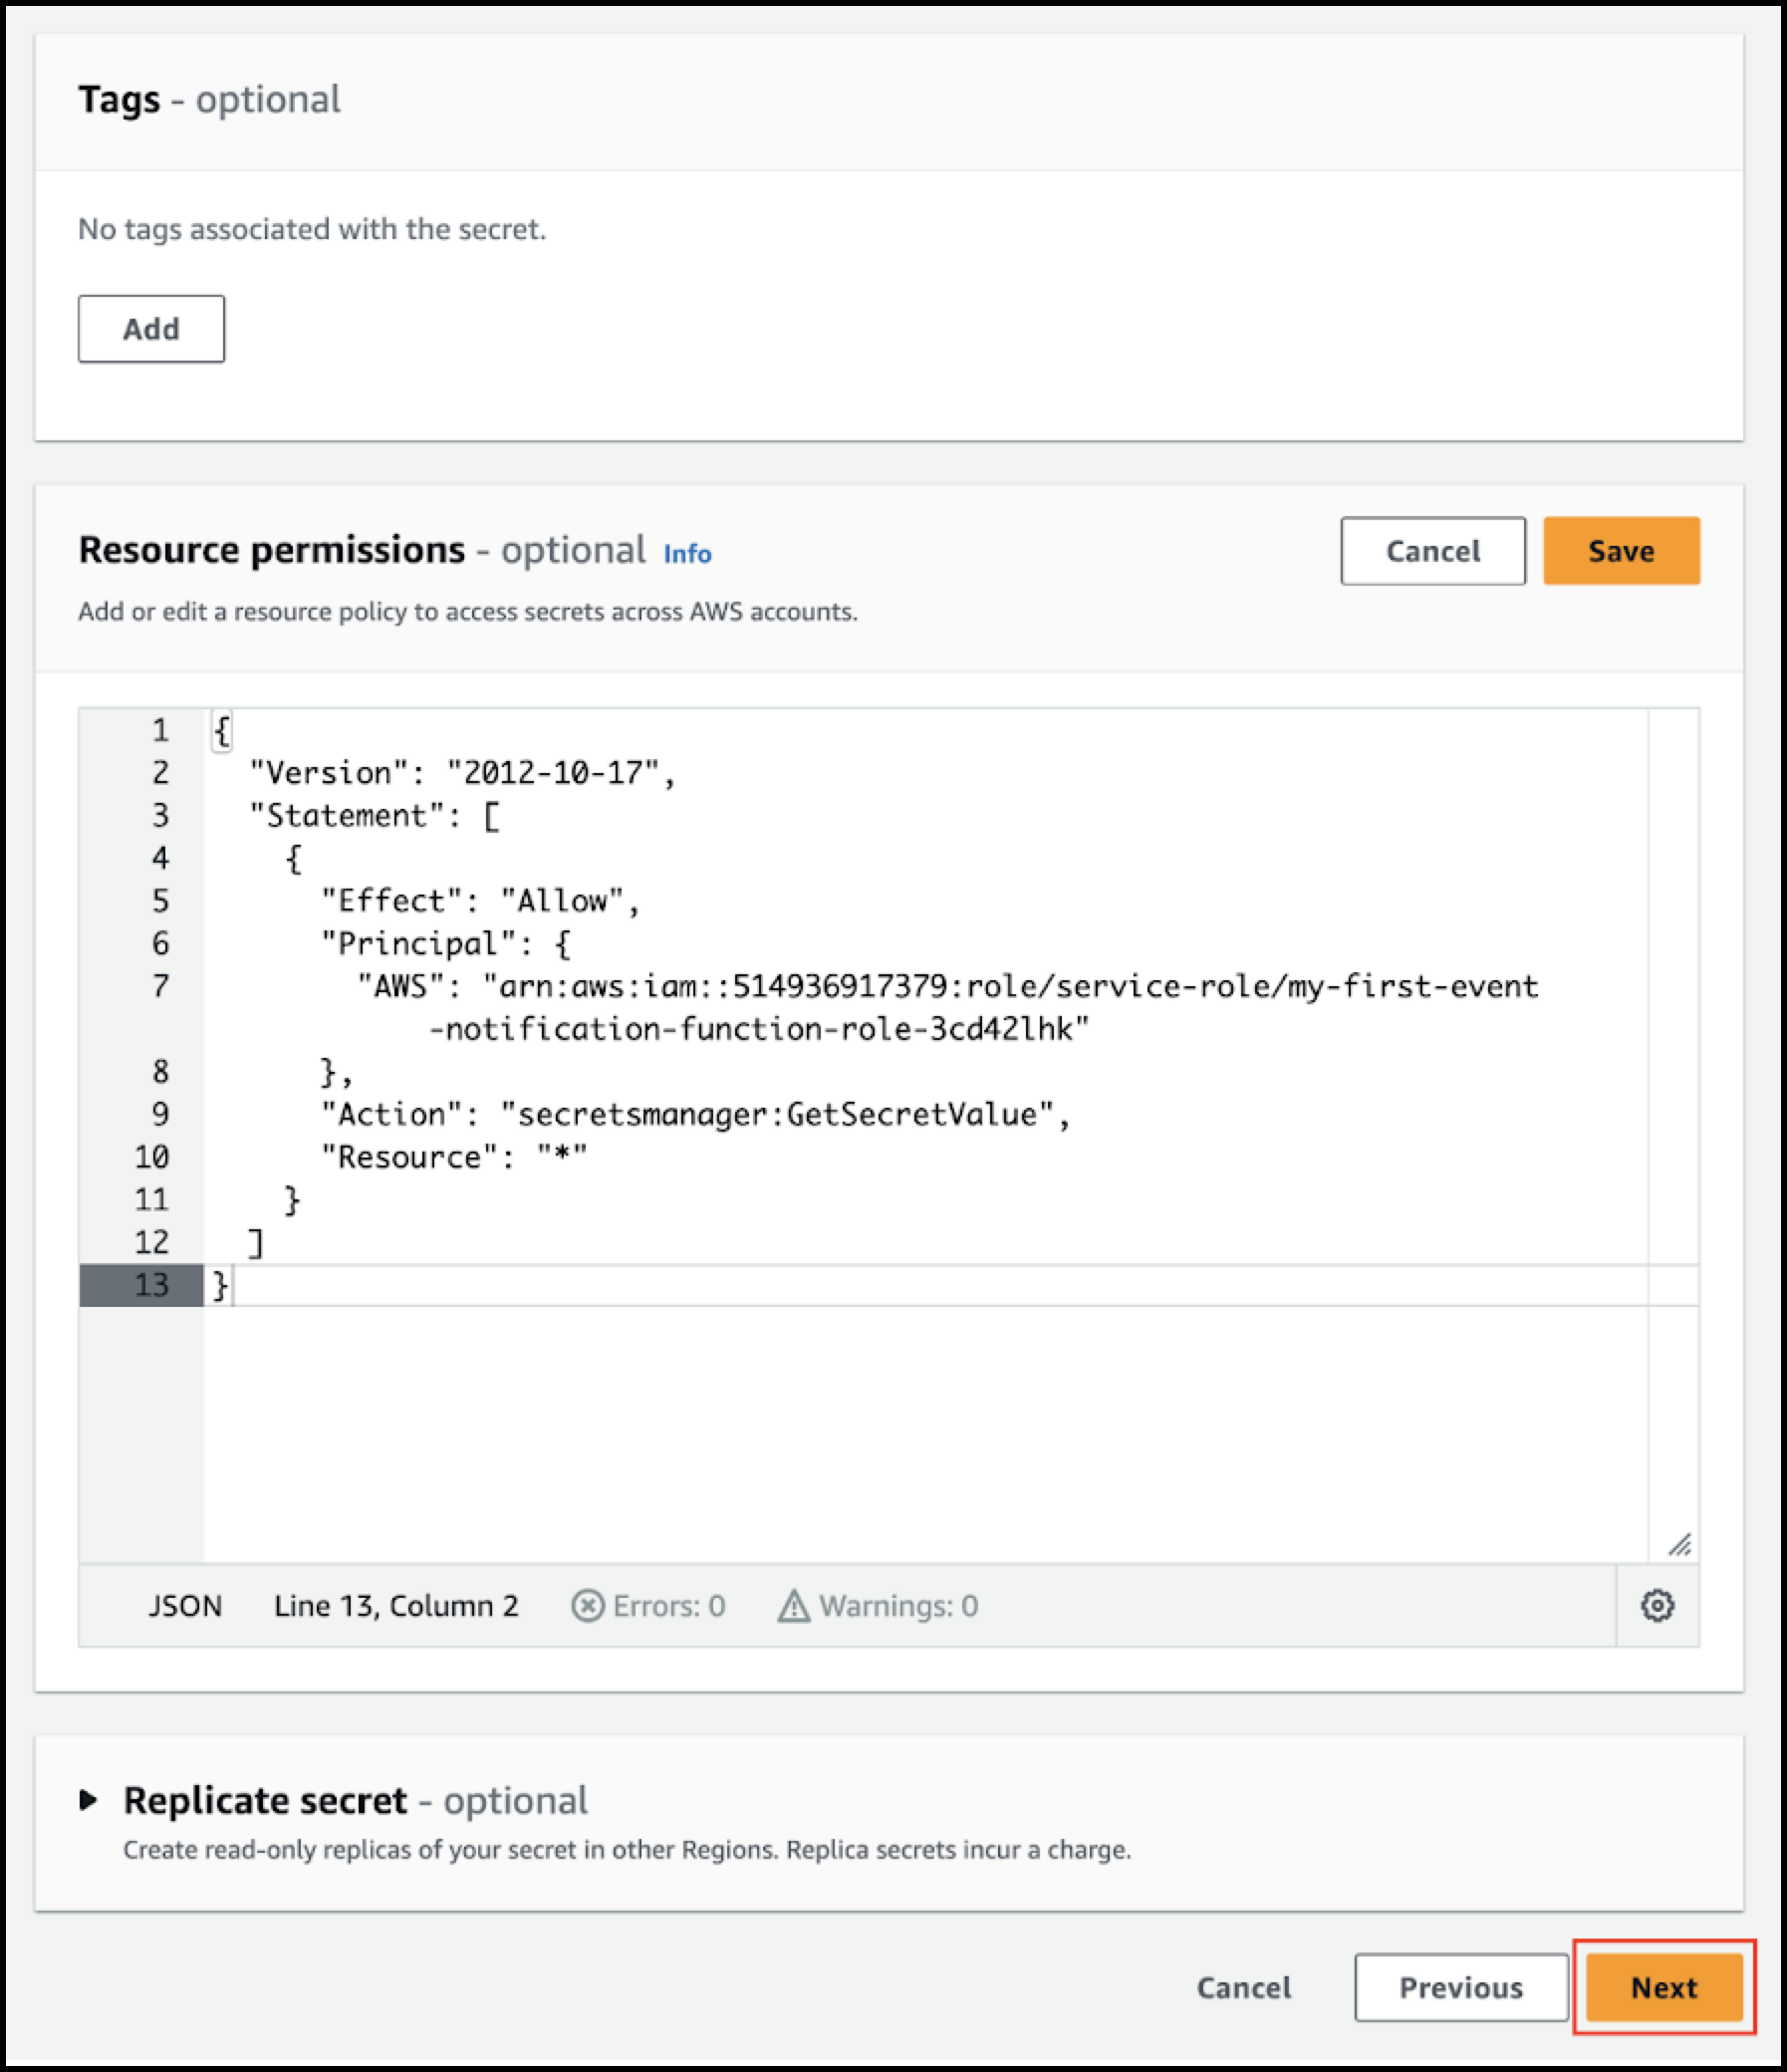
- Enter b2-object-creation-rule-signing-secret as the secret name, and click Edit permissions.
- Paste the following JSON into Resource permissions in place of the template policy, setting the AWS value to the AWS Lambda function execution role ARN that you saved earlier:
{ "Version" : "2012-10-17", "Statement" : [ { "Effect" : "Allow", "Principal" : { "AWS" : "<lambda-function-execution-role-arn>" }, "Action" : "secretsmanager:GetSecretValue", "Resource" : "*" } ] } - Click Save, and click Next.
- Click Next on the Configure rotation page.
- Click Store on the Review page.
Add Code to the AWS Lambda Function to Publish an SNS Notification
- In the AWS console, navigate to your AWS Lambda function and select the Code tab.
- Delete the existing code, and paste the following Python code, replacing the value of
topic_arnwith your SNS topic ARN. The code populates the S3-style notification message with values from the B2 notification message, using the value of theX-B2-Regioncustom HTTP header forawsRegion.Click here for Python code.
import boto3 import datetime import hashlib import hmac import json from botocore.exceptions import ClientError # Set these values according to your environment and configuration topic_arn = '<sns-topic-arn>' secret_name = "b2-object-creation-rule-signing-secret" # SDK clients for SNS and Secrets Manager sns_client = boto3.client('sns') secrets_client = boto3.client('secretsmanager') class SignatureError(Exception): """Raised when there's an error validating the message signature.""" def get_signing_secret(): """Retrieve the signing secret from AWS Secrets Manager.""" secret_value_response = secrets_client.get_secret_value(SecretId=secret_name) # get_secret_value() returns JSON string, so we need to parse it secret_value = json.loads(secret_value_response['SecretString']) return secret_value['SigningSecret'] def validate_signed_message(event): """Validate the signature on the event notification message. Verify that the x-bz-event-notification-signature header is present, well formatted, has the correct version, and matches the HMAC-SHA256 digest generated from the signing secret and message body. """ if 'x-bz-event-notification-signature' not in event['headers']: raise SignatureError('Missing signature header') signature = event['headers']['x-bz-event-notification-signature'] pair = signature.split('=') if len(pair) != 2: raise SignatureError('Invalid signature format') version = pair[0] if version != 'v1': raise SignatureError('Invalid signature version') try: signing_secret = get_signing_secret() except ClientError as err: raise SignatureError('Can\'t get signing secret') from err received_sig = pair[1] calculated_sig = hmac.new( bytes(signing_secret, 'utf-8'), msg=bytes(event['body'], 'utf-8'), digestmod=hashlib.sha256 ).hexdigest().lower() if received_sig != calculated_sig: raise SignatureError('Invalid signature') return None def create_response(status, message, err=None): """Print the message and return a formatted response""" body = f'{message}: {str(err)}' if err else message print(body) return { 'statusCode': status, 'headers': { 'Content-Type': 'text/plain', }, 'body': body, 'isBase64Encoded': False, } def lambda_handler(event, context): """Entry point for the AWS Lambda function""" try: validate_signed_message(event) except SignatureError as err: return create_response(401, 'Signature error', err) print(f'Incoming message: \n{event['body']}') # Event body is a JSON-formatted string, so we need to parse it try: body = json.loads(event['body']) except json.JSONDecodeError as err: return create_response(400, 'Error parsing JSON event body', err) # Collect outgoing messages and publish them 10-at-a-time with sns_client.publish_batch() messages = [] for b2_event in body['events']: # Incoming event timestamp is in epoch milliseconds # Outgoing message needs ISO 8601 timestamp = b2_event['eventTimestamp'] / 1000.0 eventTime = ( datetime.datetime.fromtimestamp(timestamp) .strftime('%Y-%m-%dT%H:%M:%S.%f')[:-3] + 'Z' ) # B2 region is in a custom HTTP header # Note that AWS changes all HTTP header keys to lowercase b2_region = event['headers']['x-b2-region'] # This message is based on the example S3 event notification at # https://docs.aws.amazon.com/AmazonS3/latest/userguide/notification-content-structure.html message = f'''{{ "Records":[ {{ "eventVersion":"2.1", "eventSource":"aws:s3", "awsRegion":"{b2_region}", "eventTime":"{eventTime}", "eventName":"ObjectCreated:Put", "userIdentity":{{ "principalId":"{b2_event['accountId']}" }}, "requestParameters":{{ "sourceIPAddress":"{event['requestContext']['http']['sourceIp']}" }}, "responseElements":{{ "x-amz-request-id":"{b2_event['eventId']}", "x-amz-id-2":"dummy/value/abc123" }}, "s3":{{ "s3SchemaVersion":"1.0", "configurationId":"{b2_event['matchedRuleName']}", "bucket":{{ "name":"{b2_event['bucketName']}", "ownerIdentity":{{ "principalId":"{b2_event['accountId']}" }}, "arn":"arn:aws:s3:::{b2_event['bucketName']}" }}, "object":{{ "key":"{b2_event['objectName']}", "size":{b2_event['objectSize']}, "eTag":"dummy_value", "versionId":"{b2_event['objectVersionId']}", "sequencer":"dummy_value" }} }} }} ] }}''' print(f'Outgoing message: \n{message}') messages.append({'Id': b2_event['eventId'], 'Message': message}) if (len(messages) == 10): try: response = sns_client.publish_batch( TopicArn=topic_arn, PublishBatchRequestEntries=messages) except ClientError as err: print('Error publishing message', err) messages = [] if (len(messages) > 0): try: response = sns_client.publish_batch( TopicArn=topic_arn, PublishBatchRequestEntries=messages) except ClientError as err: print('Error publishing message', err) return create_response(200, 'Success') - Click Deploy.
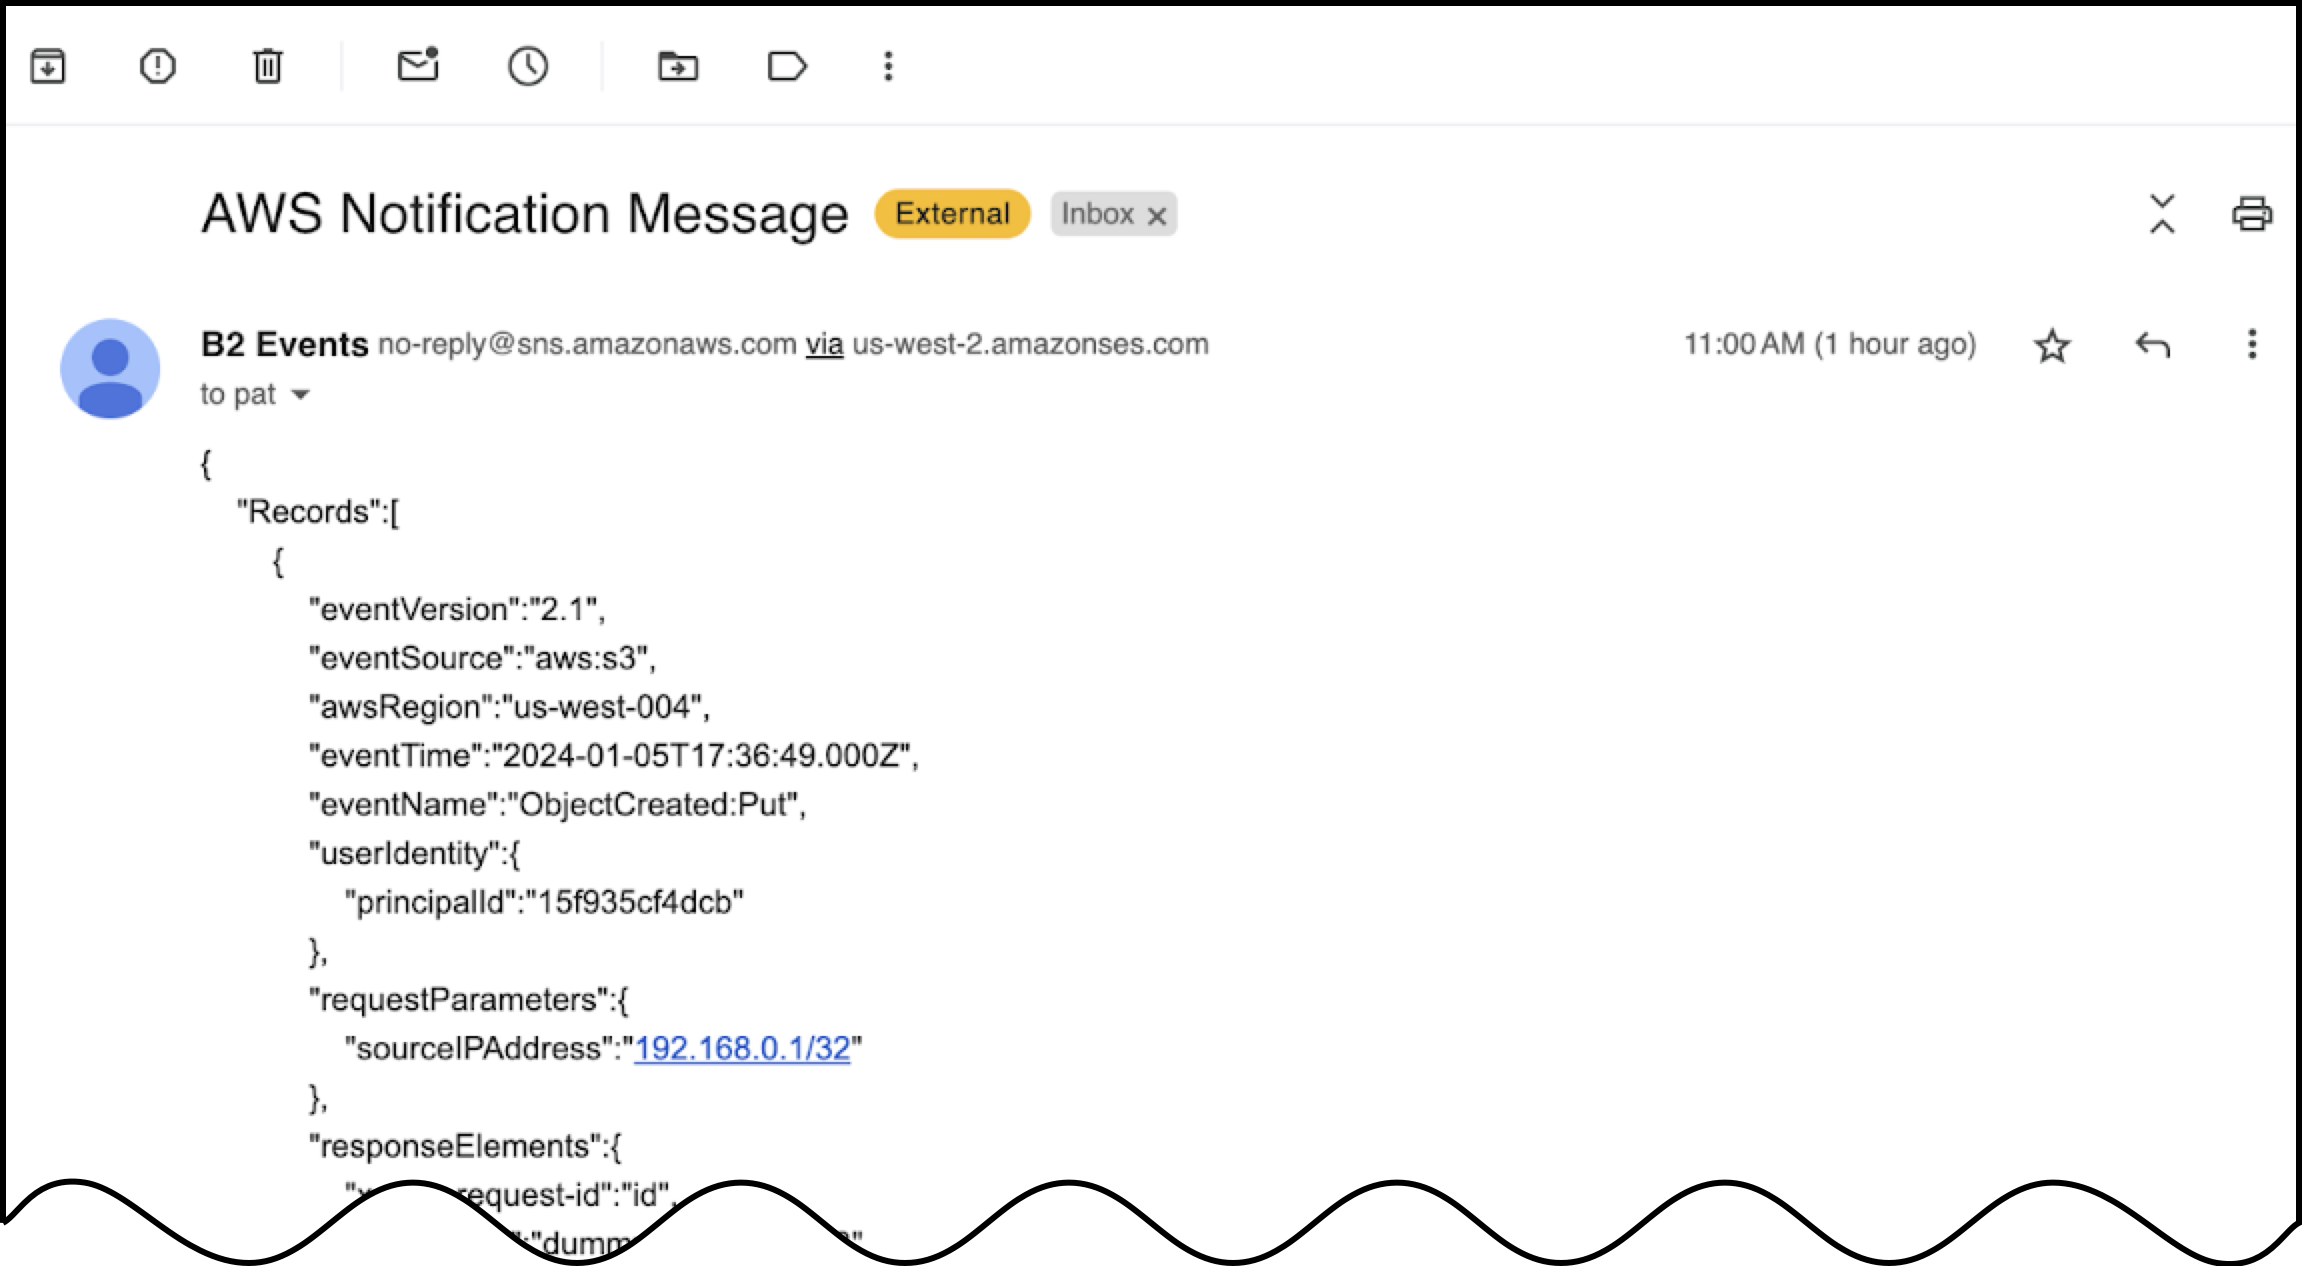
- Upload another file to your Backblaze B2 bucket.
Within a few seconds to a few minutes, depending on your email provider, you should receive an email containing a JSON event notification that is structured similarly to an S3 notification. - If you do not receive an email, in your AWS Lambda function’s console page, select the Monitor tab and click View CloudWatch logs.
- Examine the log streams to gather insight into why your AWS Lambda function is failing.
Add Code to the AWS Lambda Function to Send a Message to an SQS Queue
- In the AWS console, navigate to your AWS Lambda function and select the Code tab.
- Paste the following Python code in place of the example replacing the value of
queue_urlwith your SQS queue URL. The code populates the S3-style notification message with values from the B2 notification message, using the value of theX-B2-Regioncustom HTTP header forawsRegion.Click here for Python code.
import boto3 import datetime import hashlib import hmac import json from botocore.exceptions import ClientError # Set these values according to your environment and configuration queue_url = '<sqs-queue-url>' secret_name = 'b2-object-creation-rule-signing-secret' # SDK clients for SQS and Secrets Manager sqs_client = boto3.client('sqs') secrets_client = boto3.client('secretsmanager') class SignatureError(Exception): """Raised when there's an error validating the message signature.""" def get_signing_secret(): """Retrieve the signing secret from AWS Secrets Manager.""" secret_value_response = secrets_client.get_secret_value(SecretId=secret_name) # get_secret_value() returns JSON string, so we need to parse it secret_value = json.loads(secret_value_response['SecretString']) return secret_value['SigningSecret'] def validate_signed_message(event): """Validate the signature on the event notification message. Verify that the x-bz-event-notification-signature header is present, well formatted, has the correct version, and matches the HMAC-SHA256 digest generated from the signing secret and message body. """ if 'x-bz-event-notification-signature' not in event['headers']: raise SignatureError('Missing signature header') signature = event['headers']['x-bz-event-notification-signature'] pair = signature.split('=') if len(pair) != 2: raise SignatureError('Invalid signature format') version = pair[0] if version != 'v1': raise SignatureError('Invalid signature version') try: signing_secret = get_signing_secret() except ClientError as err: raise SignatureError('Can\'t get signing secret') from err received_sig = pair[1] calculated_sig = hmac.new( bytes(signing_secret, 'utf-8'), msg=bytes(event['body'], 'utf-8'), digestmod=hashlib.sha256 ).hexdigest().lower() if received_sig != calculated_sig: raise SignatureError('Invalid signature') return None def create_response(status, message, err=None): """Print the message and return a formatted response""" body = f'{message}: {str(err)}' if err else message print(body) return { 'statusCode': status, 'headers': { 'Content-Type': 'text/plain', }, 'body': body, 'isBase64Encoded': False, } def lambda_handler(event, context): """Entry point for the AWS Lambda function""" try: validate_signed_message(event) except SignatureError as err: return create_response(401, 'Signature error', err) print(f'Incoming message: \n{event['body']}') # Event body is a JSON-formatted string, so we need to parse it try: body = json.loads(event['body']) except json.JSONDecodeError as err: return create_response(400, 'Error parsing JSON event body', err) # Collect outgoing messages and publish them 10-at-a-time with sqs_client.send_message_batch() messages = [] for b2_event in body['events']: # Incoming event timestamp is in epoch milliseconds # Outgoing message needs ISO 8601 timestamp = b2_event['eventTimestamp'] / 1000.0 eventTime = ( datetime.datetime.fromtimestamp(timestamp) .strftime('%Y-%m-%dT%H:%M:%S.%f')[:-3] + 'Z' ) # B2 region is in a custom HTTP header # Note that AWS changes all HTTP header keys to lowercase b2_region = event['headers']['x-b2-region'] # This message is based on the example S3 event notification at # https://docs.aws.amazon.com/AmazonS3/latest/userguide/notification-content-structure.html message = f'''{{ "Records":[ {{ "eventVersion":"2.1", "eventSource":"aws:s3", "awsRegion":"{b2_region}", "eventTime":"{eventTime}", "eventName":"ObjectCreated:Put", "userIdentity":{{ "principalId":"{b2_event['accountId']}" }}, "requestParameters":{{ "sourceIPAddress":"{event['requestContext']['http']['sourceIp']}" }}, "responseElements":{{ "x-amz-request-id":"{b2_event['eventId']}", "x-amz-id-2":"dummy/value/abc123" }}, "s3":{{ "s3SchemaVersion":"1.0", "configurationId":"{b2_event['matchedRuleName']}", "bucket":{{ "name":"{b2_event['bucketName']}", "ownerIdentity":{{ "principalId":"{b2_event['accountId']}" }}, "arn":"arn:aws:s3:::{b2_event['bucketName']}" }}, "object":{{ "key":"{b2_event['objectName']}", "size":{b2_event['objectSize']}, "eTag":"dummy_value", "versionId":"{b2_event['objectVersionId']}", "sequencer":"dummy_value" }} }} }} ] }}''' print(f'Outgoing message: \n{message}') messages.append({'Id': b2_event['eventId'], 'MessageBody': message}) if (len(messages) == 10): try: response = sqs_client.send_message_batch( QueueUrl=queue_url, Entries=messages) except ClientError as err: print('Error sending message', err) messages = [] if (len(messages) > 0): try: response = sqs_client.send_message_batch( QueueUrl=queue_url, Entries=messages) except ClientError as err: print('Error sending message', err) return create_response(200, 'Success') - Click Deploy.
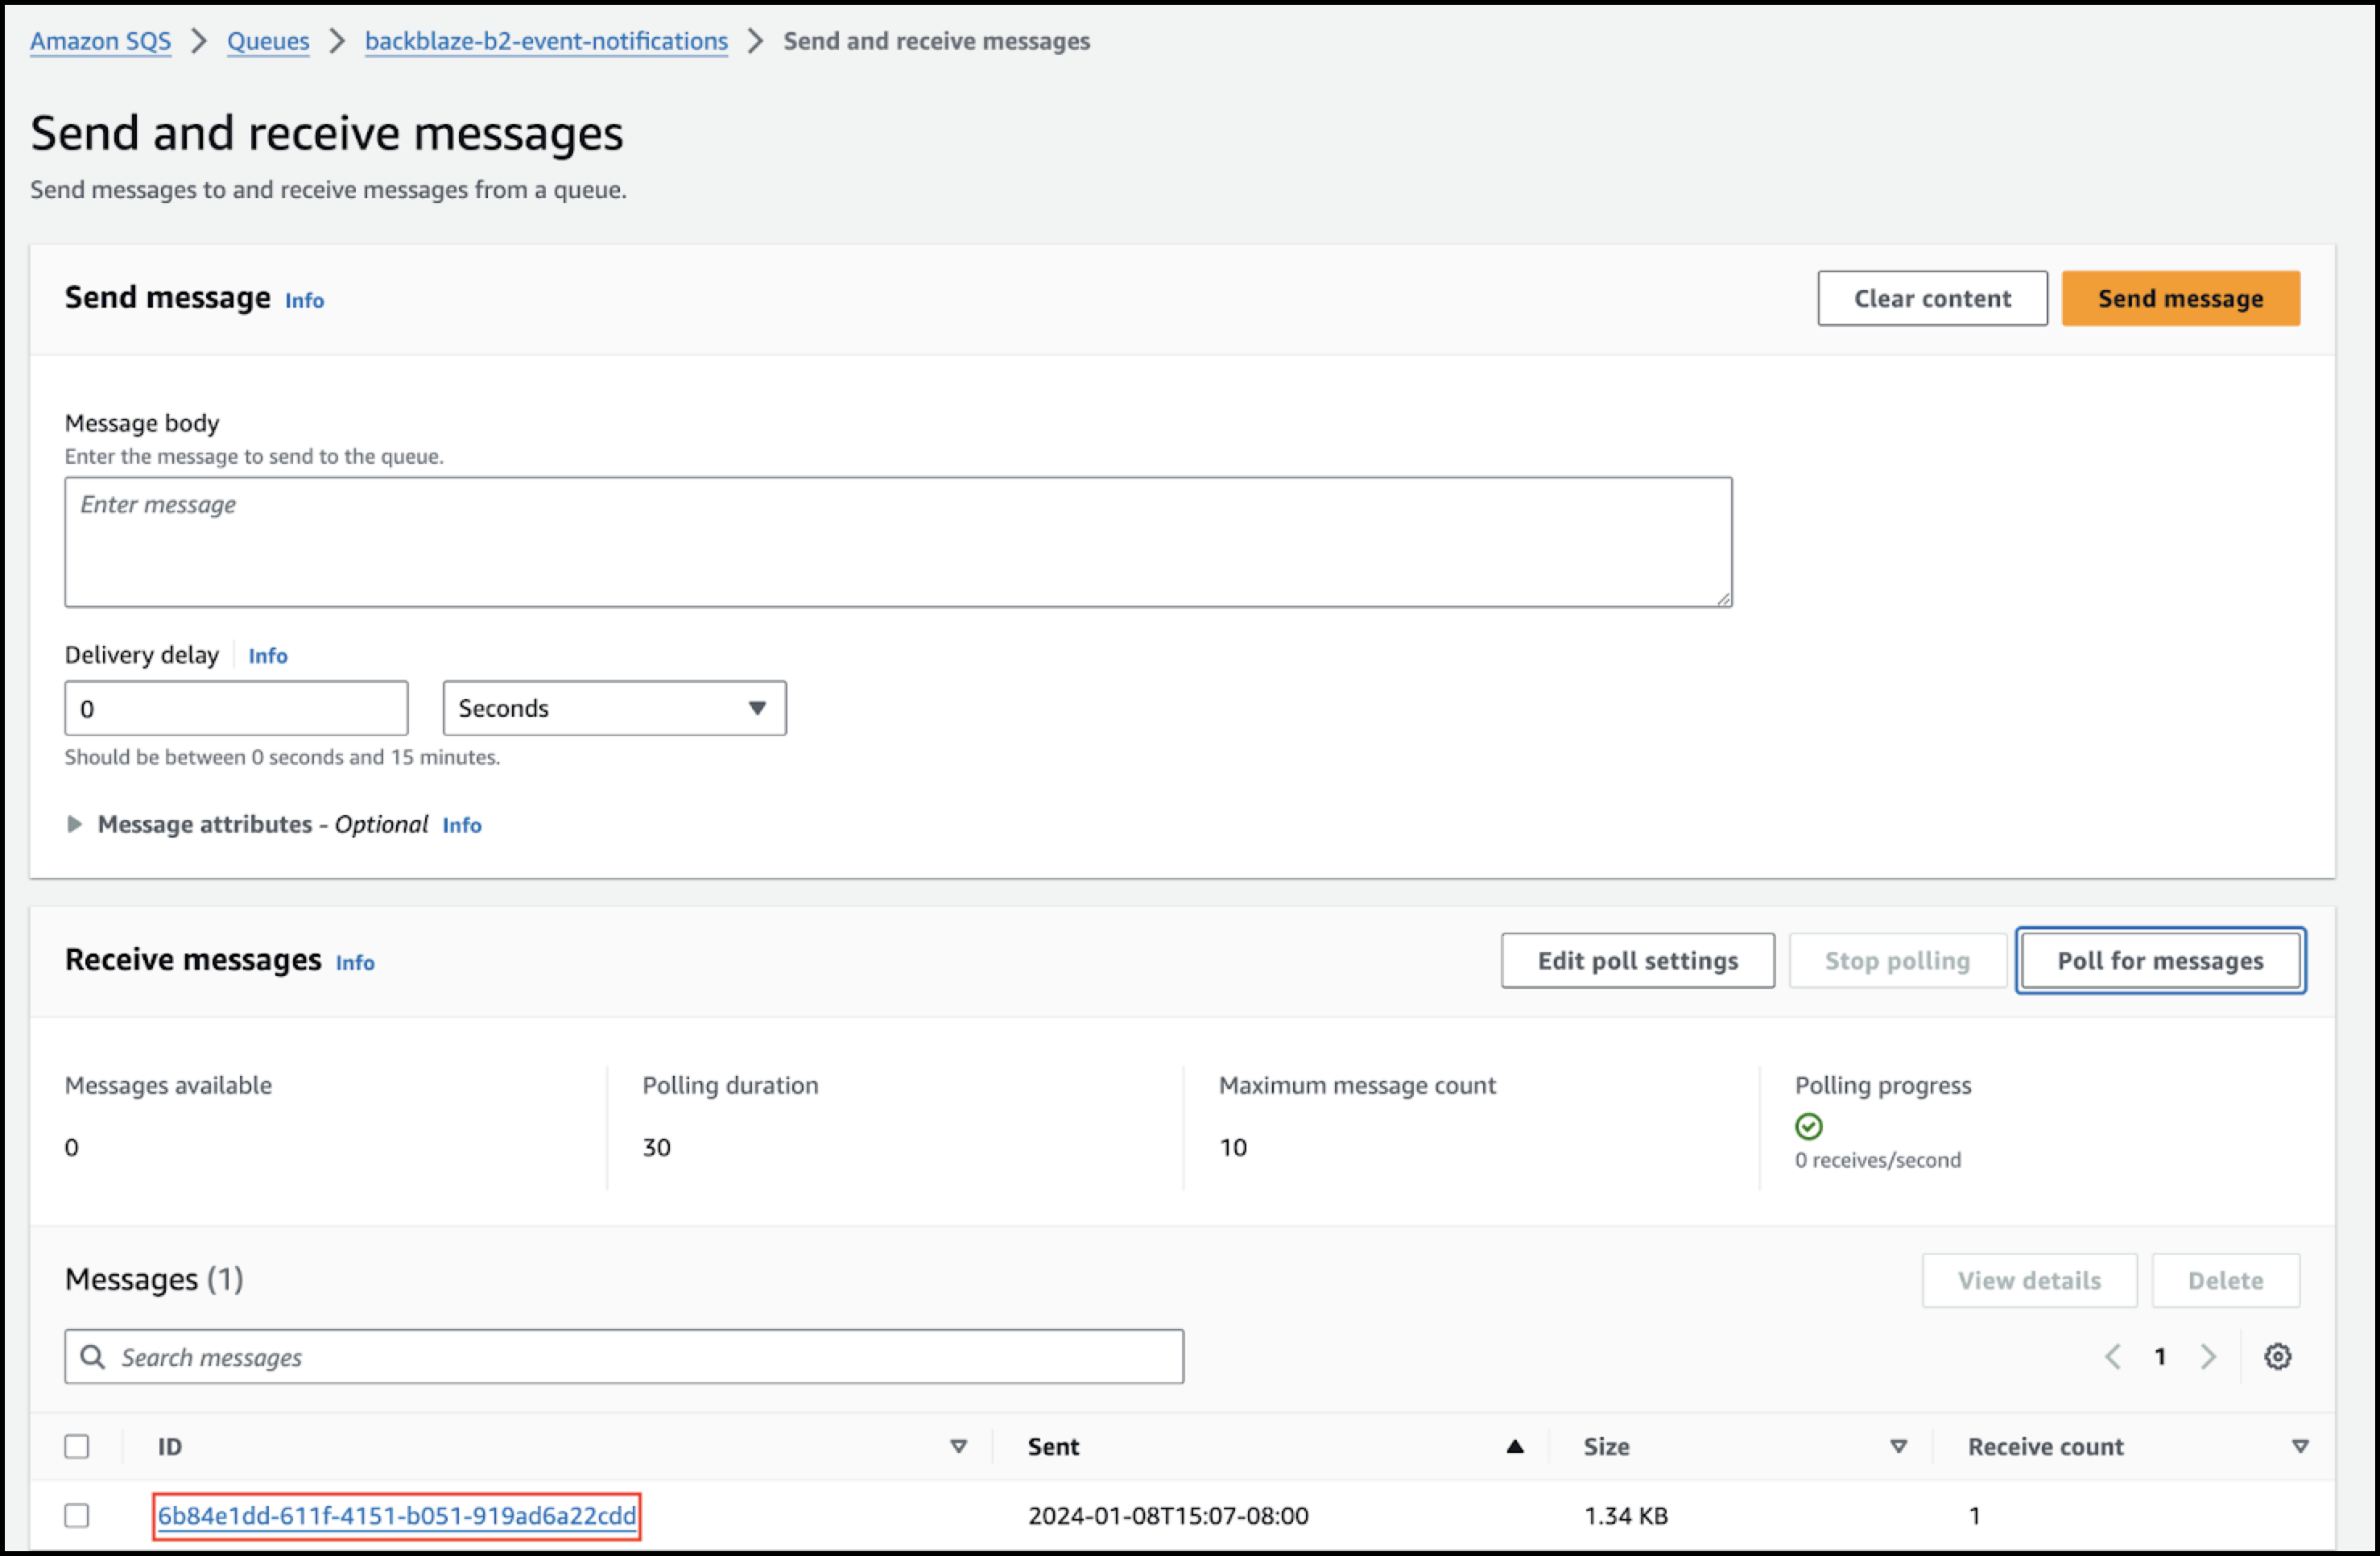
- Navigate to your SQS function’s page, and click Send and receive messages.
- Click Poll for messages.
- Upload another file to your Backblaze B2 bucket.
A new message appears at the bottom of the page. - In the message, click the message ID link.
- Scroll to the body of the message to examine the JSON-formatted message.
The following example message shows what you should see in the Body tab:Click here for example JSON.
{ "Records":[ { "eventVersion":"2.1", "eventSource":"aws:s3", "awsRegion":"us-west-004", "eventTime":"2024-02-23T22:12:47.000Z", "eventName":"ObjectCreated:Put", "userIdentity":{ "principalId":"15f935cf4dcb" }, "requestParameters":{ "sourceIPAddress":"2605:72c0:503:42::c19" }, "responseElements":{ "x-amz-request-id":"ba9a8e4eacda8b4b7d23a0ec1f04046342c319f3c608903e794c45a5b57184be", "x-amz-id-2":"dummy/value/abc123" }, "s3":{ "s3SchemaVersion":"1.0", "configurationId":"my-first-event-notification-rule", "bucket":{ "name":"Metadaddy-Tester", "ownerIdentity":{ "principalId":"15f935cf4dcb" }, "arn":"arn:aws:s3:::Metadaddy-Tester" }, "object":{ "key":"1megabyte-test-file", "size":1048576, "eTag":"dummy_value", "versionId":"4_z71d55f5943b52c7f74ed0c1b_f117370b8bbd1b3e7_d20240223_m221247_c004_v0402017_t0002_u01708726367081", "sequencer":"dummy_value" } } } ] } - If you do not see a message, in your AWS Lambda function’s console page, select the Monitor tab and click View CloudWatch logs.
- Examine the log streams to gather insight into why your AWS Lambda function is failing.
Was this article helpful?