How to Export Data from Snowflake to Backblaze B2
- Print
- DarkLight
How to Export Data from Snowflake to Backblaze B2
- Print
- DarkLight
Article summary
Did you find this summary helpful?
Thank you for your feedback
You can copy data from Snowflake to Backblaze B2 to make it available to the rich ecosystem of applications and tools that can work with S3-compatible storage. You can also migrate data from Snowflake to Backblaze B2 to take advantage of our lower storage cost, particularly for data that is infrequently accessed.
This article explains how to perform the following tasks:
- Export data from a Snowflake-native table to Backblaze B2 Cloud Storage.
- Create an external table to query the exported data from Snowflake.
For more information about using Snowflake with Backblaze B2, see Data-Driven Decisions with Snowflake and Backblaze B2.
Snowflake External Data Basics
You can manage external data by creating external tables within an external stage. An external stage is a Snowflake database object that is created in a schema. The stage object stores the URL to files in cloud storage, the settings that are used to access the cloud storage account, and convenience settings such as the options that describe the format of staged files.
Similarly, an external table is a Snowflake database object that stores certain file-level metadata, including filenames, version identifiers, and related properties. External tables can access data that is stored in any format that the Snowflake COPY INTO <table> command supports. At the time of publication, these formats are CSV, JSON, Apache Avro, Apache ORC, Apache Parquet, and XML.
Notes
External tables are read-only. You cannot perform data manipulation language (DML) operations on them. However, you can use external tables for query and join operations. You can also create views against external tables.
Querying data in an external table might be slower than querying data that you store natively in a table within Snowflake. To improve query performance, you can use a materialized view based on an external table.
Querying data in an external table might be slower than querying data that you store natively in a table within Snowflake. To improve query performance, you can use a materialized view based on an external table.
Enable Backblaze B2
Before you begin: You must have a Backblaze B2 Cloud Storage account. If you already have a Backblaze account and the left navigation menu contains a B2 Cloud Storage section, your account is already enabled for Backblaze B2.
- Sign in to the Backblaze web console.
- In the user menu in the upper-right corner of the page, select My Settings.
- Under Enabled Products, select the checkbox to enable B2 Cloud Storage.
- Review the Terms and Conditions, and click OK to accept them.
Create a Bucket
You can use an existing bucket, or you can create a new bucket.
Note
Ensure that you copy the value that is in the Endpoint field; you will need this value when you set up the external stage in Snowflake.
Sign in to the Backblaze web console.
In the left navigation menu under B2 Cloud Storage, click Buckets.
Click Create a Bucket.
Enter a name for your bucket.
A message is displayed if your bucket name is already in use.Select a privacy setting: Private or Public.
Note
You can change a bucket's privacy settings at any time.
Files that are in a private bucket require authentication to perform an action, for example, downloading.
Public buckets do not require authentication so you can easily access files. If this is your first time creating a public bucket, complete the following tasks to ensure that you have the correct permissions to create a public bucket:
Verify your email address.
Have a payment history on file, or use the credit card form to pay a small fee that is credited to your account balance.
If applicable, enable a Backblaze B2 server-side encryption key.
Enable Object Lock to restrict a file from being modified or deleted for a specified period of time.
Click Create a Bucket, and copy the value that is in the Endpoint field; you may need this value later.
Click Lifecycle Settings to control how long to keep the files in your new bucket.
If you use an existing bucket, click Buckets under B2 Cloud Storage, and note the endpoint of the bucket you will use for the Snowflake integration, for example, s3.us-west-004.backblazeb2.com.
Create an Application Key
You can use an existing key, or you can create an application key that is restricted to the bucket that you just created.
Sign in to the Backblaze web console.
In the left navigation menu under B2 Cloud Storage, click Application Keys.
Click Add a New Application Key, and enter an app key name.
You cannot search an app key by this name; therefore, app key names are not required to be globally unique. Key names are limited to 100 characters and can contain letters, numbers, and "-", but not I18N characters, such as é, à, and ü.Select All or select a specific bucket in the Allow Access to Bucket(s) menu.
If you select a specific bucket, you can also select Allow List All Bucket Names.
This option is required for the B2 Native API b2_list_buckets and the S3-Compatible API S3 List Buckets operations.
(Optional) Select your access type (Read and Write, Read Only, or Write Only).
(Optional) Enter a file name prefix to restrict application key access only to files with that prefix.
Depending on what you selected in step #4, this limits application key access to files with the specified prefix for all buckets or just the selected bucket.(Optional) Enter a positive integer to limit the time, in seconds, before the application key expires.
The value must be less than 1000 days (in seconds).Click Create New Key, and note the resulting keyID and applicationKey values.
Note
When you create a new app key, the response contains the actual key string, for example N2Zug0evLcHDlh_L0Z0AJhiGGdY. You can always find the keyID on this page, but for security, the applicationKey appears only once. Make sure you copy and securely save this value elsewhere.
Create an External Stage
Before you begin: Sign up for Snowflake if you do not already have an account. At the time of publication, Snowflake offers a 30-day free trial, including $400 worth of free usage, which is more than enough to work through the following steps and understand how the integration works. For more information about working with Amazon S3-compatible storage, click here.
- To enable access to the endpoint from your account, submit a support case to Snowflake.
- Provide your Snowflake account name and cloud region deployment.
- Provide your bucket's endpoint. You must also specify that the endpoint is provided by Backblaze, and that it has been verified using Snowflake's s3compat API test suite.
- After you have confirmation that Snowflake enabled your bucket’s endpoint in your Snowflake account, use the Snowflake console to create an external stage using the following example and details:
- Enter a valid name; this guide uses the stage name
b2_stage. - Substitute your bucket name in the
URLparameter. - Substitute your application key and application key ID in the
CREDENTIALSparameter. - Enter the region as the second element of your bucket’s endpoint, for example,
us-west-004.
A response similar to the following example is returned:CREATE STAGE b2_stage URL = 's3compat://your-bucket-name/' ENDPOINT = 's3.your-region.backblazeb2.com' REGION = 'your-region' CREDENTIALS = ( AWS_KEY_ID = 'your-application-key-id' AWS_SECRET_KEY = 'your-application-key' );
- Enter a valid name; this guide uses the stage name

Copy Data to the External Stage
Before you begin: Choose a format that you will use for external data. The open-source Apache Parquet file format is used for this article. Parquet is widely supported, its column-oriented architecture is well-suited to analytical data, and its compression and encoding schemes enhance performance while reducing storage consumption.
- Backblaze recommends that you create a named file format. You can reference this file format when you work with external files. The following example uses the Parquet file format with Snappy compression:
A response similar to the following example is returned:CREATE FILE FORMAT parquet_snappy TYPE = PARQUET COMPRESSION = SNAPPY; - Copy data from a table in Snowflake to the external stage. The following example uses one of Snowflake’s sample tables: the
customertable in the tpch_df1 schema.
A response that shows how many rows and bytes were copied is returned:COPY INTO @b2_stage/tpch_sf1/customer FROM snowflake_sample_data.tpch_sf1.customer FILE_FORMAT = parquet_snappy HEADER = true; - To view the files that were written, run the following command:
A response similar to the following example is returned:LIST @b2_stage; - To inspect the data, run the following command directly on the files:
Because Snowflake is directly reading the files, rather than querying a table with a definition, each row is shown as an OBJECT, a set of key-value pairs:SELECT * FROM @b2_stage/tpch_sf1/customer (FILE_FORMAT => 'parquet_snappy') LIMIT 10;


The data is now available for consumption by any application or tool that can read S3-compatible cloud object storage.
Create an External Table
It is possible to run basic queries directly on the files in the external stage. However, if you want to query the data in the external stage from Snowflake and you are migrating data from Snowflake to Backblaze B2, you should create an external table to allow you to query the exported data just as you do to Snowflake-native tables.
If you create a regular Snowflake table from scratch, you typically list the columns and their types like the following example. For files in an external stage, Snowflake makes it easier by providing the INFER_SCHEMA table function.
CREATE TABLE customer(
	c_phone VARCHAR(15),
	c_acctbal NUMBER(12,2),
	c_address VARCHAR(40),
	c_nationkey NUMBER(38,0),
	c_custkey NUMBER(38,0),
	c_name VARCHAR(25),
	c_mktsegment VARCHAR(10),
	c_comment VARCHAR(117)
);- For files in an external stage, use the table function INFER_SCHEMA, which automatically generates a schema from the external files. To see the output, run INFER_SCHEMA against the customer files:
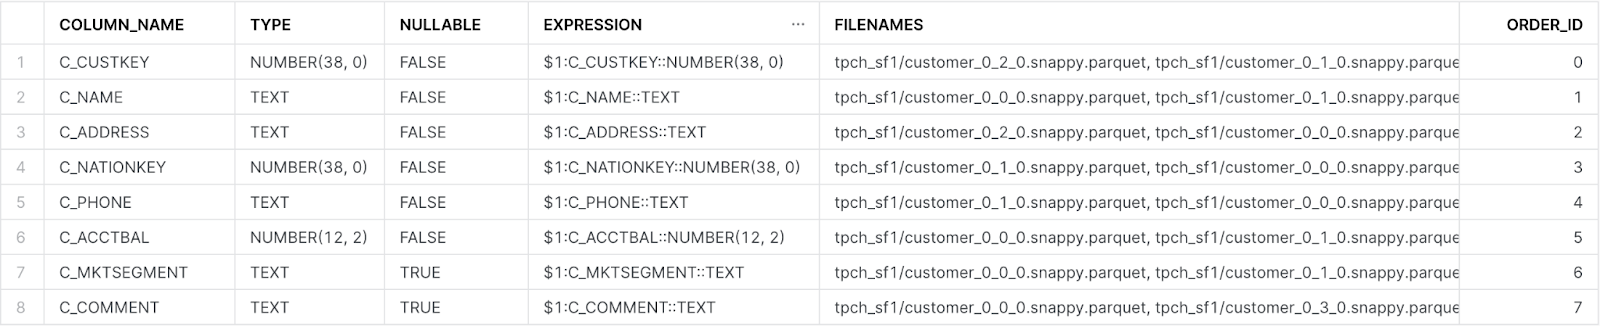
A response similar to the following example is returned:SELECT * FROM TABLE( INFER_SCHEMA( LOCATION=>'@b2_stage/tpch_sf1/customer', FILE_FORMAT=>'parquet_snappy' ) ); - Since INFER_SCHEMA returns a result set containing the columns and their metadata, convert it into an array of objects so that you can use it in the statement
CREATE EXTERNAL TABLE ... USING TEMPLATE. Run the following command to create an external table based on the schema inferred from the external files:
A response similar to the following example is returned:CREATE EXTERNAL TABLE external_customer USING TEMPLATE ( SELECT ARRAY_AGG(OBJECT_CONSTRUCT(*)) FROM TABLE( INFER_SCHEMA( LOCATION=>'@b2_stage/tpch_sf1/customer', FILE_FORMAT=>'parquet_snappy' ) ) ) LOCATION = @b2_stage/tpch_sf1 FILE_FORMAT = parquet_snappy AUTO_REFRESH = false; - Run the following command to inspect the columns in your external table:
A response similar to the following example is returned:DESCRIBE TABLE external_customer;

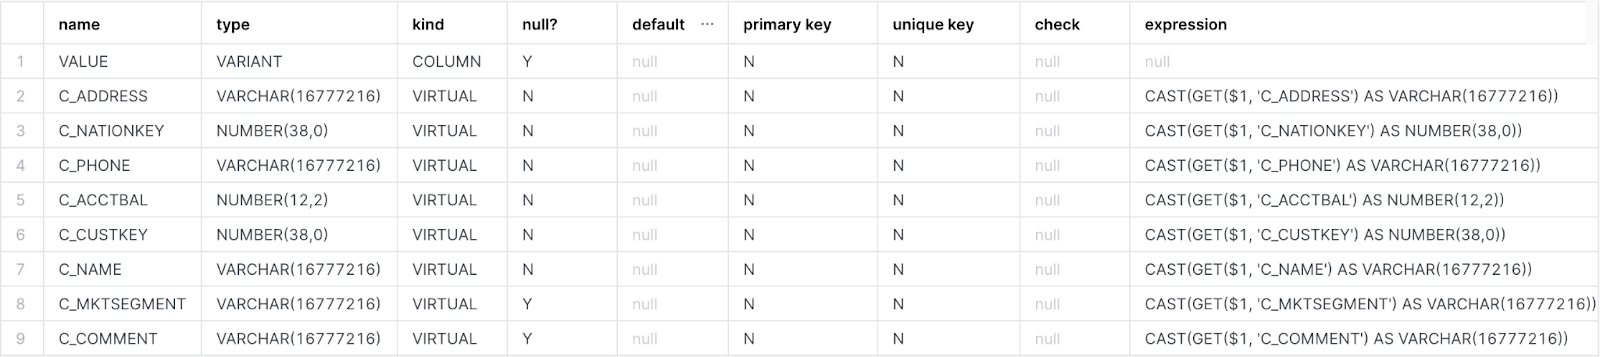
Snowflake widened all of the VARCHAR columns to 16,777,216 characters (16 MB). This is the default and also the maximum length for a VARCHAR field in Snowflake. There is no storage or performance penalty in doing this; a column consumes storage for only the amount of actual data stored and there is no performance difference between using the full-length VARCHAR declaration VARCHAR(16777216) and a smaller length.
Also, there is only one ‘real’ column in the table - the value column, with VARIANT type; all of the other columns are virtual columns, defined as expressions in terms of the value column.
Query Your External Table
- Run the following command to query the external table in exactly the same way as a regular Snowflake table:
A response similar to the following example is returned:SELECT c_name, c_mktsegment, c_acctbal FROM external_customer LIMIT 10; - To write queries that join internal and external tables, for example, to find the top 10 customers by aggregate order value by joining your
external_customertable with the sample tableorders, run the following command:
A response similar to the following example is returned:SELECT c.c_name, SUM(o.o_totalprice) total_order_value, COUNT(*) order_count FROM external_customer c JOIN snowflake_sample_data.tpch_sf1.orders o ON c.c_custkey = o.o_custkey GROUP BY c.c_name ORDER BY total_order_value DESC LIMIT 10;


If you intend to migrate data from Snowflake to Backblaze B2, as opposed to creating a copy of the data, you can DROP the Snowflake-internal table after you verify that the data was successfully exported to Backblaze B2.
Help us improve this guide. If you find an error, notice outdated information, or have suggestions for improvement, email techpubs@backblaze.com.
Was this article helpful?