
A few months ago we announced Backblaze B2 Cloud Storage, our cloud storage product. Cloud storage presents different challenges versus cloud backup in the server environment. Load balancing is one such issue. Let’s take a look at the challenges that have come up, and our solutions.
A load balancer is a server or specialized device that distributes load among the servers that actually do work and reply to requests. In addition to allowing the work to be distributed among several servers, it also makes sure that requests only get sent to healthy servers that are prepared to handle them.
For Backblaze Personal Backup and Backblaze Business Backup products, we’ve had it easy in terms of load balancing: We wrote the client, so we can just make it smart enough to ask us which server to talk to. No separate load balancer needed. The Backblaze products are also very tolerant of short outages, since the client will just upload the files slightly later.
For Backblaze B2, though, the clients are web browsers or programming language libraries like libcurl. They just make a single request for a file and expect an answer immediately. This means we need a load balancer both to distribute the load and allow us to take individual servers offline to update them.
Option 1: Layer 7, Full Proxy
The simplest and most flexible way to do load balancing is to have a pair of hosts, one active and one standby, that accept HTTPS connections from the client and create new connections to the server, then proxy the traffic back and forth between the two. This is usually referred to as “layer 7, full proxy” load balancing.
This doesn’t generally require any special setup on the server, other than perhaps making sure it understands the x-forwarded-for header so it knows the actual client’s IP address. It does have one big downside, though: The load balancer has to have enough bandwidth to handle every request and response in both directions, and enough CPU to handle TCP and SSL in both directions. Modern processors with AES-NI—onboard AES encryption and decryption—help a lot with this, but it can still quickly become a performance bottleneck when you’re talking about transferring large files at 1 Gb/s or higher.
Option 2: Layer 4, Full Proxy
Another option, if you want to reduce the burden on the load balancers, is layer 4 load balancing. The load balancers accept TCP connections from the client and create a new TCP session to the server, but they proxy through the HTTPS traffic inside the TCP session without decrypting or re-encrypting it. This still requires that the load balancer have enough bandwidth to handle all your traffic, but a lot less CPU compared to layer 7. Unfortunately, it also means that your servers don’t really have a good way to see the original client’s IP address short of hijacking the TCP options field with a proprietary extension.
Option 3: DSR
All of this is adding a lot of work layered on top of a load balancer’s basic purpose: to distribute client requests among multiple healthy back-end servers. To do this, the load balancer only needs to see the request and modify the destination at the outermost layers. No need to parse all the way to layer 7, and no need to even see the response. This is generally called Direct Server Return (DSR).
Especially when serving large files with SSL, DSR requires minimal amounts of bandwidth and CPU power on the load balancer. Because the source IP address is unchanged, the server can see the original client’s IP without even needing an x-forwarded-for header. This does have a few tradeoffs, though: It requires a fairly complex setup not only on the load balancers, but also on the individual servers. In full-proxy modes the load balancer can intercept bad responses and retry the request on a different back-end server or display a friendlier error message to the client, but since the response bypasses the load balancer in DSR mode this isn’t possible. This also makes health-checking tricky because there’s no path for responses from the back-end host to the load balancer.
After some testing, we ended up settling on DSR. Although it’s a lot more complicated to set up and maintain, it allows us to handle large amounts of traffic with minimal hardware. It also makes it easy to fulfill our goal of keeping user traffic encrypted even within our data center.
How Does It Work?
DSR load balancing requires two things:
- A load balancer with the VIP address attached to an external NIC and ARPing, so that the rest of the network knows it “owns” the IP.
- Two or more servers on the same layer 2 network that also have the VIP address attached to a NIC, either internal or external, but are not replying to ARP requests about that address. This means that no other servers on the network know that the VIP exists anywhere but on the load balancer.
A request packet will enter the network, and be routed to the load balancer. Once it arrives there, the load balancer leaves the source and destination IP addresses intact and instead modifies the destination MAC address to that of a server, then puts the packet back on the network. The network switch only understands MAC addresses, so it forwards the packet on to the correct server.
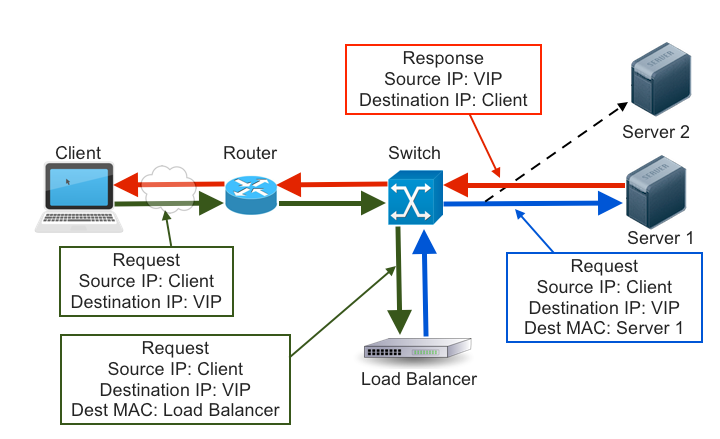
When the packet arrives at the server’s network interface, it checks to make sure the destination MAC address matches its own. It does, so accepts the packet. It then, separately, checks to see whether the destination IP address is one attached to it somehow. It is, even though the rest of the network doesn’t know it, so it accepts the packet and passes it on to the application. The application then sends a response with the VIP as the source IP address and the client as the destination IP, so it’s routed directly to the client without passing back through the load balancer.
How Do I Set It Up?
DSR setup is very specific to each individual network setup, but we’ll try to provide enough information that this can be adapted to most cases. The simplest way is probably to just pay a vendor like F5, A10, or Kemp to handle it. You’ll still need the complex setup on the individual hosts, though, and the commercial options tend to be pretty pricey. We also tend to prefer open-source over black-box solutions, since they’re more flexible and debuggable.
HAProxy and likely other applications can do DSR, but we ended up using IPVS (formerly known as LVS). The core packet routing of IPVS is actually part of the Linux kernel, and then various user-space utilities are used for health checks and other management. For user-space management, there’s a number of other good options like Keepalived, Ldirectord, Piranha, and Google’s recently-released Seesaw. We ended up choosing Keepalived because we also wanted VRRP support for failing over between load balancers, and because it’s both simple and stable/mature.
Setting Up IPVS and Keepalived
Good news! If your kernel is 2.6.10 or newer (and it almost certainly is), IPVS is already included. If /proc/net/ip_vs exists, it’s already loaded. If not, modprobe ip_vs will load the module. Most distributions will probably compile it as a kernel module, but your results with VPS providers may vary. At this point, you’ll probably also want to install the ipvsadm utility so you can manually inspect and modify the IPVS config.
The Keepalived load-balancing config is fairly straightforward: a virtual_server section with a real_server section inside of it for each back-end server. Most of the rest depends on your specific needs, but you’ll want to set lb_kind to “DR.” You can use SSL_GET as a simple health checker, but we use “MISC_CHECK” with a custom script, which lets us stop sending new traffic to a server that’s shutting down by setting its weight to 0.
The host config is where things get a bit more complicated. The important part is that the VIP address is assigned to an interface, but the server isn’t sending ARP replies about it. There’s a few ways to do this that work about equally well, but we use arptables rules defined in /etc/network/interfaces:
pre-up /sbin/arptables -I INPUT -j DROP -d <VIPADDRESS>

pre-up /sbin/arptables -I OUTPUT -j mangle -s <VIPADDRESS> ‐‐mangle-ip-s <SERVERIPADDRESS>

pre-down /sbin/arptables -D INPUT -j DROP -d <VIPADDRESS>

pre-down /sbin/arptables -D OUTPUT -j mangle -s <VIPADDRESS> ‐‐mangle-ip-s <SERVERIPADDRESS>
Once the arptables rules are in place, you’ll want to add the actual address to the interface:
post-up /sbin/ip addr add <VIPADDRESS>/32 dev $LOGICAL

pre-down /sbin/ip addr del <VIPADDRRESS>/32 dev $LOGICAL
If your backend server doesn’t have an actual external IP and normally talks to the outside via NAT, you will need to create a source-based route, also in the interfaces config:
post-up /sbin/ip rule add from <VIPADDRESS> lookup 200

pre-down /sbin/ip rule del from <VIPADDRESS> lookup 200

post-up /sbin/ip route add default via <VIPADDRESS> dev $LOGICAL table 200

pre-down /sbin/ip route del default via <VIPADDRESS> dev $LOGICAL table 200
Finally, make sure your web server (or other daemon) is listening on specifically, or on all addresses (0.0.0.0 or :::).
It’s Not Working!
- First, make sure the load balancer and server are on the same layer-2 network. If they’re on different subnets, none of this will work.
- Check the value of
/proc/sys/net/ipv4/conf/*/rp_filterand make sure it’s not set to 1 anywhere. - Run
tcpdump -e -n hoston the load balancer and make sure that the requests are reaching the load balancer with a destination IP of and a destination MAC address belonging to the load balancer, then leaving again with the same source and destination IP but the MAC address of the back-end server. - Run
ipvsadmon the load balancer and make sure IPVS is configured - Run
tcpdump -e -n hoston the server and make sure that requests are arriving with a destination IP of , and leaving again with a source of and a destination of - On the server, run
ip route get fromto make sure the host has a non-NATTED return route to the outside. - On the server, run
ip neigh show, where is the “via” IP from the previous “ip route get” command, to make sure the host knows how to reach the gateway.