In my last blog post, I explained how to use a Cloudflare Worker to send notifications on Backblaze B2 events. That post focused on how a Worker could proxy requests to Backblaze B2 Cloud Storage, sending a notification to a webhook at Pipedream that logged each request to a Google Spreadsheet.
Developers integrating applications and solutions with Backblaze B2 can use the same technique to solve a wide variety of use cases. As an example, in this blog post, I’ll explain how you can use that same Cloudflare Worker to trigger a serverless function at our partner Rising Cloud that automatically creates thumbnails as images are uploaded to a Backblaze B2 bucket, without incurring any egress fees for retrieving the full-size images.
What is Rising Cloud?
Rising Cloud hosts customer applications on a cloud platform that it describes as Intelligent-Workloads-as-a-Service. You package your application as a Linux executable or a Docker-style container, and Rising Cloud provisions instances as your application receives HTTP requests. If you’re familiar with AWS Lambda, Rising Cloud satisfies the same set of use cases while providing more intelligent auto-scaling, greater flexibility in application packaging, multi-cloud resiliency, and lower cost.
Rising Cloud’s platform uses artificial intelligence to predict when your application is expected to receive heavy traffic volumes and scales up server resources by provisioning new instances of your application in advance of when they are needed. Similarly, when your traffic is low, Rising Cloud spins down resources.
So far, so good, but, as we all know, artificial intelligence is not perfect. What happens when Rising Cloud’s algorithm predicts a rise in traffic and provisions new instances, but that traffic doesn’t arrive? Well, Rising Cloud picks up the tab—you only pay for the resources your application actually uses.
As is common with most cloud platforms, Rising Cloud applications must be stateless—that is, they cannot themselves maintain state from one request to the next. If your application needs to maintain state, you have to bring your own data store. Our use case, creating image thumbnails, is a perfect match for this model. Each thumbnail creation is a self-contained operation and has no effect on any other task.
Creating Image Thumbnails on Demand
As I explained in the previous post, the Cloudflare Worker will send a notification to a configured webhook URL for each operation that it proxies to Backblaze B2 via the Backblaze S3 Compatible API. That notification contains JSON-formatted metadata regarding the bucket, file, and operation. For example, on an image download, the notification looks like this:
{
    "contentLength": 3015523,
    "contentType": "image/png",
    "method": "GET",
    "signatureTimestamp": "20220224T193204Z",
    "status": 200,
    "url": "https://s3.us-west-001.backblazeb2.com/my-bucket/image001.png"
}
If the metadata indicates an image upload (i.e. the method is PUT, the content type starts with image, and so on), the Rising Cloud app will retrieve the full-size image from the Backblaze B2 bucket, create a thumbnail image, and write that image back to the same bucket, modifying the filename to distinguish it from the original.
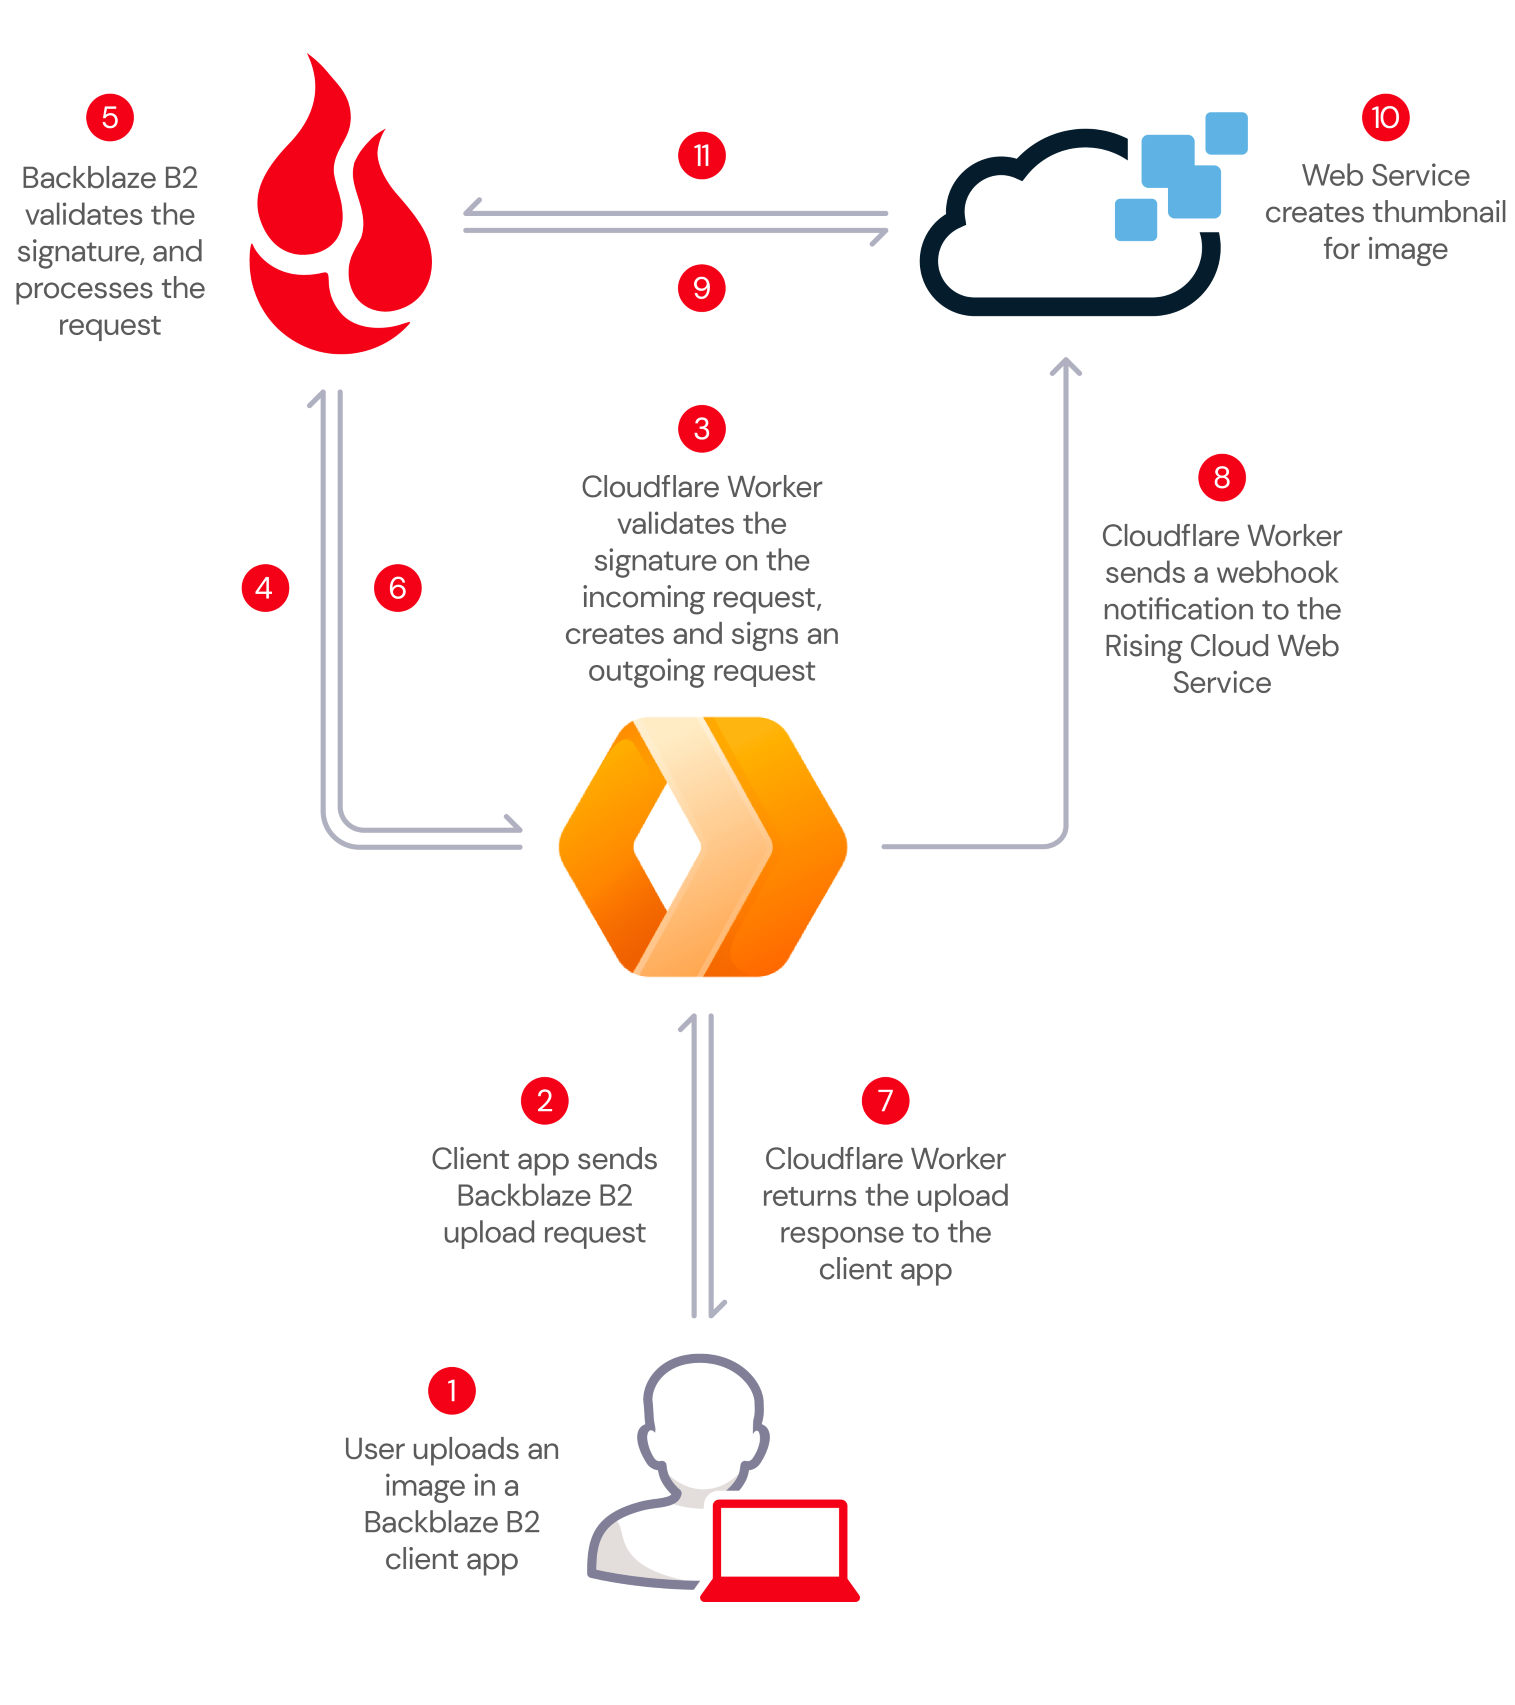
Here’s the message flow between the user’s app, the Cloudflare Worker, Backblaze B2, and the Rising Cloud app:
- A user uploads an image in a Backblaze B2 client application.
- The client app creates a signed upload request, exactly as it would for Backblaze B2, but sends it to the Cloudflare Worker rather than directly to Backblaze B2.
- The Worker validates the client’s signature and creates its own signed request.
- The Worker sends the signed request to Backblaze B2.
- Backblaze B2 validates the signature and processes the upload.
- Backblaze B2 returns the response to the Worker.
- The Worker forwards the response to the client app.
- The Worker sends a notification to the Rising Cloud Web Service.
- The Web Service downloads the image from Backblaze B2.
- The Web Service creates a thumbnail for the image.
- The Web Service uploads the thumbnail to Backblaze B2.
These steps are illustrated in the diagram below.
I decided to write the application in JavaScript, since the Node.js runtime environment and its Express web application framework are well-suited to handling HTTP requests. Also, the open-source Sharp Node.js module performs this type of image processing task 4x-5x faster than either ImageMagick or GraphicsMagick. The source code is available on GitHub.
The entire JavaScript application is less than 150 lines of well-commented JavaScript and uses the AWS SDK’s S3 client library to interact with Backblaze B2 via the Backblaze S3 Compatible API. The core of the application is quite straightforward:
    // Get the image from B2 (returns a readable stream as the body)
    console.log(`Fetching image from ${inputUrl}`);
    const obj = await client.getObject({
      Bucket: bucket,
      Key: keyBase + (extension ? "." + extension : "")
    });

    // Create a Sharp transformer into which we can stream image data
    const transformer = sharp()
      .rotate()                // Auto-orient based on the EXIF Orientation
tag
      .resize(RESIZE_OPTIONS); // Resize according to configured options

    // Pipe the image data into the transformer
    obj.Body.pipe(transformer);

    // We can read the transformer output into a buffer, since we know
    // that thumbnails are small enough to fit in memory
    const thumbnail = await transformer.toBuffer();

    // Remove any extension from the incoming key and append '_tn.'
    const outputKey = path.parse(keyBase).name + TN_SUFFIX
                        + (extension ? "." + extension : "");
    const outputUrl = B2_ENDPOINT + '/' + bucket + '/'
                        + encodeURIComponent(outputKey);

    // Write the thumbnail buffer to the same B2 bucket as the original
    console.log(`Writing thumbnail to ${outputUrl}`);
    await client.putObject({
      Bucket: bucket,
      Key: outputKey,
      Body: thumbnail,
      ContentType: 'image/jpeg'
    });

    // We're done - reply with the thumbnail's URL
    response.json({
      thumbnail: outputUrl
    });
One thing you might notice in the above code is that neither the image nor the thumbnail is written to disk. The getObject() API provides a readable stream; the app passes that stream to the Sharp transformer, which reads the image data from Backblaze B2 and creates the thumbnail in memory. This approach is much faster than downloading the image to a local file, running an image-processing tool such as ImageMagick to create the thumbnail on disk, then uploading the thumbnail to Backblaze B2.
Deploying a Rising Cloud Web Service
With my app written and tested running locally on my laptop, it was time to deploy it to Rising Cloud. There are two types of Rising Cloud applications: Web Services and Tasks. A Rising Cloud Web Service directly accepts HTTP requests and returns HTTP responses synchronously, with the condition that it must return an HTTP response within 44 seconds to avoid a timeout—an easy fit for my thumbnail creator app. If I was transcoding video, on the other hand, an operation that might take several minutes, or even hours, a Rising Cloud Task would be more suitable. A Rising Cloud Task is a queueable function, implemented as a Linux executable, which may not require millisecond-level response times.
Rising Cloud uses Docker-style containers to deploy, scale, and manage apps, so the next step was to package my app as a Docker image to deploy as a Rising Cloud Web Service by creating a Dockerfile.
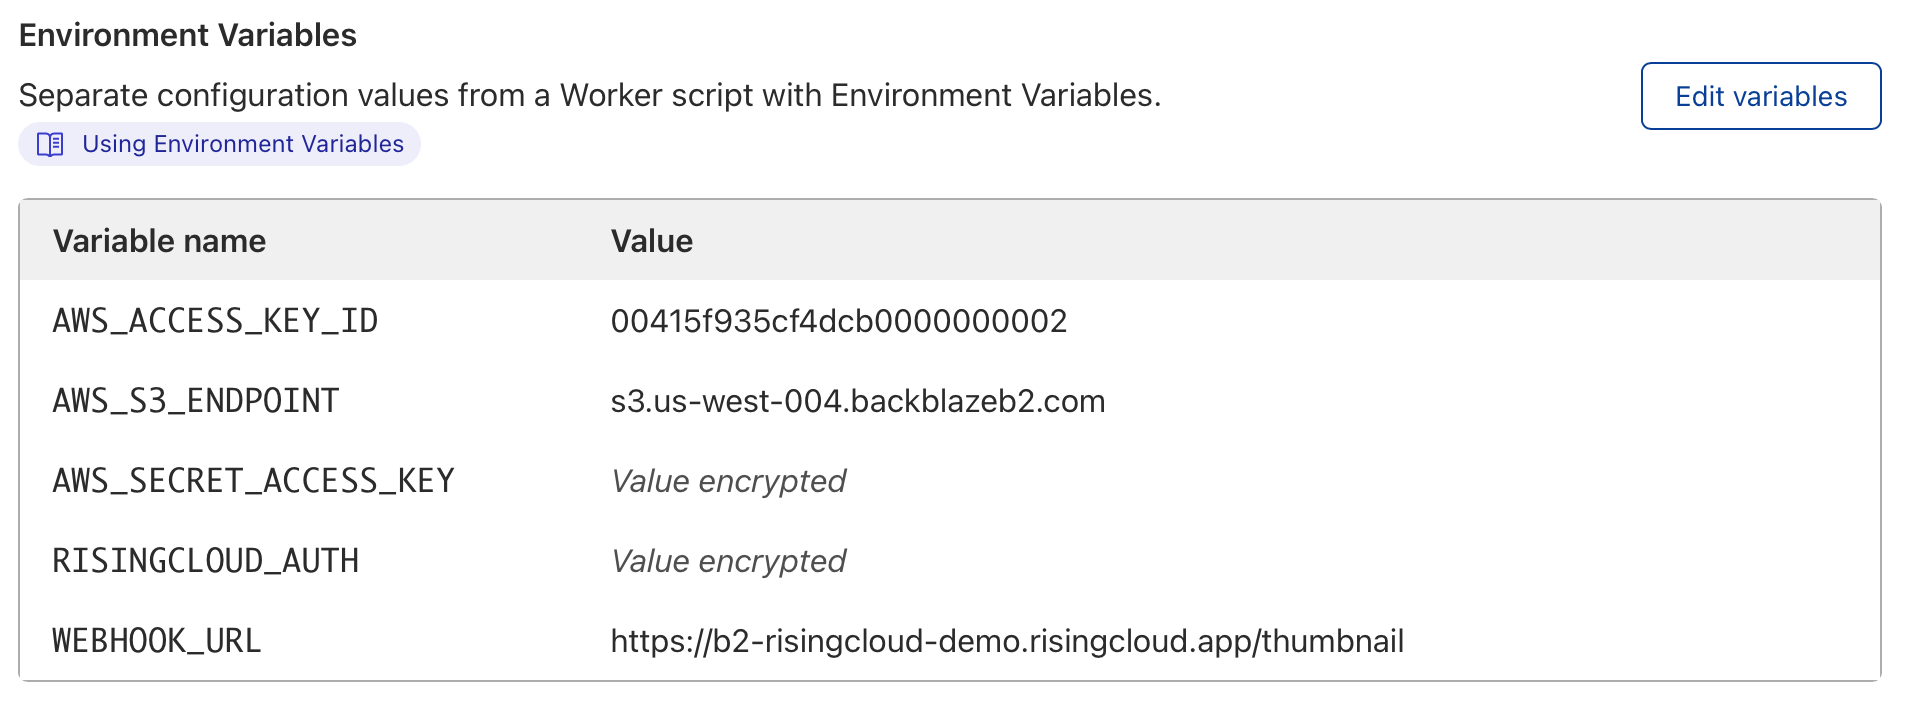
With that done, I was able to configure my app with its Backblaze B2 Application Key and Key ID, endpoint, and the required dimensions for the thumbnail. As with many other cloud platforms, apps can be configured via environment variables. Using the AWS SDK’s variable names for the app’s Backblaze B2 credentials meant that I didn’t have to explicitly handle them in my code—the SDK automatically uses the variables if they are set in the environment.

Notice also that the RESIZE_OPTIONS value is formatted as JSON, allowing maximum flexibility in configuring the resize operation. As you can see, I set the withoutEnlargement parameter as well as the desired width, so that images already smaller than the width would not be enlarged.
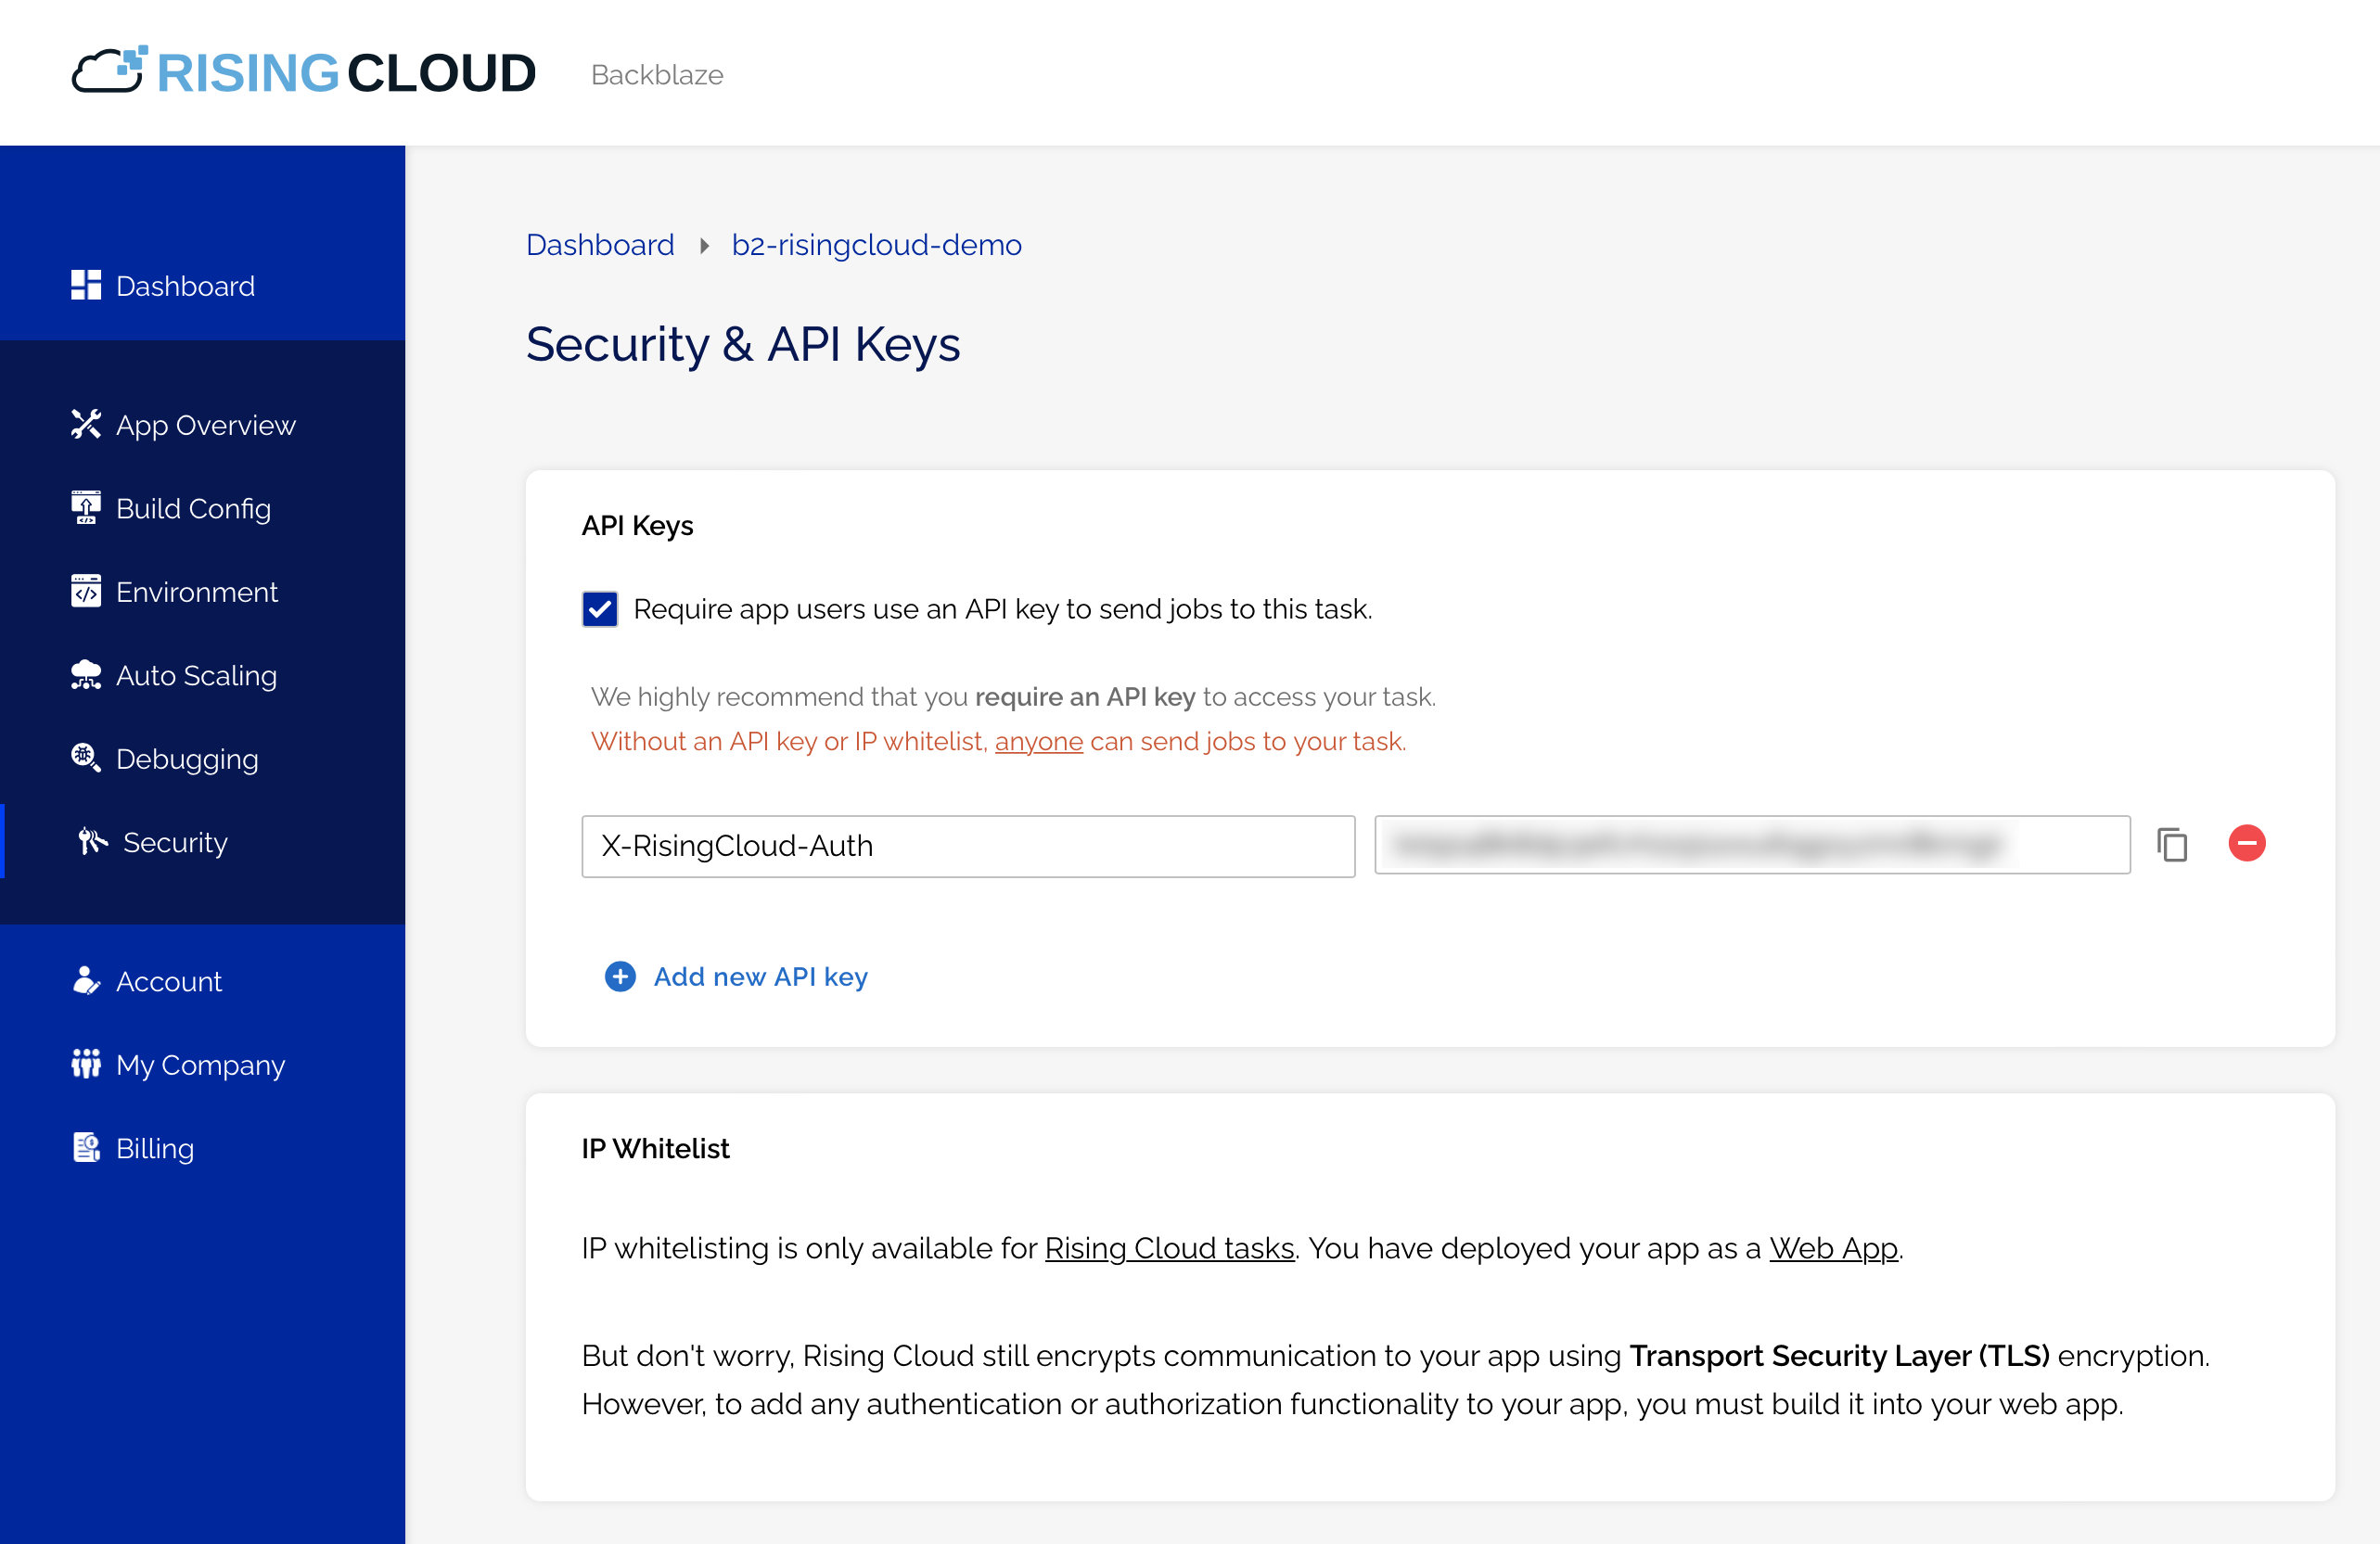
Calling a Rising Cloud Web Service
By default, Rising Cloud requires that app clients supply an API key with each request as an HTTP header with the name X-RisingCloud-Auth:
So, to test the Web Service, I used the curl command-line tool to send a POST request containing a JSON payload in the format emitted by the Cloudflare Worker and the API key:
curl -d @example-request.json \
	-H 'Content-Type: application/json' \
	-H 'X-RisingCloud-Auth: ' \
	https://b2-risingcloud-demo.risingcloud.app/thumbnail
As expected, the Web Service responded with the URL of the newly created thumbnail:
{
  "thumbnail":"https://s3.us-west-001.backblazeb2.com/my-bucket/image001_tn.jpg"
}
(JSON formatted for clarity)
The final piece of the puzzle was to create a Cloudflare Worker from the Backblaze B2 Proxy template, and add a line of code to include the Rising Cloud API key HTTP header in its notification. The Cloudflare Worker configuration includes its Backblaze B2 credentials, Backblaze B2 endpoint, Rising Cloud API key, and the Web Service endpoint (webhook):
This short video shows the application in action, and how Rising Cloud spins up new instances to handle an influx of traffic:
Process Your Own Backblaze B2 Files in Rising Cloud
You can deploy an application on Rising Cloud to respond to any Backblaze B2 operation(s). You might want to upload a standard set of files whenever a bucket is created, or keep an audit log of Backblaze B2 operations performed on a particular set of buckets. And, of course, you’re not limited to triggering your Rising Cloud application from a Cloudflare worker—your app can respond to any HTTP request to its endpoint.
Submit your details here to set up a free trial of Rising Cloud. If you’re not already building on Backblaze B2, sign up to create an account today—the first 10 GB of storage is free!