You’re about to upgrade your Mac. Maybe you want to sell it or trade it in, and maybe you’re just throwing it out—either way, you likely still have plenty of personal data on your old computer. Getting rid of that data isn’t straightforward, and it is important. Sure, you could live out the famous printer destruction scene from the movie “Office Space” and smash the computer to pieces. As satisfying as that might be, there are better ways to wipe your Mac clean.
While there used to be two separate processes for wiping your Mac clean based on whether your computer had a hard disk drive (HDD) or a solid state drive (SSD), instructions for how to wipe your Mac are now based on your Mac’s processing chip—a Mac or an Intel-based chip.
Do You Need to Know What Type of Drive You Have?
Around 2010, Apple started moving to only SSD storage in many of its devices. That said, some Mac desktop computers continued to offer the option of both SSD and HDD storage until 2020, a setup they called a Fusion Drive. The Fusion Drive is not to be confused with flash storage, a term that refers to the internal storage that holds your readily available and most accessed data at lower power settings.
Note that as of November 2021, Apple does not offer any Macs with a Fusion Drive. Basically, if you bought your device before 2010 or you have a desktop computer from 2021 or earlier, there’s a chance you may be using an HDD.
The good news here is twofold. First, it’s pretty simple to figure out what kind of drive you have, and we’ll detail those steps below (just in case you’re one of those HDD holdouts). Second, Mac’s Help Center directions to wipe your Mac are bifurcated not around your drive type, but around what internal performance chip you’re using (Mac or Intel). Over the years, updates to the Mac operating system (macOS, or OS for general purposes) have made it much easier to wipe your Mac clean, but if you have an older OS, you may have to follow slightly different instructions.
HDDs and SSDs: What’s The Difference?
There are good reasons that Apple switched to using mostly SSDs, and good reasons they kept HDDs around for as long as they did as well. If you want to know more about the differences in drive types, check out Hard Disk Drive (HDD) vs. Solid State Drive (SSD): What’s the Difference?So, What Kind of Drive Do You Have?
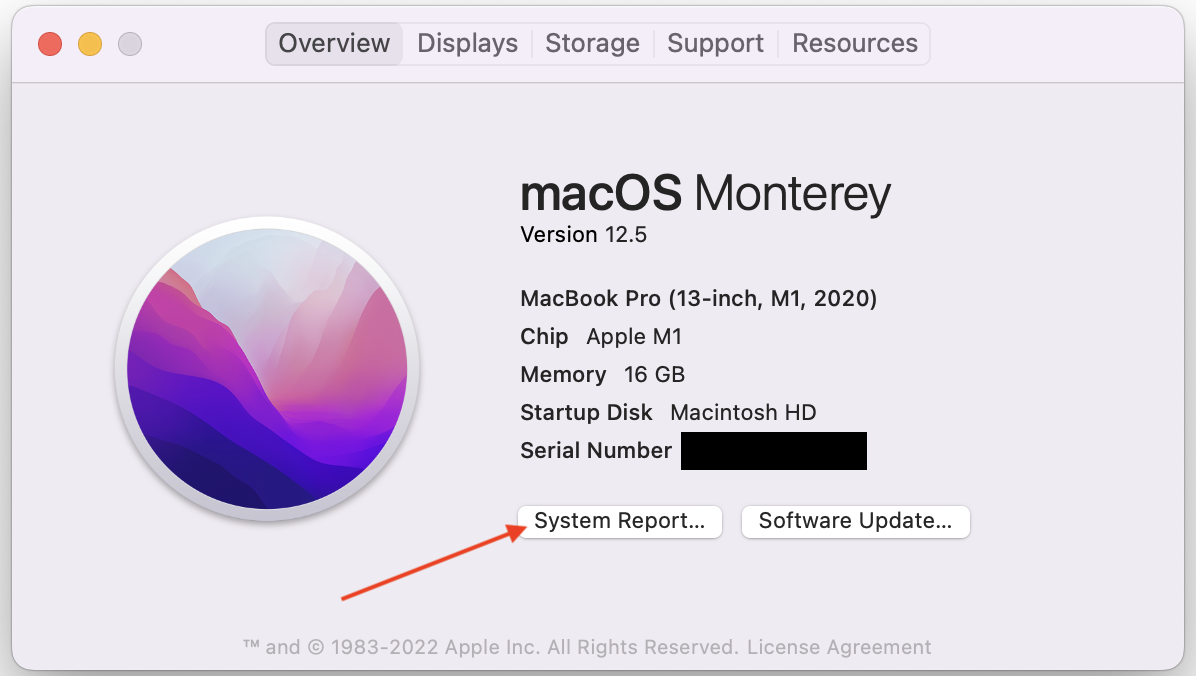
To determine what kind of drive your Mac uses, click on the Apple menu and select About This Mac.
Avoid the pitfall of selecting the Storage tab in the top menu. What you’ll find is that the default name of your drive is “Macintosh HD” which is confusing, given that they’re referring to the internal storage of the computer as a hard drive when (in most cases), your drive is an SSD. While you can find information about your drive on this screen, we prefer the method that provides maximum clarity.
So, on the Overview screen, click System Report. Bonus: You’ll also see what type of processor you have and your macOS version (which will be useful later).
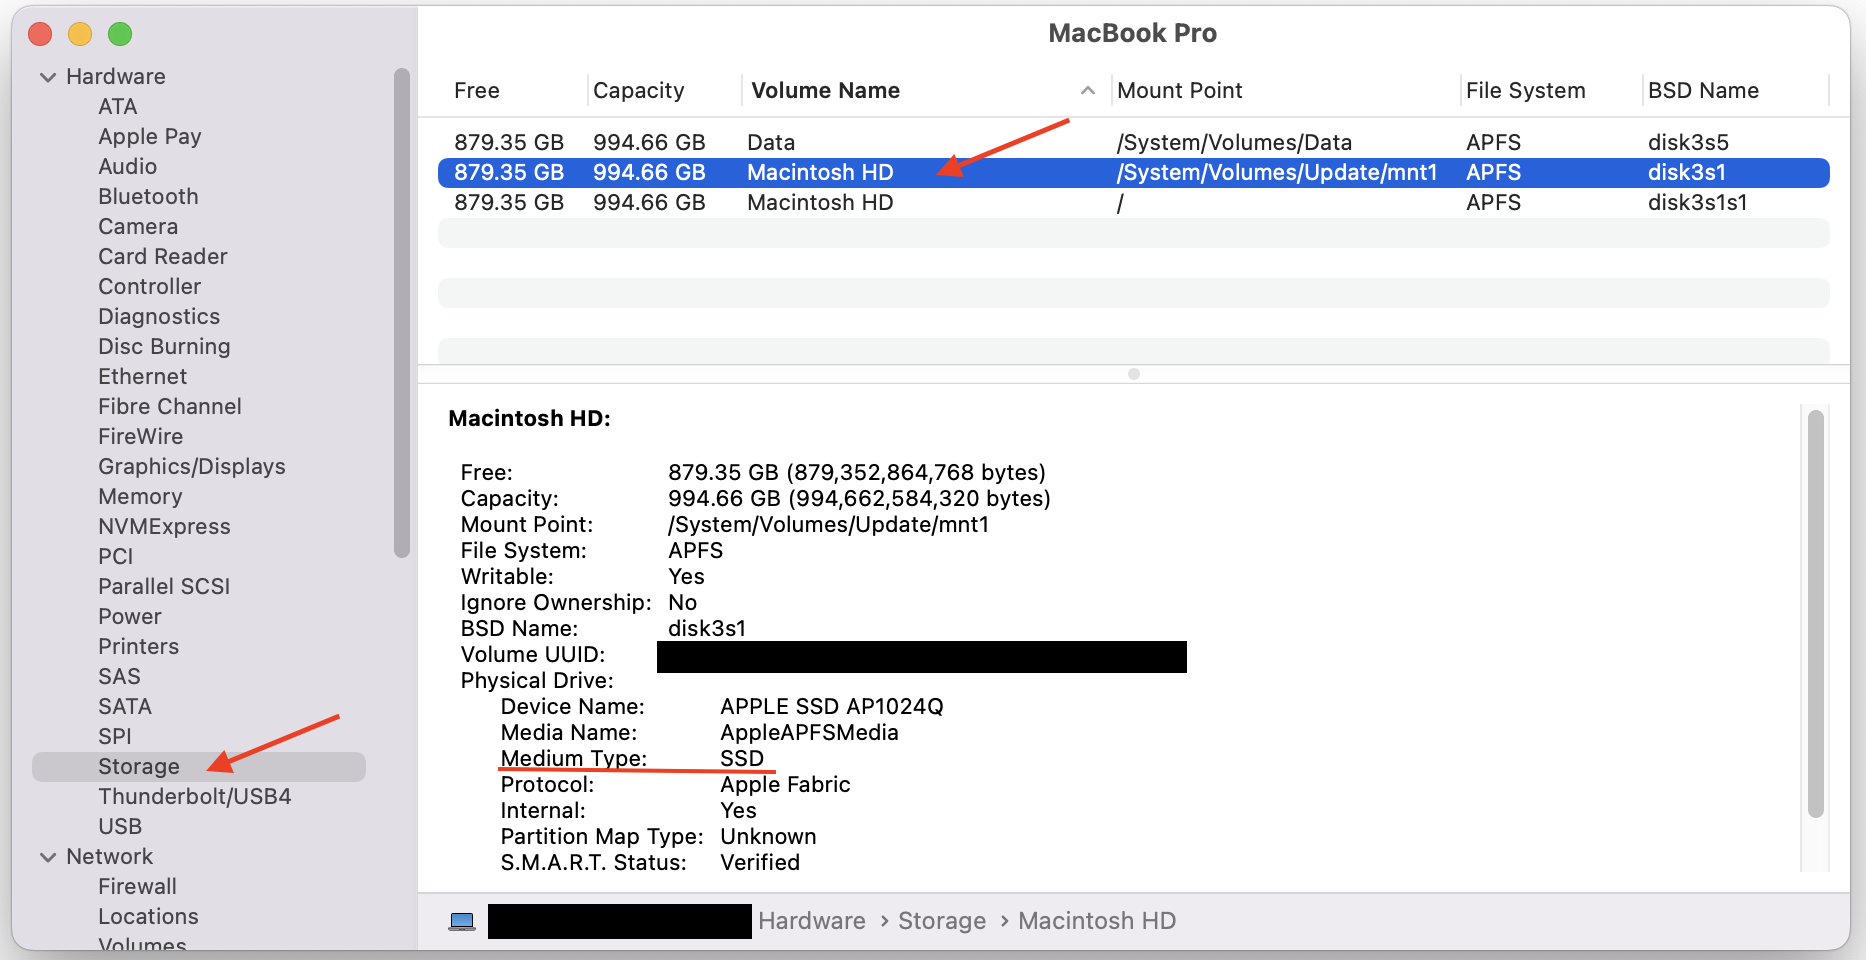
Once there, select the Storage tab, then the volume name you want to identify. You should see a line called Medium Type, which will tell you what kind of drive you have.
Identify Your Processing Chip
In November 2020, Apple launched its first Macs equipped with M1 chips, replacing the Intel-based processors of the past. The evolution of the M-series Apple chips has been notable largely for performance enhancements, but given that (at the time of publishing) this was only three years ago, there’s a good chance that many users will have an Intel processor.
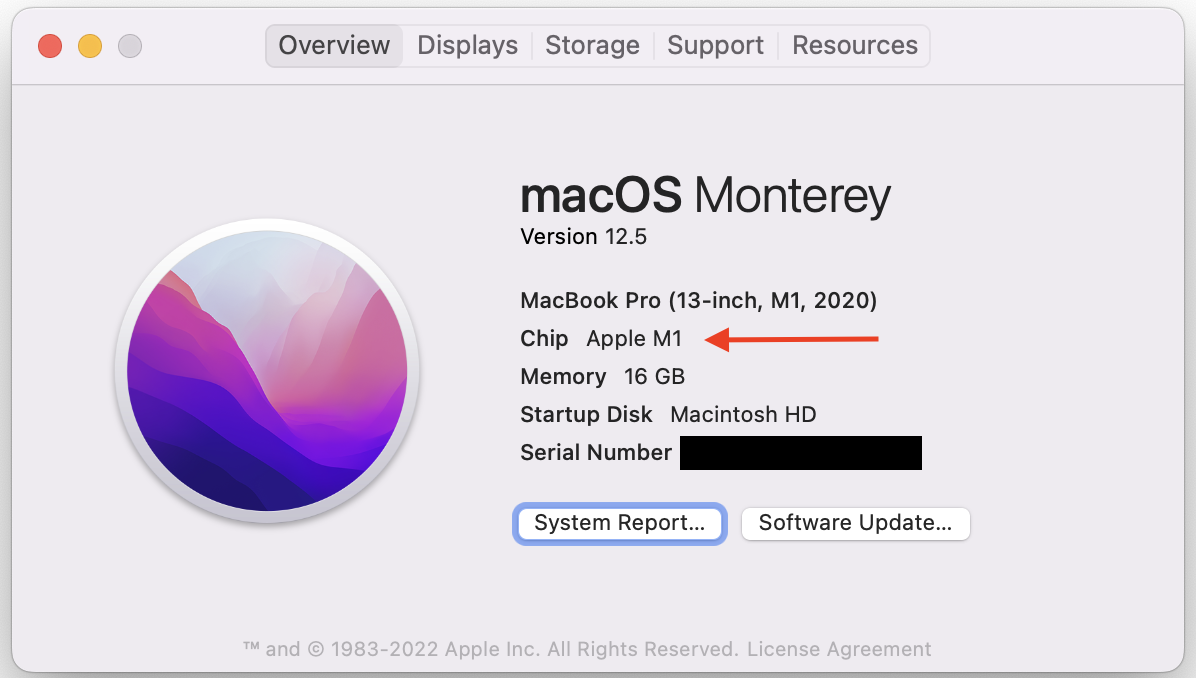
To see what kind of chip you have, follow the same instructions as above—go to your Apple menu and select About This Mac. If you have an M-series chip, you’ll see that listed as marked in the screenshot below.
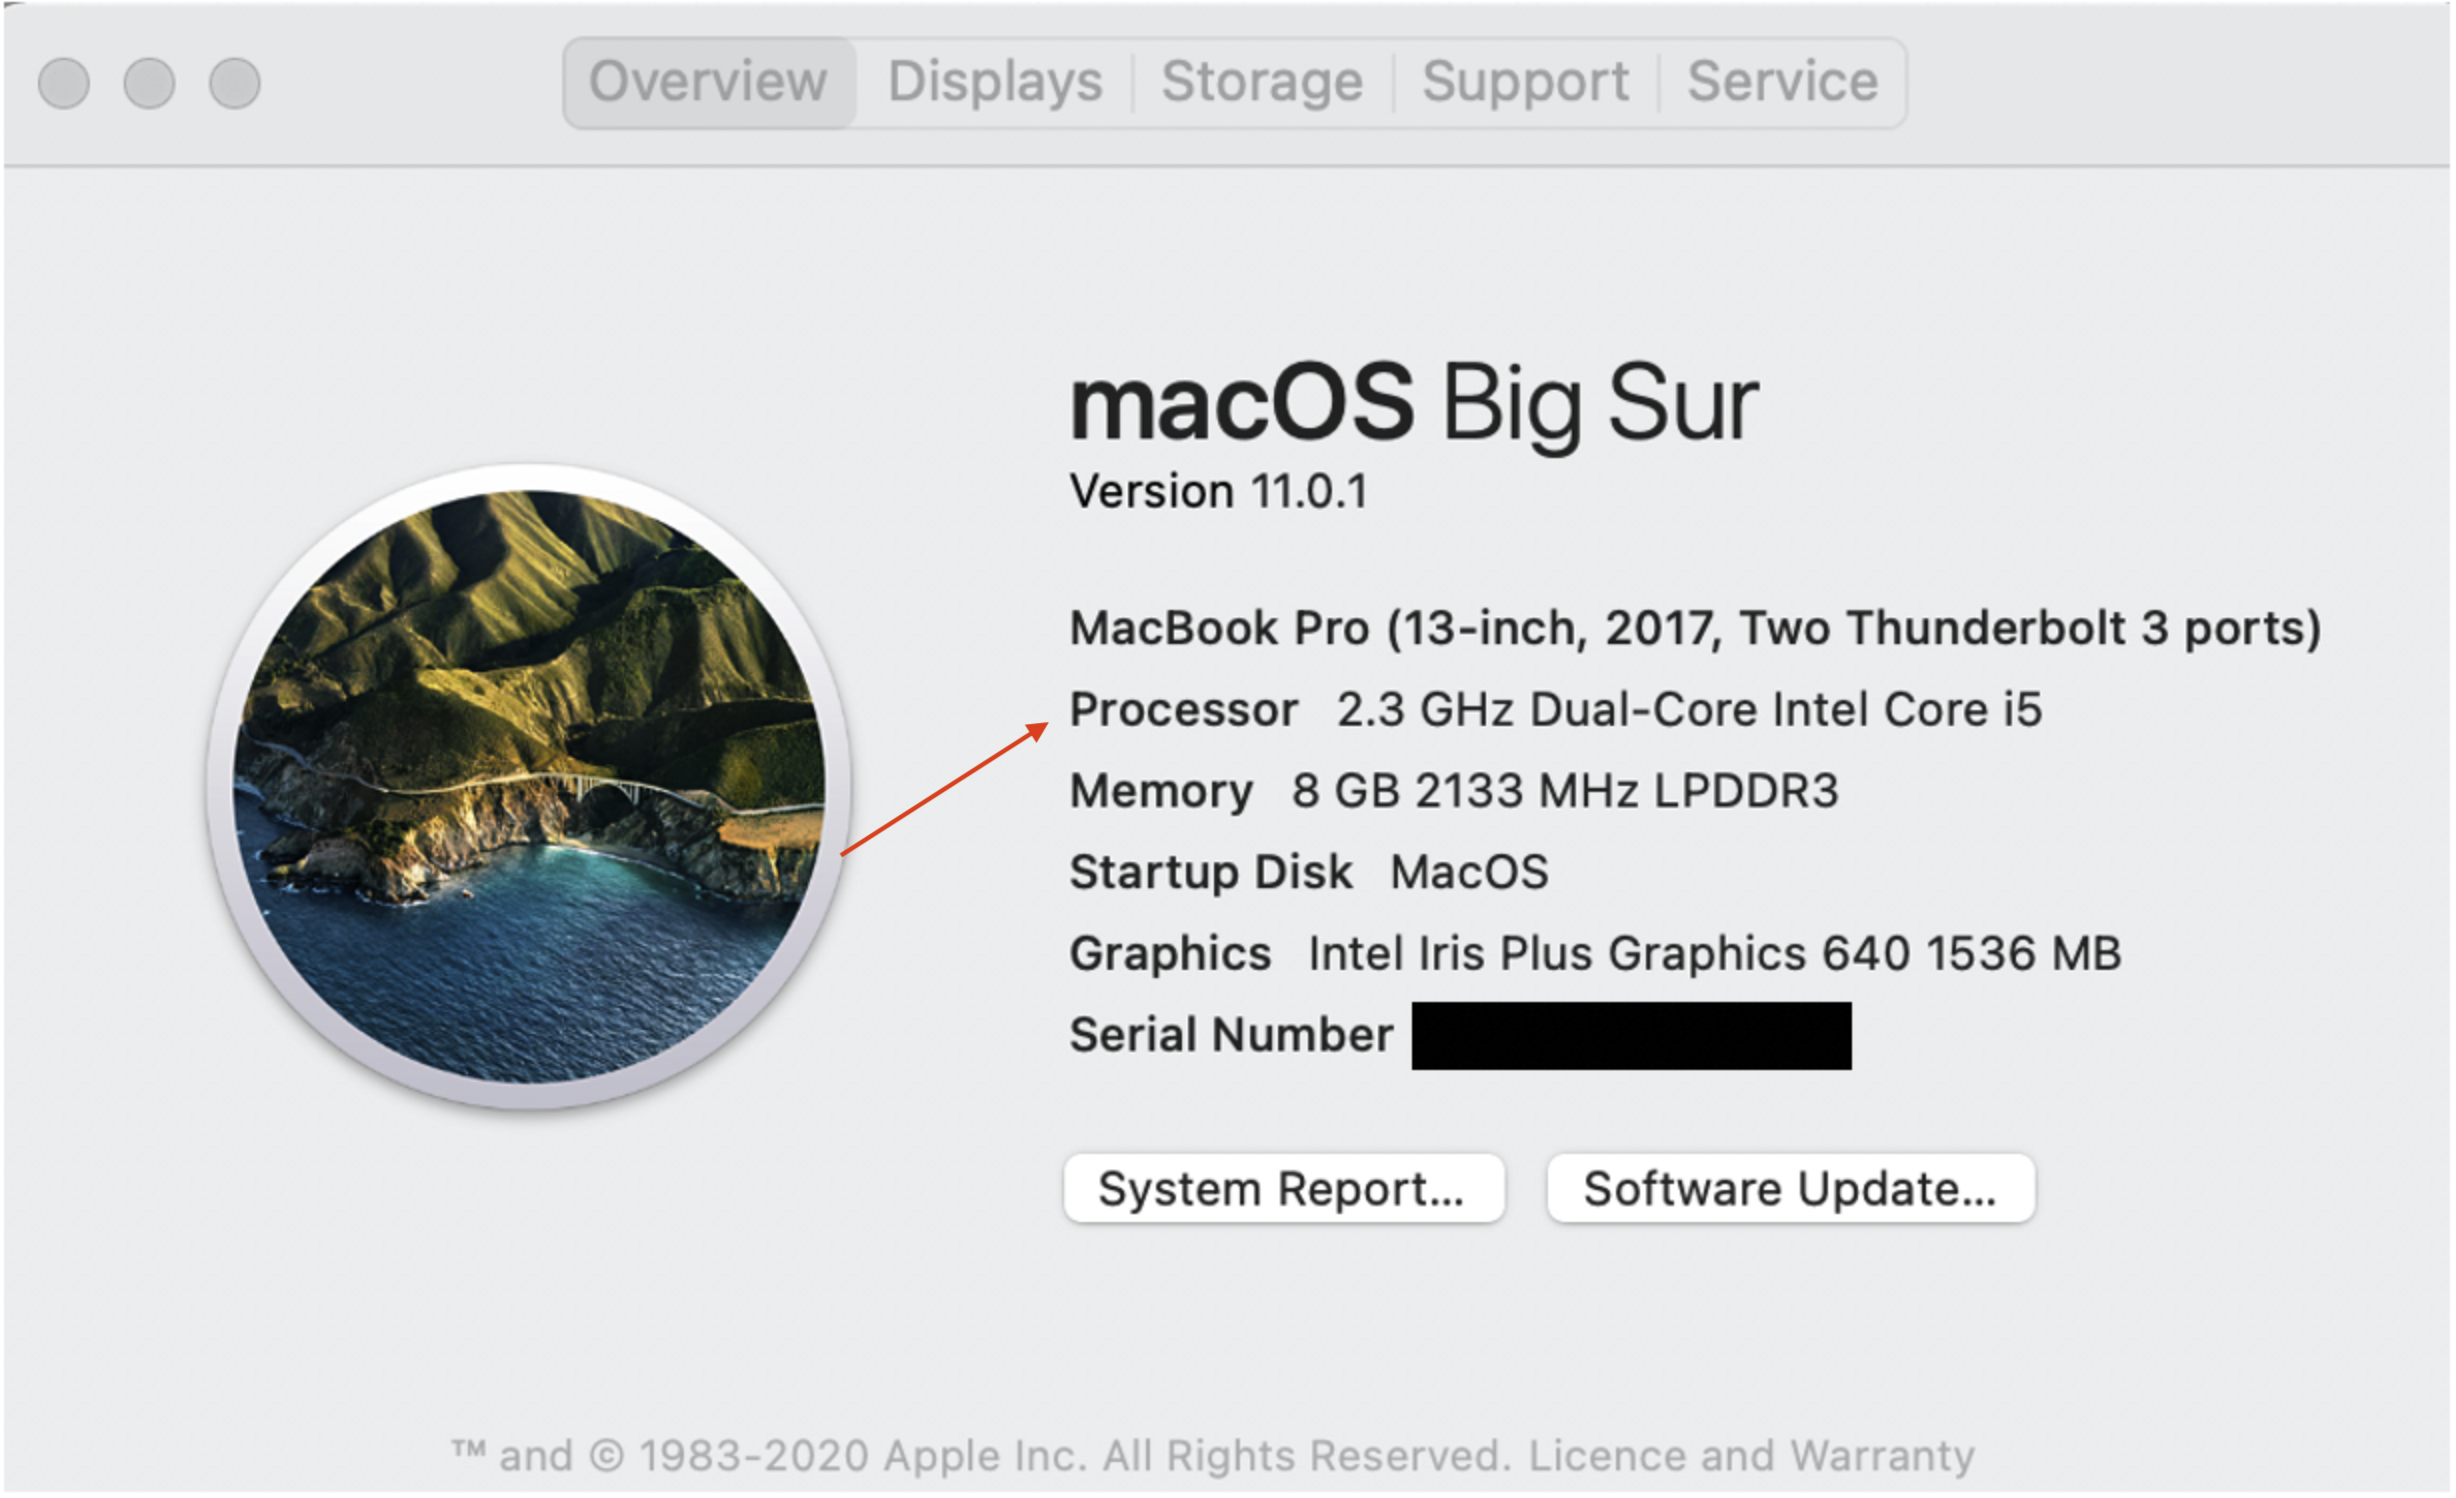
If you have an Intel-based Mac, you will see Processor, followed by the name of an Intel processor.
Now You Need to Know Your Mac OS
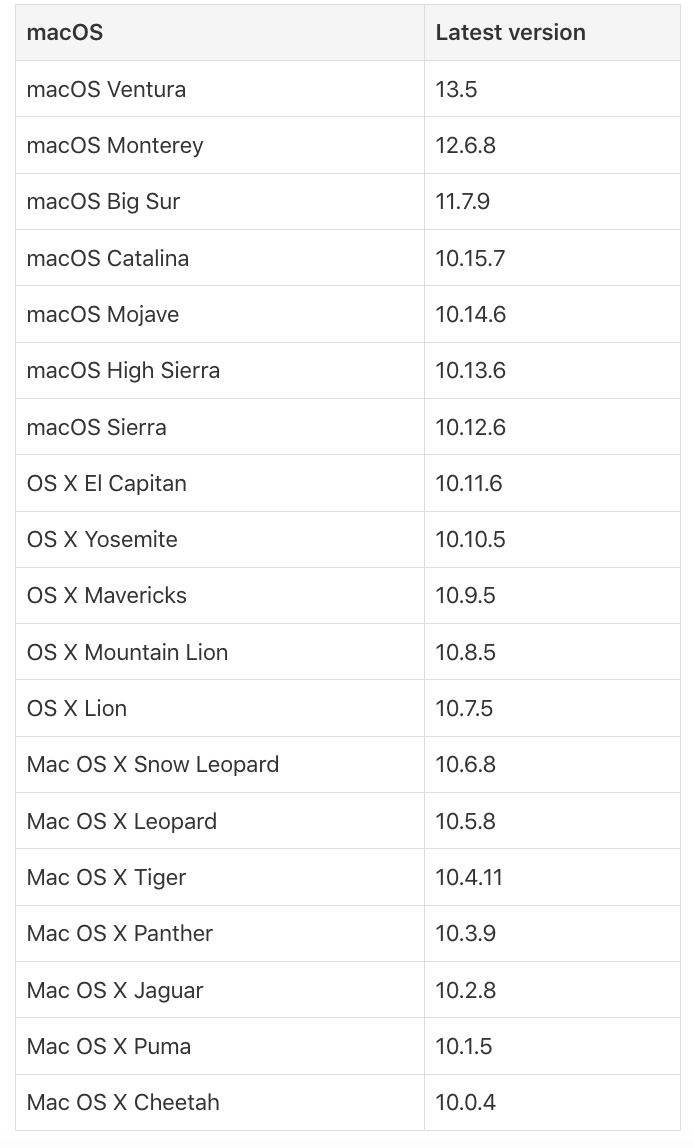
Great news! If you’re running Mac OS Monterey or later, it’s super easy to erase your Mac. Of course, you’ll have seen your current OS in our favorite About This Mac screen, but below is a list of all OS releases you can compare against, as well as the Apple Help article on the topic.
One Last Thing Before You Get Started—And It’s Crucial
Before you get started, you’ll want to make sure any important data on your hard drive has been backed up. The Apple OS has a built-in backup capability called Time Machine backup software.
While Time Machine is a good start, it doesn’t fulfill the requirements of a 3-2-1 backup strategy. And (as we all know) Apple devices work best with other Apple devices—so if you want to point your Time Machine backups to a non-Apple network device, you’ll have some creative setup to do. Ideally, you’d pair Time Machine with a product like Backblaze Personal Backup for maximum flexibility and cyber resilience. Note that even though backup runs on a schedule, we recommend hitting the manual backup button before you wipe your Mac to ensure you’ve got the most recent information.
How to Wipe Your Mac…Can Be Slightly Different Based on Your Computer
Once you’ve verified your data is backed up, roll up your sleeves and get to work. The key here is macOS Recovery—a part of the Mac operating system since OS 10.7 Lion. You can use the apps in macOS Recovery on a Mac with an Apple processing chip to repair your internal storage device, reinstall macOS, restore your files from a Time Machine backup, set the security policy for different volumes, transfer files between two Mac computers, start up in safe mode, and more.
Okay, so now that you know your operating system, processing chip, and drive type, we can get to the actual how-to of how to wipe your Mac. The steps will be slightly different based on each of the above variables. Let’s dig in.
Wipe a Mac With an Apple Chip and a Recent macOS Update
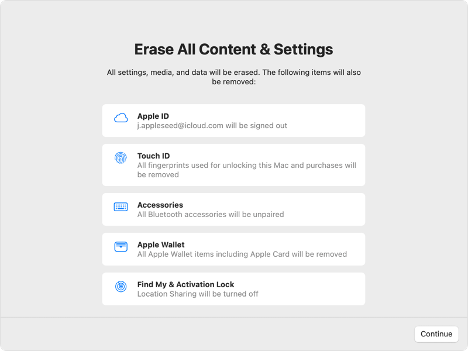
Assuming you’re rocking a recent macOS update, then you’re going to wipe your Mac using the Erase All Content and Settings function. (You might also see this called the Erase Assistant in Apple’s Help articles.) This will delete all your data, iCloud and Apple logins, Apple wallet information, Bluetooth pairings, fingerprint sensor profiles, and Find My Mac settings, as well as resetting your Mac to factory settings. Here’s how you find it.
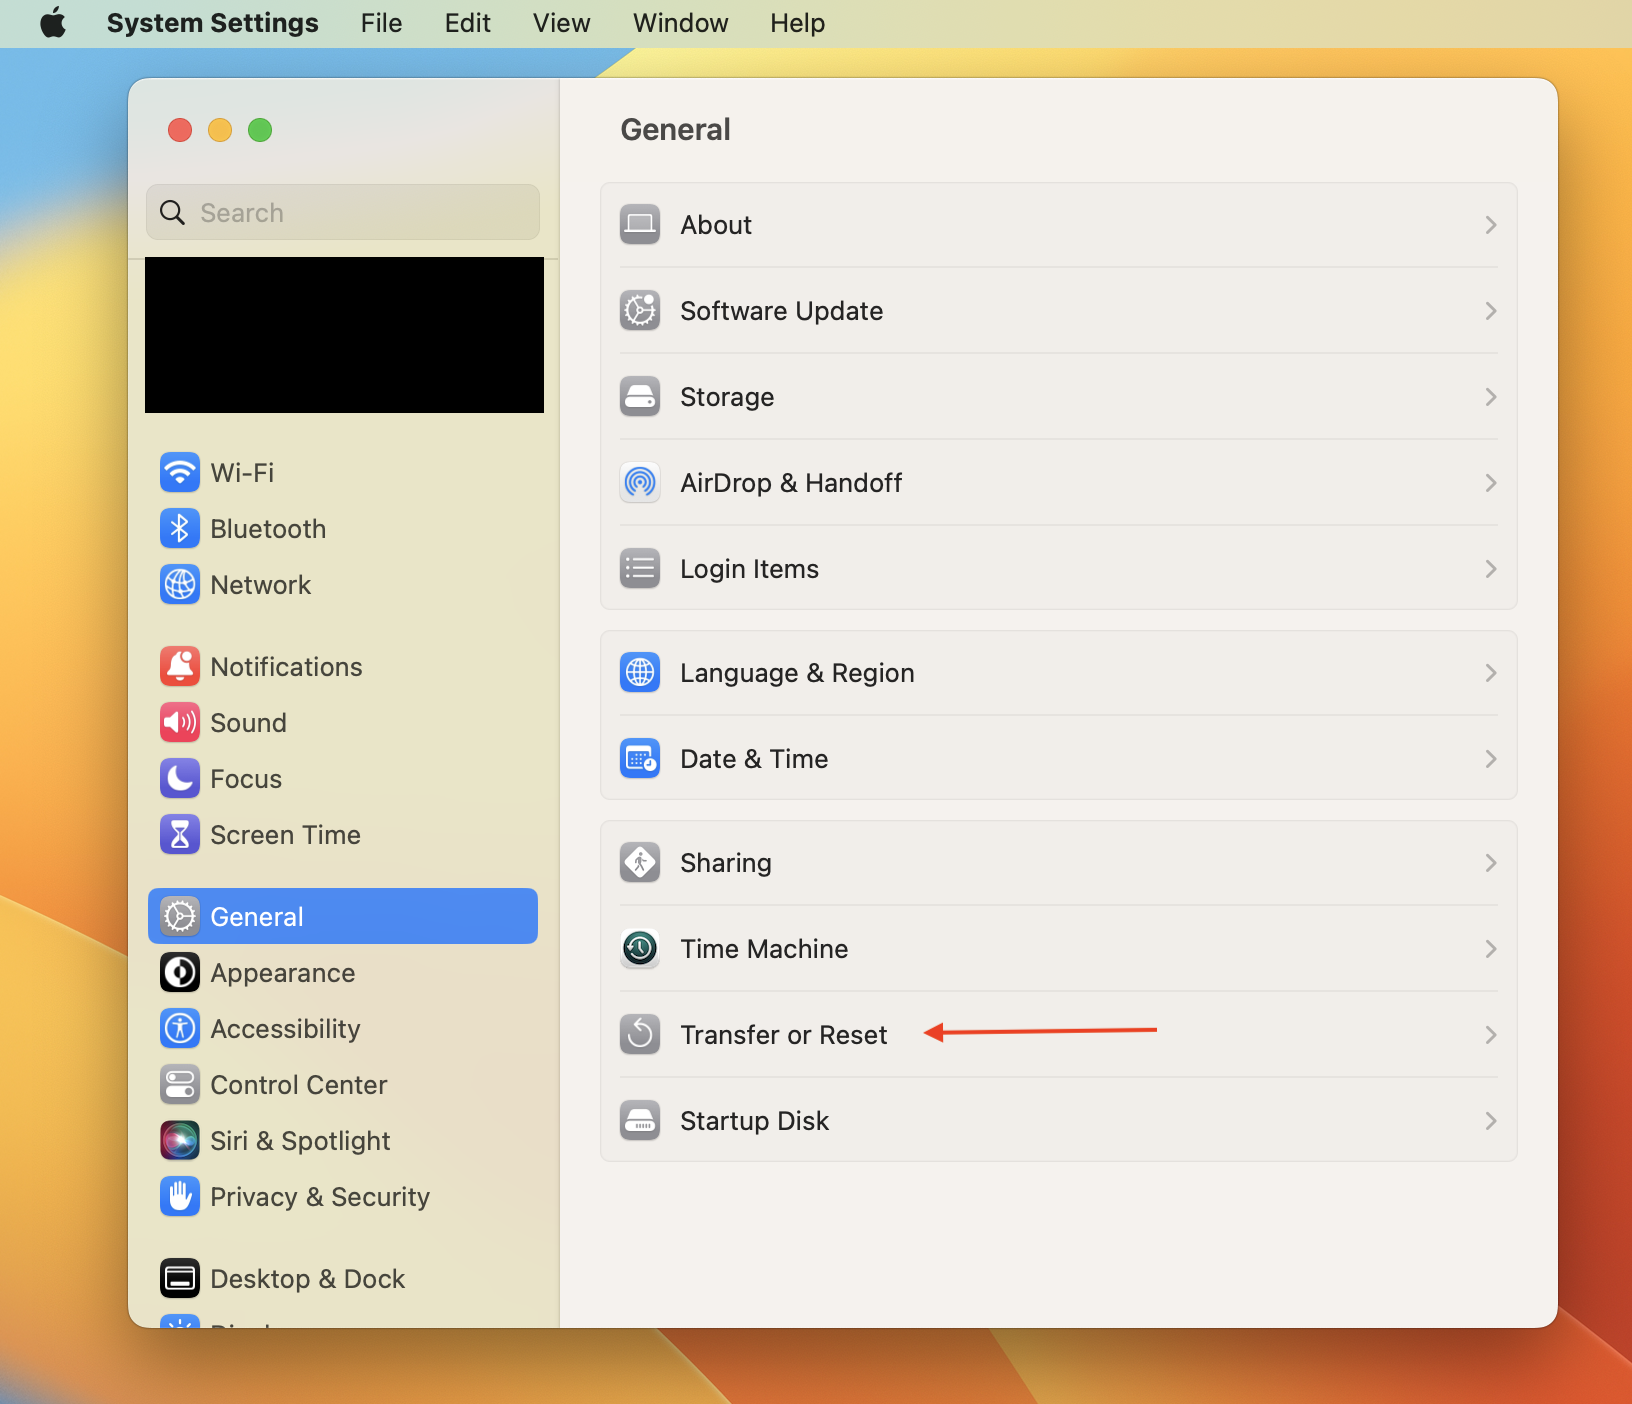
If you have macOS Ventura:
- Select the Apple menu.
- Choose System Settings.
- Click General in the sidebar.
- Click Transfer or Reset on the right.
- Click Erase all Content and Settings.
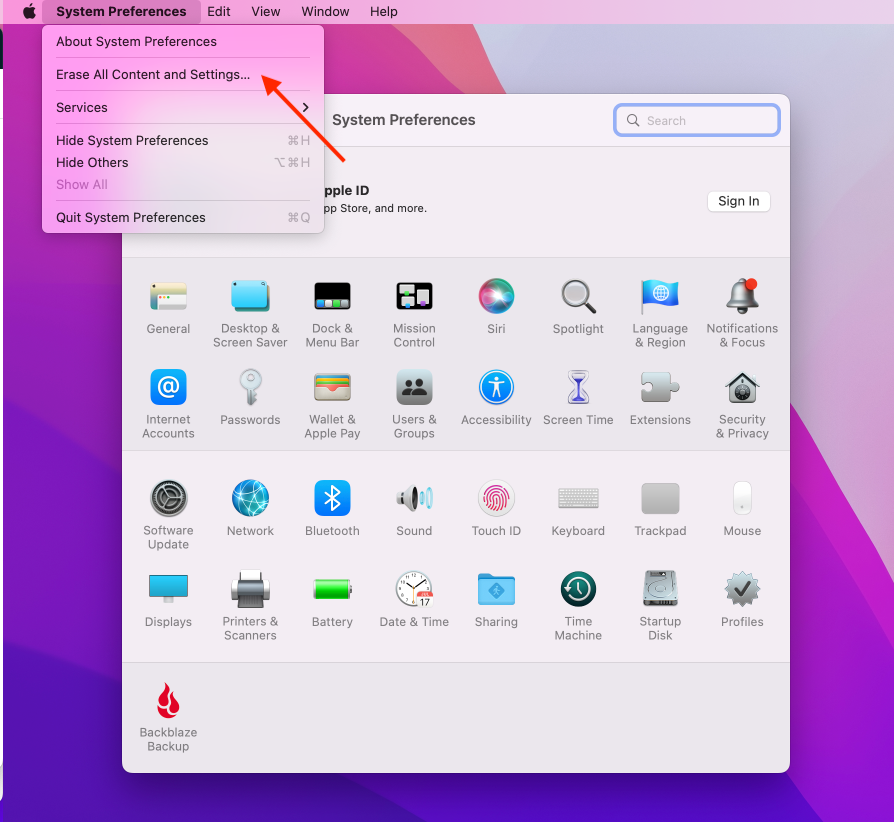
If you have macOS Monterey:
- Select the Apple Menu.
- Choose System Preferences.
- Once the System Preferences window is open, select the dropdown menu in your top navigation bar. Then, select Erase All Content and Settings.
After you’ve done that, then the steps will be the same for each process. Here’s what to expect.
- You’ll be prompted to log in with your administrator credentials.
- Next, you will be reminded to back up via Time Machine. Remember that if you choose this option, you’ll want to back up to an external device or cloud storage—because, of course, you’re about to get rid of all the data on this computer.
- Click Continue to allow all your settings, data, accounts, etc. to be removed.
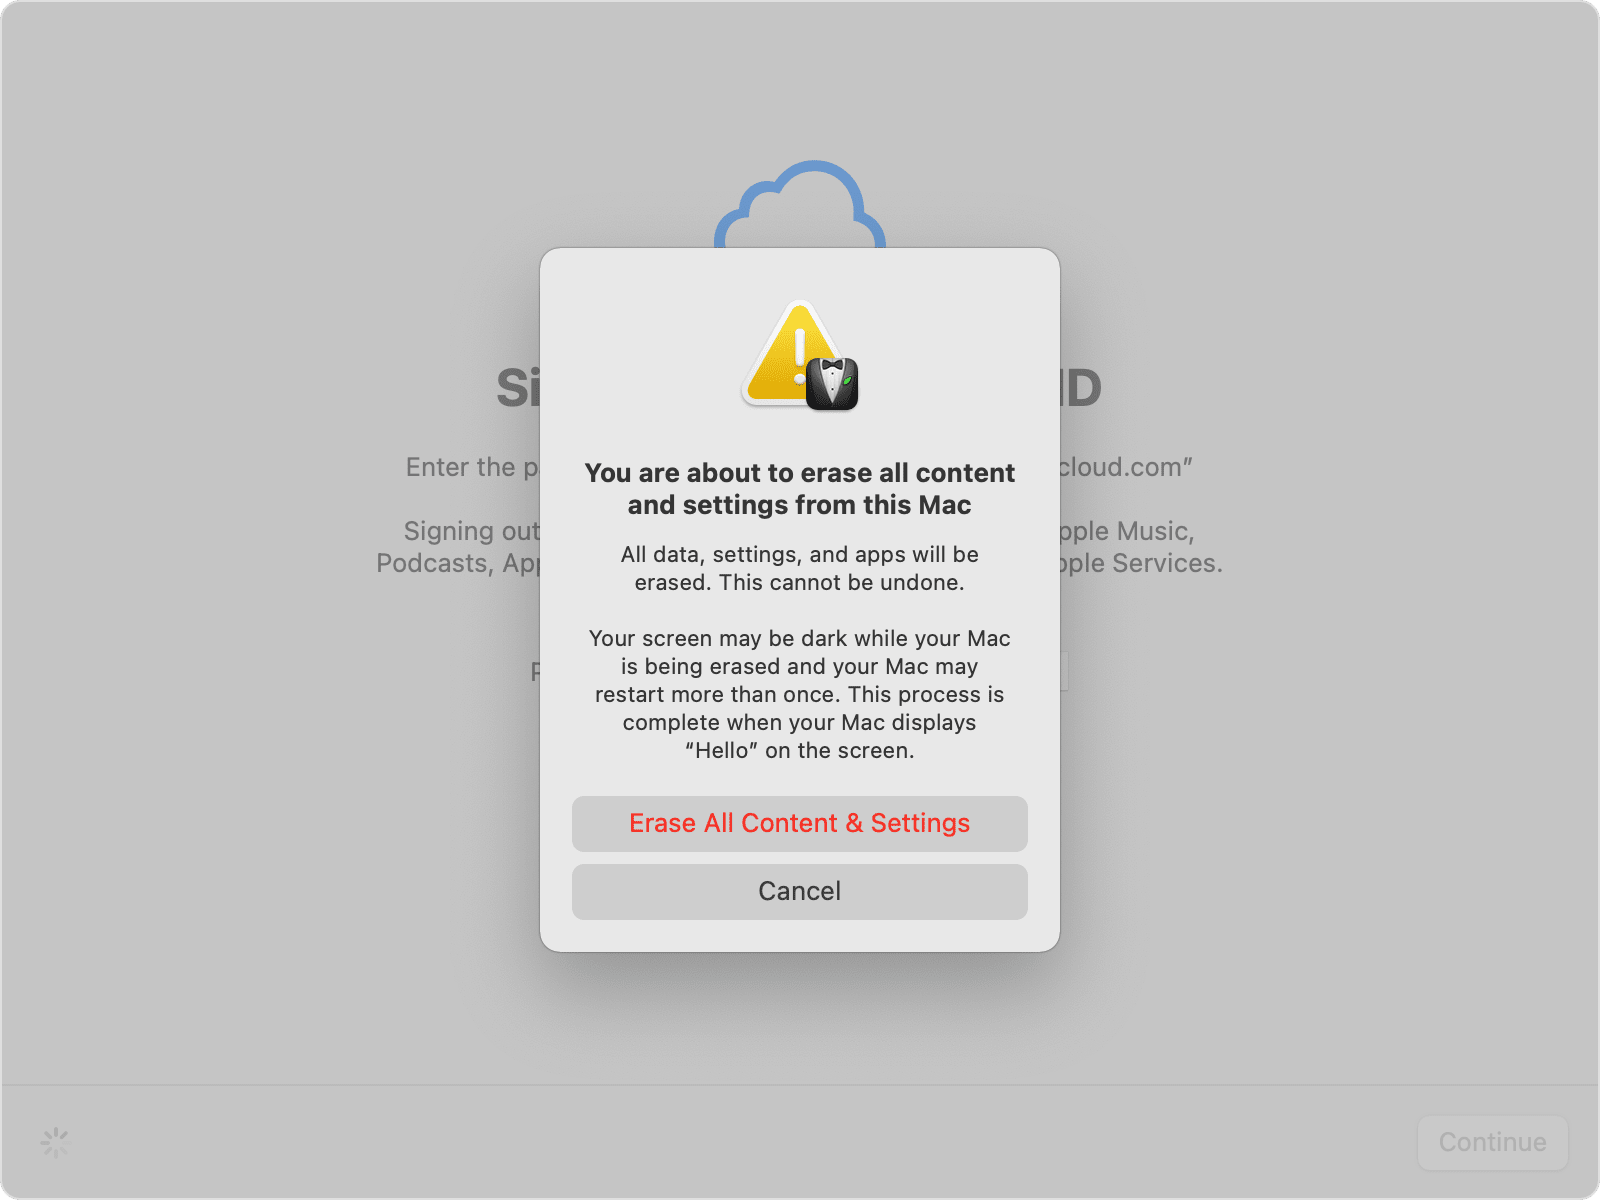
- If you’re asked to sign out of Apple ID, enter your Apple password and hit Continue.
- Click Erase all Content & Settings to confirm.
- Your Mac will automatically restart. If you have an accessory like a Bluetooth keyboard, you’ll be prompted to reconnect that device.
- Select a WiFi network or attach a network cable.
- After joining a network, your Mac activates. Click Restart.
- After your device has restarted, a setup assistant will launch (just like when you first got your Mac).
It’ll be pretty clear if you don’t meet the conditions to erase your drive using this method because you won’t see Erase All Content and Settings on the System Settings we showed you above. So, here are instructions for the other methods.
How to Wipe a Mac With an Apple Chip Using Disk Utility
Disk Utility is exactly what it sounds like: a Mac system application that helps you to manage your various storage volumes. You’d use it to manage storage if you have additional storage volumes, like a network attached storage (NAS) device or external hard drive; to set up a partition on your drive; to create a disk image (basically, a backup); or to simply give your disks a check up if they’re acting funky.
You can access Disk Utility at any time by selecting Finder > Go > Utilities, but you can also trigger Disk Utility on startup as outlined below.
- Turn on your Mac and continue to press and hold the power button until the startup options window comes up. Click Options, then click Continue.
- You may be prompted to login with either your administrative password or your Apple ID.
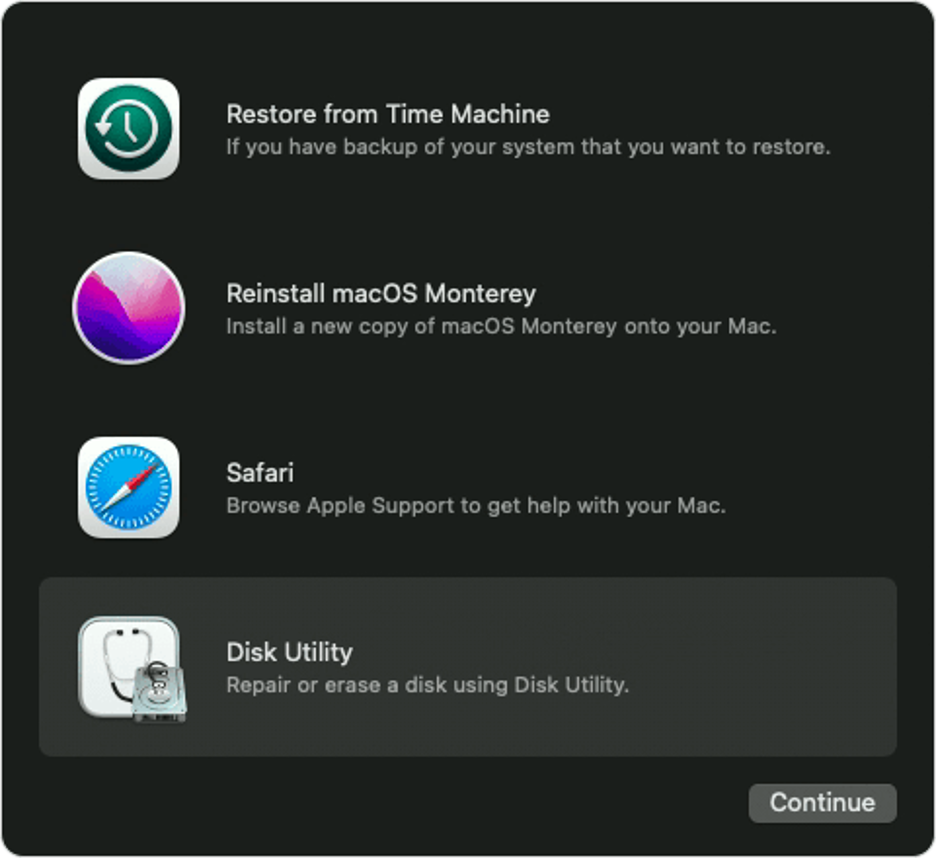
- When the Utilities window appears, select Disk Utility and hit Continue.
- If you’d previously added other drives to your startup disk, click the delete volume button (–) to erase them.
- Then, choose Macintosh HD in the sidebar.
- Click the Erase button, then select a file system format and enter a name for it. For Macs with an M1 chip, your option for a file system format is only APFS.
- Click Erase or, if it’s an option, Erase Volume Group. You may be asked for your Apple ID at this point.
- You’ll be prompted to confirm your choice, then your computer will restart.
- Just as in the other steps, when the computer restarts, it will attempt to activate by connecting to WiFi or asking you to attach a network cable.
- After it activates, select Exit to Recovery Utilities.
Once it’s done, the Mac’s hard drive will be clean as a whistle and ready for its next adventure: a fresh installation of the macOS, being donated to a relative or a local charity, or just sent to an e-waste facility. Of course, you can still drill a hole in your disk or smash it with a sledgehammer if it makes you happy, but now you know how to wipe the data from your old computer with much less ruckus.
How To Wipe a Mac With an Intel Processor Using Disk Utility
Last but not least, let’s talk about how to wipe an Intel-based Mac. (Fusion Drives fall into this category as well.)
- Starting with your Mac turned off, press the power button, then immediately hold down the command (⌘) and R keys and wait until the Apple logo appears. This will launch macOS Recovery.
- You may be prompted to log in with an administrator account password.
- When the Recovery window appears, select Disk Utility.
- In the sidebar, choose Macintosh HD.
- Click the Erase button, then select a file system format and enter a name for it. Your options for a file system format include Apple File System (APFS), which is the file system used by macOS 10.13 or later, and macOS Extended, which is the file system used by macOS 10.12 or earlier.
- Click Erase or Erase Volume Group. You may be prompted to provide your Apple ID.
- If you previously used Disk Utility to add other storage volumes, you can erase them individually using the process above.
- When you’ve deleted all your drives, quit Disk Utility to return to the utilities window. You may also choose to restart your computer at this point.
Securely Erasing Drives: Questions and Considerations
Some of you drive experts out there might remember that there is some nuance to security when it comes to erasing drives, and that there are differences in erasing HDDs versus SSDs. Without detouring into the nuances of why and how that’s the case, just know that on Fusion Drives or Intel-based Macs, you may see additional Security Options you can enable when erasing HDDs.
There are four options in the “Security Options” slider. “Fastest” is quick but insecure—data could potentially be rebuilt using a file recovery app. Moving that slider to the right introduces progressively more secure erasing. Disk Utility’s most secure level erases the information used to access the files on your disk, then writes zeros across the disk surface seven times to help remove any trace of what was there. This setting conforms to the DoD 5220.22-M specification. Bear in mind that the more secure method you select, the longer it will take. The most secure methods can add hours to the process. For peace of mind, we suggest choosing the most secure option to erase your hard drive. You can always start the process in the evening and let it run overnight.
After the process is complete, restart your Mac and see if you can find any data. A quick inspection is not foolproof, but it can provide some peace of mind that the process finished without an interruption.
Securely Erasing SSDs and Why Not To
If your Mac comes equipped with an SSD, Apple’s Disk Utility software won’t actually let you zero the drive. Sounds strange, right? Apple’s online Knowledge Base explains that secure erase options are not available in Disk Utility for SSDs.
Fortunately, you are not restricted to using the standard erasure option to protect yourself. Instead, you can use FileVault, a capability built into the operating system.
FileVault Keeps Your Data Safe
FileVault is an excellent option to protect all of the data on a Mac SSD with encryption. FileVault is whole-disk encryption for the Mac. With FileVault engaged, you need a password to access the information on your hard drive. Even without it, your data is encrypted and it would be very difficult for anybody else to access.
Before you use FileVault, there is a crucial downside. If you lose your password or the encryption key, your data may be gone for good!
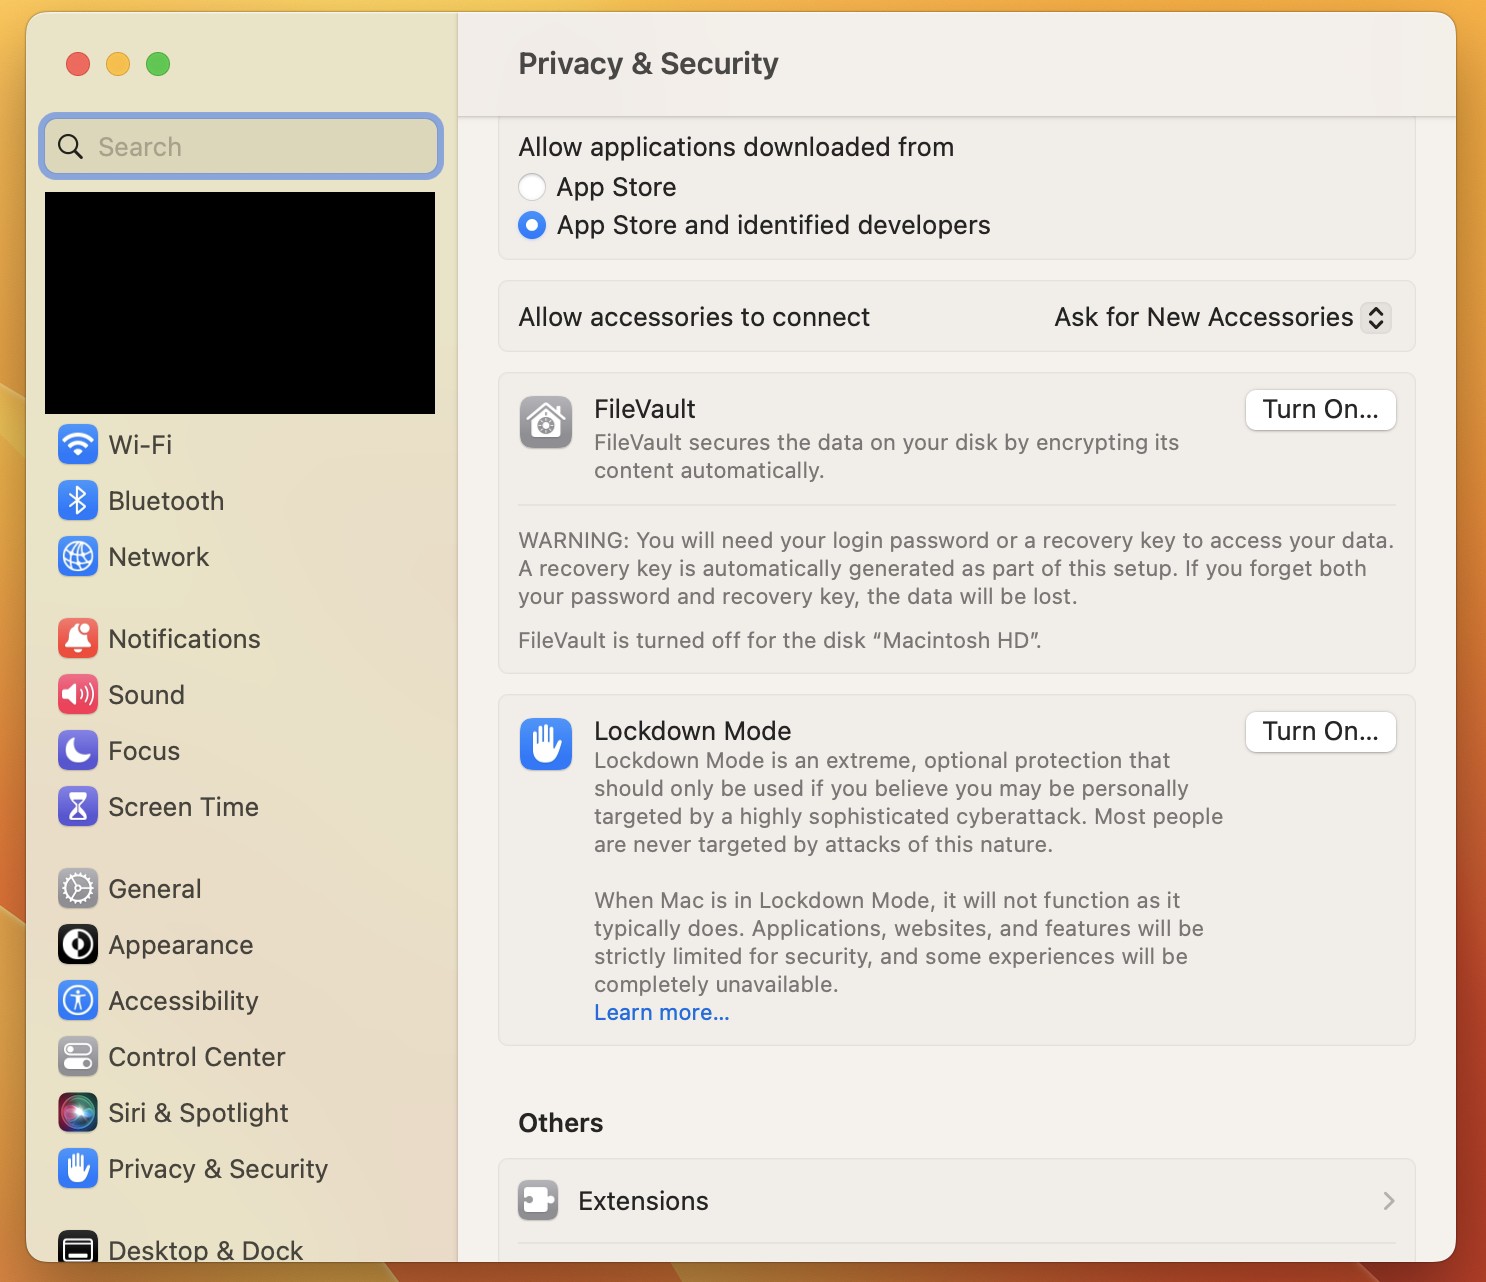
When you first set up a new Mac, you’re given the option of turning FileVault on. If you don’t do it then, you can turn on FileVault at any time by clicking on your Mac’s System Preferences, clicking on Security & Privacy, and clicking on the FileVault tab. Be warned, however, that the initial encryption process can take hours, as will decryption if you ever need to turn FileVault off.
With FileVault turned on, you can restart your Mac into its Recovery System following the directions above and erase your hard drive using Disk Utility, once you’ve unlocked it (by selecting the disk, clicking the File menu, and clicking Unlock). That deletes the FileVault key, which means any data on the drive is useless.
Nowadays, most Macs manage disk encryption through the T2 chip and its Secure Enclave, which is entirely separate from the main computer itself. This is why FileVault has no CPU overhead—it’s all handled by the T2 chip. Although FileVault doesn’t impact the performance of most modern Macs, we’d suggest only using it if your Mac has an SSD, not a conventional HDD.
Securely Erasing Free Space on Your SSD
If you don’t want to take Apple’s word for it, if you’re not using FileVault, or if you just want to, there is a way to securely erase free space on your SSD. It’s a little more involved, but it works. Before we get into the nitty-gritty, let me state for the record that this really isn’t necessary to do, which is why Apple’s made it so hard to do.
To delete all data from an SSD on an Apple computer, use Apple’s Terminal app. Terminal provides you with command line interface (CLI) access to the OS X operating system. Terminal lives in the Utilities folder, but you can access Terminal from the Mac’s Recovery System. Once your Mac has booted into the Recovery partition, click the Utilities menu and launch Terminal.
From a Terminal command line, type the following:
diskutil secureErase freespace VALUE /Volumes/DRIVE
That tells your Mac to securely erase the free space on your SSD. You’ll need to change VALUE to a number between 0 and 4. Zero is a single-pass run of zeroes, 1 is a single-pass run of random numbers, 2 is a seven-pass erase, 3 is a 35-pass erase. Finally, level 4 is a three-pass erase with random fills plus a final zero fill. DRIVE should be changed to the name of your hard drive. To run a seven-pass erase of your SSD drive in JohnB-MacBook, you would enter the following:
diskutil secureErase freespace 2 /Volumes/JohnB-MacBook
Note that while Mac’s Terminal typically uses forward slashes ( / ), if you have as space in the name of your hard drive, you’ll see a backslash ( \ ) to indicate that break in syntax. (So “Macintosh HD” becomes /Macintosh\ HD.) For example, to run a 35-pass erase on a hard drive called Macintosh HD, enter the following:
diskutil secureErase freespace 3 /Volumes/Macintosh\ HD
If you’re like the majority of computer users, you’ve never opened your Terminal application—and that’s probably a good thing. If you’re providing the proper instructions, a CLI lets you directly edit the guts of your computer. If you’re not providing the proper instructions, things will just error out, and likely you won’t know why. All this to say: Apple has made specific choices about designing products for folks who aren’t computer experts. Sometimes it limits how customizable you can get on your device (i.e. it’s super hard to zero out an SSD), but usually it’s for good reason—in this case, it’s to preserve the health of your drive in the long term.
When Erasing Is Not Enough: How To Destroy a Drive
If you absolutely, positively must be sure that all the data on a drive is irretrievable, see this Scientific American article (with contributions by Gleb Budman, Backblaze CEO), How to Destroy a Hard Drive—Permanently.
Since you’re interested in SSDs, you might enjoy reading other posts in our SSD 101 series. And if you’d like to learn how to securely erase a Windows PC HDD or SSD, take a look at our guide here.