Offload Veeam Cloud Tier Backups to Backblaze B2 with Immutability
- Print
- DarkLight
Offload Veeam Cloud Tier Backups to Backblaze B2 with Immutability
- Print
- DarkLight
Article Summary
Share feedback
Thanks for sharing your feedback!
Backblaze is certified as Veeam Ready—Object and Veeam Ready—Object with Immutability. Immutability is an important part of protecting backups from threats such as ransomware or stolen credentials by ensuring that your backup data is safe and secure for a specified timeframe.
This guide shows you how to set up Backblaze B2 Cloud Storage as part of a Scale-Out Backup Repository with Immutability in Veeam using our S3-Compatible API. To protect against ransomware, Backblaze strongly recommends that all Veeam customers enable immutability when offloading backups to Backblaze B2 using Veeam Cloud Tier.
This guide applies only to Enterprise and Enterprise Plus editions of Veeam Backup & Replication and Veeam Availability Suite. You can back up other editions of Veeam to Backblaze B2 using our partner, Tiger Bridge. Click here for more information.
If you need assistance with installing Veeam in your environment, click here.
Video Tutorials
The following video guide walks you through how to set up Backblaze B2 as part of a Scale-Out Backup Repository with immutability in Veeam using our S3-Compatible API.
The following video guide walks you through how to set up a local storage repository for the Scale-Out Backup Repository in Veeam. After this step is complete, you can back up your Veeam data to Backblaze B2 using our S3-Compatible API. You can also enable Object Lock for immutable ransomware protection.
Enable Backblaze B2
Before you begin: You must have a Backblaze B2 Cloud Storage account. You can sign up here. If you already have a Backblaze account and the left navigation menu contains a B2 Cloud Storage section, your account is already enabled for Backblaze B2.
- Sign in to your Backblaze account.
- In the left navigation menu under Account, click My Settings.
- Under Enabled Products, select the checkbox to enable B2 Cloud Storage.
- Review the Terms and Conditions, and click OK to accept them.
Create a Bucket
Object Lock allows immutability in Veeam to prevent your files from being changed. To protect your offloaded backups from ransomware, Backblaze strongly recommends that you enable Object Lock and use the Veeam Immutability feature. For more information about Object Lock, click here.
- Sign in to your Backblaze account.
- In the left navigation menu under B2 Cloud Storage, click Buckets.
- Click Create a Bucket.
- Enter a name for your bucket.
Bucket names must be at least six characters and globally unique. A message is displayed if your bucket name is already in use. - Select a privacy setting: Private or Public.
Files that are in a private bucket require authentication to perform an action, for example, downloading. Public buckets do not require authentication so you can easily share files. You can change a bucket's privacy settings at any time. - If applicable, enable a Backblaze B2 server-side encryption key.
- Enable Object Lock to restrict a file from being modified or deleted for a specified period of time.
Object Lock is required to use Veeam with Immutability. - Click Create a Bucket, and copy the value that is in the Endpoint field; you will need this value for other processes.
- Click Lifecycle Settings, and ensure that this option is set to Keep all versions of the file (default).
Create an Application Key
You cannot use your master app key with Veeam Cloud Tier or the Backblaze S3-Compatible API.
Do not change any of the default settings.
Application keys control access to your Backblaze B2 Cloud Storage account and the buckets that are contained in your account.
- Sign in to your Backblaze account.
- In the left navigation menu under Account, click Application Keys.
- Click Add a New Application Key, and enter an app key name.
You cannot search an app key by this name; therefore, app key names are not required to be globally unique. - Select All or a specific bucket in the Allow Access to Bucket(s) dropdown menu.
- Optionally, select your access type (Read and Write, Read Only, or Write Only).
- Optionally, select the Allow List All Bucket Names checkbox (required for the B2 Native API b2_list_buckets and the S3-Compatible API S3 List Buckets operations).
- Optionally, enter a file name prefix to restrict application key access only to files with that prefix. Depending on what you selected in step #4, this limits application key access to files with the specified prefix for all buckets or just the selected bucket.
- Optionally, enter a positive integer to limit the time, in seconds, before the application key expires. The value must be less than 1000 days (in seconds).
- Click Create New Key, and note the resulting keyID and applicationKey values.
Note
When you create a new app key, the response contains the actual key string, for example N2Zug0evLcHDlh_L0Z0AJhiGGdY. You can always find the keyID on this page, but for security, the applicationKey appears only once. Make sure you copy and securely save this value elsewhere.
Set Up a Veeam Repository
You must create a scale-out backup repository by adding a local storage component as a backup repository.
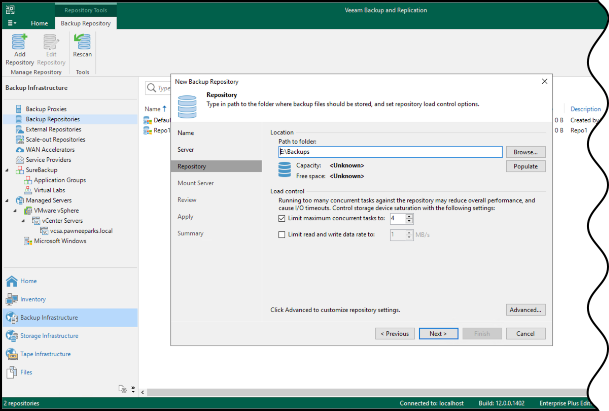
- Open Veeam Backup & Replication, and click Connect.
- Select Backup Infrastructure in the left navigation menu, and select Backup Repositories.
- In the top menu, click Add Repository.
- Select Direct attached storage, and select Microsoft Windows.
- Enter a name and a description for your repository, and click Next.
- Click Populate, select the drive that you want to use, and click Next.
- Click Browse to specify a folder on the drive or use the default folder, and click Next.
By default, Veeam creates a folder named “Backups” at the root of the drive. - Click Next, and click Apply to apply the settings.
- After the backup repository is created and each step is green, click Next and click Finish.
Your repository is displayed in the Backup Repositories section of Backup Infrastructure.
Add a Repository for Backblaze B2
Your bucket must have Object Lock enabled, and your application key must be newly created.
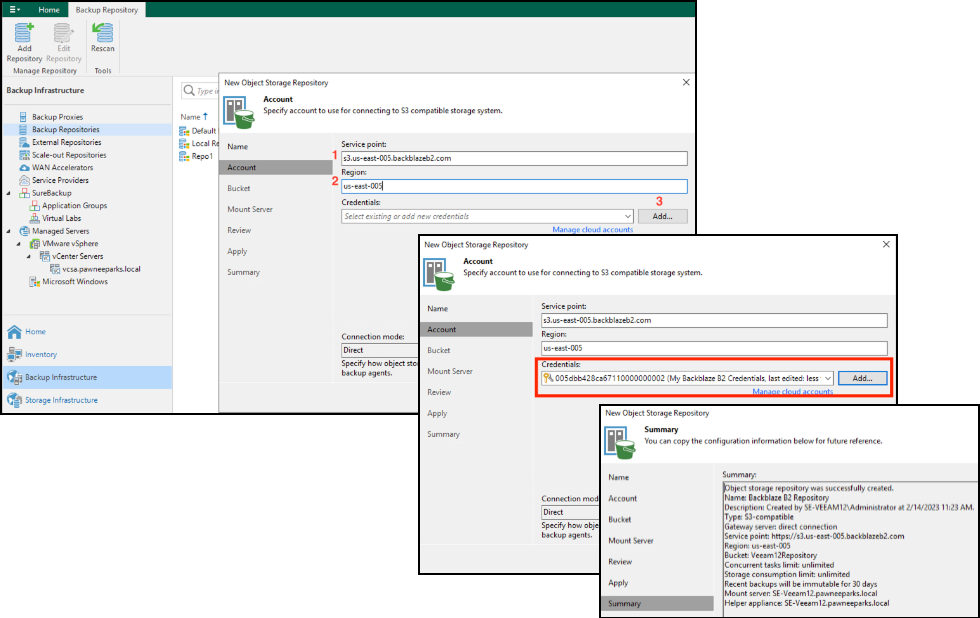
- Open Veeam Backup & Replication, and click Connect.
- Select Backup Infrastructure in the left navigation menu, and select Backup Repositories.
- In the top menu, click Add Repository.
- Select Object storage, and select S3 Compatible.
- Enter the details for your repository.
- Enter a name and a description for your repository, and click Next.
- In the Service point field, enter the S3 endpoint that you copied in the "Create a Bucket" task (for example, S3.us-east-005.backblazeb2.com).
- In the Region field, enter the second part of the S3 endpoint (for example, us-east-005).
- In the Credentials field, click Add.
- Enter your keyID in the Access Key field, enter your applicationKey in the Secret Key field, and enter a description.
- Click OK, and click Next.
- In the Bucket section, click Browse, select the bucket that you created, and click OK.
- In the Folder field, click Browse and click New Folder.
- Enter a name for your folder, press Enter, and click OK.
- Select the Make recent backups immutable checkbox, and enter the number of days to lock your files.
Backblaze strongly recommends that you use the immutability feature to protect your organization from ransomware. - To apply your settings, click Next and click Apply.
- After the items on the Apply page are green, click Next and click Finish.
The Backblaze B2 repository is displayed in the Backup Repositories section of Backup Infrastructure.
Add a Scale-Out Repository
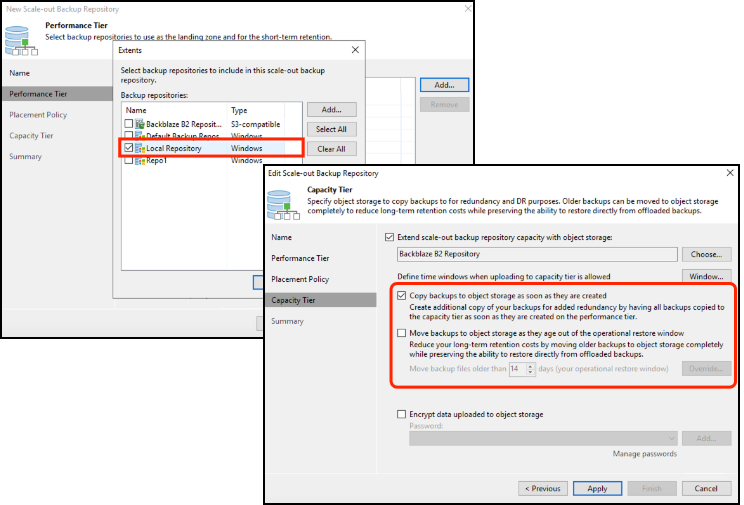
- Open Veeam Backup & Replication, and click Connect.
- Select Backup Infrastructure in the left navigation menu, select Scale-out Repositories, and click Add Scale-out Repository.
- Enter a name and a description, and click Next.
- On the Performance Tier tab, click Add, select the local repository that you created in the “Set Up a Veeam Repository” task, and click OK.
- Ensure that Data locality is selected, and click Next.
- In the Capacity Tier tab, select Extend scale-out backup repository capacity with object storage, and click Choose.
- Select the Backblaze B2 repository that you created in the “Add a Repository for Backblaze B2” task, and click OK.
- Define the time windows to allow uploading to the capacity tier.
- Backblaze recommends that you select Copy backups to object storage as soon as they are created, which creates a copy of your backups on both tiers.
- Click Apply, and click Finish.
The scale-out repository appears in the Scale-out Repositories section of Backup Infrastructure.
Create a Backup Job
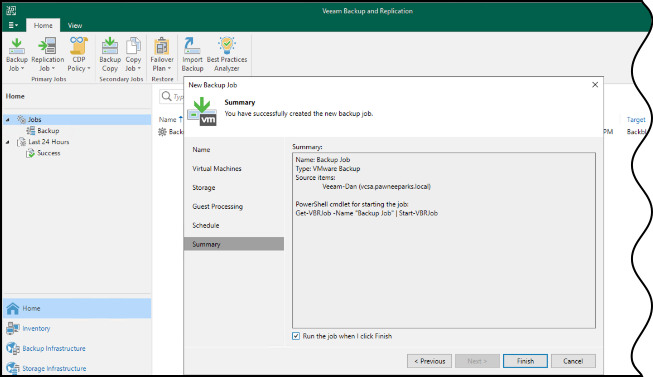
- Open Veeam Backup & Replication, and click Connect.
- Select Home in the left navigation menu, and select Jobs.
- Click Backup Job, and select Virtual machine.
- Enter a name and a description, and click Next.
- Click Add, select the VMs to back up to Backblaze B2, click Add, and click Next.
- In the Backup Repository menu, select the backup repository that you created in the "Set Up a Veeam Repository" task, and click Advanced.
- In the Schedule tab, set the scheduling options for the backup job and click Apply.
- To run the first backup job immediately, select Run the job when I click Finish.
- Click Finish.
You can validate that the backup is running by clicking Session Tools and clicking Last 24 Hours in the left-hand column. You can see the current backup job, and when that job completes, Veeam begins a new job to offload the data to Backblaze B2 with “Offload” in the Job Name.
Was this article helpful?